您需要 登录 才可以下载或查看,没有账号?注册

x

Introduction
I am a passionate 3D Generalist with a passion for modelling, texturing/shading, and sculpting. Currently, I'm working at Guerrilla Games as a Character Artist on the recently released Horizon Forbidden West.
介绍
我是一个充满激情的3D多面手,对建模,纹理/着色和雕刻充满热情。目前,我正在Guerrilla Games担任最近发行的Horizon Forbidden West的角色艺术家。

Goals
For this specific project, I wanted to try out some new techniques and styles. I always loved (and still do) the Ben Affleck’s take on Batman, and with him not getting another movie, I wanted to create an outfit in a way that would be a continuation of the previous suits and put my own spin/style to it.
目标
对于这个特定的项目,我想尝试一些新的技术和风格。我一直喜欢(现在仍然喜欢)本·阿弗莱克(Ben Affleck)对蝙蝠侠的演绎,而且由于他没有得到另一部电影,我想以一种延续以前套装的方式创造一套服装,并赋予我自己的旋转/风格。
Software
Most of the project was created in Zbrush, starting from a simple sphere.
For the cape, I used Marvelous Designer to get a proper simulation and realistic feel for it, but everything else was modeled/sculpted in Zbrush using a lot of Dynamesh and Zremesher.
For the retopology, I used Topogun with UVs done in Maya.
Texturing was done in Substance Painter and the final presentation in Unreal Engine 5.
软件
该项目的大部分内容都是在Zbrush中创建的,从一个简单的球体开始。
对于斗篷,我使用Marvelous Designer来获得适当的模拟和逼真的感觉,但其他所有内容都是使用大量Dynamesh和Zremesher在Zbrush中建模/雕刻的。
对于重拓扑,我使用Topogun和在Maya中完成的UV。
纹理在Substance Painter中完成,最后在虚幻引擎5中完成。
References & Inspiration
For reference, I used a lot of different sources.
I knew I wanted to use Ben Affleck’s interpretation as a starting point, and I love the Batman v Superman suit, so that’s where I started off from.
参考和灵感
作为参考,我使用了很多不同的来源。
我知道我想用本·阿弗莱克的诠释作为起点,我喜欢蝙蝠侠大战超人套装,所以这就是我开始的地方。
The idea behind the project was to create a “what-if” scenario where Ben Affleck continued in the role (in a separate universe from Robert Pattinson, who also gave an amazing performance, and I can’t wait for The Batman 2).
At the end of the Zack Snyder’s Justice League, we see the suit get some plating and get a little bit more technical, so that’s where I played off from.
该项目背后的想法是创建一个“假设”场景,让本·阿弗莱克继续扮演这个角色(与罗伯特·帕丁森(Robert Pattinson)在一个单独的宇宙中,他也给出了惊人的表演,我迫不及待地想看《蝙蝠侠2》)。
在扎克·斯奈德的正义联盟结束时,我们看到这件衣服得到了一些镀层,并得到了更多的技术,所以这就是我玩的地方。
Using other media, like the comics, statues and games, I pretty much designed the suit as I went along.
A huge starting point for the project was Josh Nizzi’s Batman for Prime 1, which was the main inspiration for the torso, and originally the shoulders until I changed them to a more Arkham Knight-like look.
使用其他媒体,如漫画,雕像和游戏,我几乎在前进的过程中设计了西装。
该项目的一个重要起点是Josh Nizzi的Prime 1的蝙蝠侠,这是躯干的主要灵感来源,最初是肩膀,直到我将它们更改为更像阿卡姆骑士的外观。
Modelling Workflow
I originally started with a quick sketch of the cowl, trying to see if I could get something I was at that point happy with and to use as motivation for me to continue the project.
建模工作流程
我最初从快速草图开始,试图看看我是否能得到一些我当时满意的东西,并作为我继续这个项目的动力。
After getting something that I was pretty happy with, I blocked out a quick body.
在得到一些我非常满意的东西后,我阻止了一个快速的身体。
While this was in no way perfect and required a lot of adjustments down the line, it gave me a starting point to continue the rest of the project. At this point, I was just interested in getting something on the canvas.
Once I was happy with the major forms, I duplicated the body tool and sketched out the armor. Since this was a pretty form-fitting body, using the actual body to sculpt made sure it followed the overall shapes.
虽然这绝不是完美的,并且需要进行大量调整,但它给了我一个起点来继续项目的其余部分。在这一点上,我只是对在画布上得到一些东西感兴趣。
一旦我对主要形式感到满意,我就复制了车身工具并勾勒出盔甲的草图。由于这是一个非常合身的身体,因此使用实际的身体进行雕刻可确保它遵循整体形状。
I started mostly focused on the torso, which in hindsight I would do differently, and actually do the entire body in one go, making it easier to keep a nice and consistent style throughout the project.
Once I had the shapes I wanted in place, I started splitting them off of the sketch. Using a lot of masking and split masked points (subtool/split/split masked points) or extracting them, it gave me the tools as separate elements, allowing for an easier time to work on them.
我开始主要专注于躯干,事后看来,我会以不同的方式做,实际上一次性完成整个身体,从而更容易在整个项目中保持良好和一致的风格。
一旦我有了我想要的形状,我就开始把它们从草图上分离出来。使用大量的遮罩和分割蒙版点(子工具/分割/分割蒙版点)或提取它们,它给了我作为独立元素的工具,使我更容易地处理它们。
I always recommend keeping a duplicate of your sketch around, since splitting them will remove them from the original sketch, making it hard to go back.
At this point, there are two ways that I like to go with my extractions, we can use Zremesher as demonstrated by Marco Plouffe here: https://www.artstation.com/artwork/oOZYaL
Or another approach to clean up these meshes is to add some thickness to them using Panel loops or Mask by Feature with only the Borders function enabled and pushing the surface down.
我总是建议保留草图的副本,因为拆分它们会将它们从原始草图中删除,使其难以返回。
在这一点上,我喜欢使用我的提取有两种方式,我们可以使用Marco Plouffe在这里演示的Zermeshe:https://www.artstation.com/artwork/oOZYaL
或者,清理这些网格的另一种方法是使用面板环或按功能遮罩(仅启用“边框”功能并将表面向下推)向它们添加一些厚度。
At this point, a combination of the ClipCurve, hPolish and TrimDynamic brushes will help you get this surface clean.
A way to create sharp plane changes is by lowering the intensity of the DamStandard brush and swapping between the normal way to use the brush and holding ALT on your keyboard to push the surface out.
This process takes a bit of time but gives you a lot of control over the final polish.
此时,ClipCurve,hPolish和TrimDynamic刷的组合将帮助您清洁此表面。
创建尖锐平面变化的一种方法是降低 DamStandard 画笔的强度,并在正常使用画笔的方式和按住键盘上的 ALT 以将表面推出来之间切换。
这个过程需要一点时间,但可以让你对最终的抛光进行很多控制。
I do like to add subdivisions to the model, by duplicating the model, ZRemeshing it and adding subdivisions to it until it’s roughly the same polycount as the original dynamesh mesh.
(For this, I don’t really care what the topology looks like, as long as it captures the shapes).
At this point, I can reproject the dynamesh tool onto the new tool with subdivisions to do further refinements and get it as clean as I can get it.
This process was used on most of the hard surface pieces until they were cleaned up, and ready for detailing.
我确实喜欢通过复制模型,ZRemeshing并向其添加细分来向模型添加细分,直到它与原始动态网格的多边形计数大致相同。
(为此,我并不真正关心拓扑结构的样子,只要它捕获了形状)。
此时,我可以将动态网格工具重新投影到带有细分的新工具上,以进行进一步的优化并使其尽可能干净。
该过程用于大多数硬质表面件,直到它们被清理干净并准备好进行细节处理。
Face
For the face, I used one of the 3d ScanStore’s HD heads.
I sculpted out the significant major forms to try and get the likeness of Ben Affleck, and after that using Wrap4D – Demonstrated on 3d Scanstore’s youtube page here:
I wrapped the HD mesh around my sculpt. This gave me a lot of fine pore detail and fine wrinkles.
I did some minor sculpt adjustments but overall it’s pretty much using the HD head for the details.
脸
对于面部,我使用了3d ScanStore的HD头之一。
我雕刻出重要的主要形式,试图获得Ben Affleck的肖像,然后使用Wrap4D - 在3d Scanstore的youtube页面上演示:
我把HD网格缠绕在我的雕塑上。这给了我很多细小的毛孔细节和细纹。
我做了一些小的雕刻调整,但总的来说,它几乎使用HD头来做细节。
Materials/Texturing/Substance
For the materials, I used some base materials from GameTextures () to get started but added a lot of extra color detail and break-up to make the armor seem a bit more used than something that was brand new.
材料/纹理/物质
对于材质,我使用了GameTextures(https://gametextures.com/)中的一些基础材质来开始,但添加了很多额外的颜色细节和分解,使盔甲看起来比全新的东西更常用。
I wanted to have some of the damage drive other parts of the texture, so I relied a lot on anchor points, using the anchor points made sure that scratches I added, not only took away the outer material, exposing the underlying metal, but also added some height, roughness and color variation around the damaged area.
我想让一些损伤驱动纹理的其他部分,所以我非常依赖锚点,使用锚点确保我添加的划痕,不仅带走了外部材料,暴露了下面的金属,而且还增加了一些高度,粗糙度和损坏区域周围的颜色变化。
For more information anchor points, I highly recommend this video at the official Substance channel to get started:
I wanted to try and get a nice breakup between the different materials, and have some different roughness values to keep the person looking at it interested.
有关更多信息,我强烈建议在官方Substance频道上观看此视频以开始使用:https://www.youtube.com/watch?v=Ix4eknncFU0
我想尝试在不同的材料之间得到一个很好的分手,并有一些不同的粗糙度值,以保持人们的兴趣。
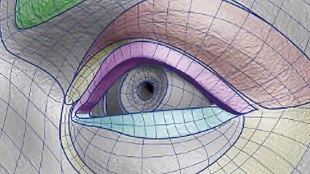
Eyes
Since I knew I wanted to use Unreal in the end, the Metahuman eyes were a huge timesaver and looked great.
I used Quixel bridge to download some Metahumans and loaded them in Maya.
This allowed me to get the eye geometry, with all UVs as created by Epic so I could reuse all of their existing materials.
眼睛
由于我知道我最终想使用虚幻引擎,超人类的眼睛节省了大量时间,看起来很棒。
我使用Quixel bridge下载了一些Metahumans,并将它们加载到Maya中。
这让我能够获得Epic创建的所有UV的眼睛几何形状,这样我就可以重用他们所有现有的材料。
Be sure to not change anything to those models, to make sure you’re able to reuse the Metahuman materials in Unreal.
确保不要对这些模型进行任何更改,以确保您能够在虚幻引擎中重用超人类材质。
Skin Material
For the skin material, I wanted to create a nice close-up to show the great detail of the 3d scan store data, so I needed a nice skin shader to show it off.
Luckily as I was approaching that point, Nick Rutlinh published his awesome skin shader with a video walkthrough on how to create it.
Following those videos, I could replicate the shader and have a beautiful skin shader that held up nicely in close-ups.
表皮材料
对于皮肤材料,我想创建一个漂亮的特写镜头来显示3D扫描存储数据的细节,所以我需要一个漂亮的皮肤着色器来展示它。
幸运的是,当我接近这一点时,Nick Rutlinh发布了他令人敬畏的皮肤着色器,并附有有关如何创建它的视频演练。
https://www.artstation.com/artwork/klZOvy
在这些视频之后,我可以复制着色器,并拥有一个漂亮的皮肤着色器,可以在特写镜头中很好地保持。
Another option is of course to use the MetaHuman skin shader, created and provided by Epic, but I took the opportunity to also create it and learn the thought process behind the shader itself.
另一种选择当然是使用由Epic创建和提供的MetaHuman皮肤着色器,但我借此机会也创建了它,并学习了着色器本身背后的思维过程。
Detail Normals
Since I knew I wanted to create close-up shots in Unreal, I added a function for Detail Normals to the shader.
This allowed me to get as close as I wanted to the character and keep some excellent crisp detail in the texture.
In this image, you can see an essential way to set this up in Unreal, with control for tiling, rotation and strength.
细节法线
由于我知道我想在虚幻中创建特写镜头,所以我在着色器中添加了细节法线功能。
这让我能够尽可能地接近角色,并在纹理中保留一些出色的清晰细节。
在此图像中,您可以看到在虚幻引擎中进行设置的基本方法,其中包含对平铺、旋转和强度的控制。
You can go as crazy as you want with this, adding support for RGB masking to allow for different detail in different areas, but at it’s core, this is how I set it up.
你可以随心所欲地疯狂,添加对RGB遮罩的支持,以允许在不同区域获得不同的细节,但从本质上讲,这就是我设置它的方式。
Lighting
For the lighting, I started off with just the mask and face in Unreal, and as you can see my initial light setup (key, fill and 2 rims) was made for that.
照明
对于光照,我从虚幻引擎中的蒙版和脸部开始,正如你所看到的,我最初的光照设置(键、填充和2个轮辋)就是为此而制作的。
As the full body went in, my main Light setup remained (Key, Fill, Rim) but I added extra lights and played a lot with the different intensity’s of the lights to make sure the entire model got the atmosphere and look that I wanted for it.
随着全身进入,我的主要灯光设置仍然存在(Key,Fill,Rim),但我添加了额外的灯光,并使用不同强度的灯光进行了很多游戏,以确保整个模型获得我想要的氛围和外观。
In the light settings I also like to add an HDR texture to get a more realistic light.
在灯光设置中,我还喜欢添加HDR纹理以获得更逼真的光线。
In the image above you can see me using a SoftBox texture to replicate an actual softbox as it would be used in photography.
在上图中,您可以看到我使用SoftBox纹理来复制实际的柔光箱,就像它在摄影中使用的一样。
My advice for lighting is to Google professional photography setups, for example for portrait photography, and try to emulate to get a nice starting point.
Another great point of reference is movies, you can usually find some great inspiration from those.
You might find that your model reacts a little bit differently in these lighting conditions but this is where the creative/artistic part comes in, and where you can add extra fill lights, or increase or decrease the intensity of the lights to really get the look and feel you want for your final presentation.
我对照明的建议是谷歌专业摄影设置,例如肖像摄影,并尝试模仿以获得一个很好的起点。
另一个很好的参考点是电影,你通常可以从中找到一些很好的灵感。
您可能会发现,在这些照明条件下,模型的反应略有不同,但这是创意/艺术部分出现的地方,您可以在其中添加额外的补光灯,或者增加或减少灯光的强度,以真正获得最终演示所需的外观和感觉。
Rigging/Posing
For the rigging and posing, I used Mixamo to make that progress quite simple and straightforward.
For future projects, this is something I want to dive into a bit more and rig it myself. I uploaded the model, aligned the points and found an animation that I liked.
While this wasn’t perfect, it worked well enough for my needs.
索具/摆姿势
对于索具和摆姿势,我使用Mixamo使进度变得非常简单明了。
对于未来的项目,这是我想深入研究并自己操纵的东西。我上传了模型,对齐了点,找到了我喜欢的动画。
虽然这并不完美,但它足以满足我的需求。
Originally I also wanted to render out a proper animation of him walking or standing up, but ran into a lot of problems with the cloth simulation, so maybe next time.
For the pose, I loaded the animation in Maya and found a frame that I liked and exported that separately as an FBX file.
I loaded it in Zbrush and adjusted the cape to fit that specific pose to prevent any clipping.
最初我也想渲染出他走路或站起来的适当动画,但在布料模拟中遇到了很多问题,所以也许下次。
对于姿势,我在Maya中加载了动画,找到了一个我喜欢的帧,并将其单独导出为FBX文件。
我将其装入Zbrush中,并调整了斗篷以适合该特定姿势,以防止任何剪切。
Scene Setup
The rest of the scene is not overly complex, I added in a PostProcessVolume and played a little bit with color correcting the scene, with some bloom/glare and Chromatic Aberration and really get the look and feel that I wanted.
For the fog in the background of the scene, I used Devon Chiu’s FogCard Blueprint (https://dcscd.gumroad.com/l/QyRkA) which was super easy to use being literal drag and drop and added a lot of atmosphere to the scene.
场景设置
场景的其余部分并不过分复杂,我添加了一个PostProcessVolume,并播放了一点颜色校正场景,有一些绽放/眩光和色差,真正得到了我想要的外观和感觉。
对于场景背景中的雾,我使用了Devon Chiu的FogCard蓝图(),它非常易于使用,可以进行文字拖放,并为场景增添了很多氛围。
Rendering
For the rendering, I used the Movie Render queue, which gives me a lot cleaner shots, due to the ability to add some Anti-Aliasing samples. It takes a few minutes to set up, but I love the results over the regular screenshot tools in Unreal
If you want more info on it, I can highly recommend William Faucher’s very in-depth explanation on it:https://youtu.be/FxvF3zncClA
渲染
对于渲染,我使用了电影渲染队列,由于能够添加一些抗锯齿样本,它给了我更干净的镜头。设置需要几分钟,但我喜欢虚幻引擎中常规截图工具的结果。
如果你想了解更多关于它的信息,我可以强烈推荐William Faucher对它的非常深入的解释:https://youtu.be/FxvF3zncClA
Conclusion
Overall, this project was a lot of fun, for something that started off as a quick sketch I am happy with how it came out.
I always treat my personal work as a way to practice new techniques, and this one was no exception, and I learned a lot from it.
结论
总的来说,这个项目很有趣,对于一些从快速草图开始的东西,我对它是如何产生的感到满意。
我总是把我的个人工作当作一种练习新技术的方式,这次也不例外,我从中学到了很多东西。
|