您需要 登录 才可以下载或查看,没有账号?注册

x

Introduction
介绍
Hello there! My name is Joshua Gouw or Joshua Wu which is more often used on my social media. I graduated from 3dsense Media School around 7 years ago which is located in Singapore. After I graduated, I started my career doing a few Kickstarter projects as a freelancer. I used to do modeling, sculpting, texturing, and lookdev for an indie game, then i had to quit the industry for a little while to help with my family business until i joined a local studio called Brandoville Studios as a Senior Character Modeler back in 2019.
你好呀!我的名字是 Joshua Gouw 或 Joshua Wu,这在我的社交媒体上更常用。大约 7 年前,我毕业于位于新加坡的 3dsense 媒体学校。毕业后,我以自由职业者的身份开始了我的职业生涯,做了一些 Kickstarter 项目。我曾经为独立游戏做建模、雕刻、纹理和外观开发,然后我不得不退出这个行业一段时间以帮助我的家族企业,直到我回到当地一家名为 Brandoville Studios 的工作室担任高级角色建模师2019 年。
A year later, I was given the opportunity to lead the team as an Art Director. We worked on numerous projects since such as World of Warcraft 3 Reforged, Final Fantasy 14, some unannounced Naughty Dog projects, as well as a few others.
一年后,我得到了作为艺术总监领导团队的机会。自此以来,我们参与了许多项目,例如《魔兽世界 3 重制版》、《最终幻想 14》、一些未宣布的顽皮狗项目以及其他一些项目。
As of now, I am working at XM Studios as a Digital Sculptor. We do a lot of quarter scale collectible statues from Marvel, DC Comics, etc.
截至目前,我在 XM Studios 担任数字雕刻师。我们做了很多来自 Marvel、DC Comics 等的四分之一尺寸的收藏雕像。

The Jinx Project
金克斯计划
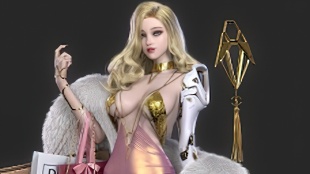
The very main goal of making a fanart of Jinx was to set my foot in the cinematic/animation industry. My idea was to create a portfolio piece that shows both realistic and stylized character modeling, killing two birds with one stone.
制作 Jinx 的同人画的主要目标是让我涉足电影/动画行业。我的想法是创建一个作品集,展示现实和风格化的角色建模,用一块石头杀死两只鸟。
Last year, Arcane was released and I was captivated by the series. Jinx was a very well-known character and a very lovable one as well. So I decided to utilize that and challenge myself to bring her into a more realistic style while also maintaining the essence of her character and personality.
去年,Arcane 发布了,我被这个系列迷住了。Jinx是一个非常有名的角色,也是一个非常可爱的角色。所以我决定利用这一点并挑战自己,让她进入一种更现实的风格,同时保持她性格和个性的本质。
Before I started the project, I did a lot of research in order to establish the art direction of this project. I studied Jinx's characteristics not only from the original Arcane show but also from some of the fan art, cosplay, and illustrations. That helped me to analyze different types of approaches people use to create this character. I believe working on a plan could streamline the art direction process significantly.
在我开始这个项目之前,为了确定这个项目的艺术方向,我做了很多研究。我不仅从最初的奥术表演中研究了金克丝的特点,还从一些粉丝艺术、角色扮演和插图中研究了金克丝的特点。这帮助我分析了人们用来创建这个角色的不同类型的方法。我相信制定计划可以显着简化艺术指导过程。
Sculpting the Face
雕刻脸部
I started using a DynaMeshed sphere in ZBrush and then slowly forming up her facial features. At that point, I was not being too accurate and faithful to her original design. The goal was to quickly generate a base in order to avoid excessive planning and overthinking.
我开始在 ZBrush 中使用 DynaMeshed 球体,然后慢慢形成她的面部特征。那时,我并不太准确和忠实于她最初的设计。目标是快速生成基地,以避免过度计划和过度思考。
Just like painting, a blank canvas can be pretty intimidating. In this case, a grey sphere was the scariest thing to start from. I usually begin my project using a base to speed up the whole process but sometimes, starting fresh can help me go crazy with iterations and the decision-making process.
就像绘画一样,一张空白的画布可能非常令人生畏。在这种情况下,一个灰色的球体是最可怕的开始。我通常使用基础来开始我的项目以加快整个过程,但有时,重新开始可以帮助我在迭代和决策过程中发疯。
Once I got the rough proportions done, I came back to the reference and studied the proportion further, and asked myself several questions such as how far apart are both of her eyes? What about the distance between her mouth and her nose? Then I wrote down all the notes so that I could later use this information as my starting point to alter those proportions closer to more believable ones.
一旦我完成了粗略的比例,我回到参考并进一步研究了比例,并问了自己几个问题,比如她的双眼相距多远?她的嘴和鼻子之间的距离是多少?然后我写下了所有的笔记,以便我以后可以使用这些信息作为我的起点,将这些比例更改为更接近更可信的比例。
From the very beginning, I already set out to replicate her calm troubled look from the show. I wanted the audience to feel what she is feeling – unsettled, confused, and angered in a weirdly subtle way. She is broken inside, and that's why so many people are able to empathize with her.
从一开始,我就已经着手复制她在节目中平静而烦恼的样子。我想让观众感受到她的感受——不安、困惑和以一种奇怪微妙的方式生气。她的内心是破碎的,这就是为什么这么多人能够同情她。
The biggest challenge was to translate her face from a very expressive stylized proportion into something more realistic and believable. One of my biggest inspirations was James Cameron's Alita from Alita: Battle Angel. Although uncanny, I personally think they did a great job translating Alita from an anime character into a more human one.
最大的挑战是将她的脸从一个非常富有表现力的风格化比例转化为更真实和可信的东西。我最大的灵感之一是詹姆斯卡梅隆的《阿丽塔:战斗天使》中的阿丽塔。虽然不可思议,但我个人认为他们在将阿丽塔从动漫角色转变为更人性化的角色方面做得很好。
One thing that I learned while making her face was that I did not have to make her look photoreal, all I needed to do was to make her look more photographic. Her facial proportions are still so much different as opposed to a real human being. Her eyes are too big for a real human being, her head size was significantly larger compared to her body proportions as well.
我在做她的脸时学到的一件事是我不必让她看起来像照片一样,我需要做的就是让她看起来更有照片感。与真人相比,她的面部比例仍然有很大不同。她的眼睛对于一个真正的人类来说太大了,她的头部尺寸与她的身体比例相比也明显更大。
That helped me to achieve her final look.
这帮助我完成了她的最终造型。
Once I was satisfied with the primary and secondary forms, I moved on to the tertiary and the micro details. The details are the reason why she feels photographic and believable. This is the key to convincing people that my take on Jinx can also belong to the real world. Every pore, indent, scar, every crease needed to be there.
一旦我对初级和次级形式感到满意,我就转向第三级和微观细节。细节是她感觉摄影和可信的原因。这是让人们相信我对金克斯的看法也可以属于现实世界的关键。每个毛孔,凹痕,疤痕,每个折痕都需要在那里。
I combined several techniques and brushes to achieve the details needed. I used 175 skin alphas from TexturingXYZ, femaleFace_20s_01 to be exact. ZBrush Guides' skin brush set also helped me push the imperfections of the skin. I applied the Alpha using a Standard brush with different kinds of intensity depending on the look I need.
我结合了几种技术和画笔来实现所需的细节。确切地说,我使用了来自 TexturingXYZ 的 175 个皮肤 alpha,femaleFace_20s_01。ZBrush Guides 的皮肤刷套装也帮助我消除了皮肤的瑕疵。根据我需要的外观,我使用具有不同强度的标准画笔应用了 Alpha。
NOTE: When you are applying your alpha using a Standard brush for the geometry, it is important to change the mid-value of the alpha to 50, depending on the alpha used, you can also turn on the surface button to automatically pick the right mid-value. However, it is not always accurate.
注意:当您使用标准画笔为几何体应用 alpha 时,将 alpha 的中间值更改为 50 很重要,根据使用的 alpha,您还可以打开表面按钮以自动选择右侧中值。但是,它并不总是准确的。
NOTE: This method is not the most efficient as there are so many better ways to create a believable skin. You can purchase scan data from many websites and project the model onto your initial sculpt to get a so much better result in a much shorter period of time. At the time, I intentionally decided to do the older method because the process compelled me to study how the skin works. I was not able to get the perfect result but I learned so many things along the way.
注意:这种方法不是最有效的,因为有很多更好的方法可以创建可信的皮肤。您可以从许多网站购买扫描数据并将模型投影到您的初始造型上,以便在更短的时间内获得更好的结果。当时,我故意决定采用旧方法,因为这个过程迫使我研究皮肤的工作原理。我没能得到完美的结果,但一路上我学到了很多东西。
Once I applied all the alphas to the head, I proceeded to sculpt everything by hand using the same brushes when I blocked her out. What I did back and forth was test my model in Arnold and try to provide feedback myself.
一旦我将所有的阿尔法应用于头部,当我将她挡在外面时,我就开始使用相同的刷子手工雕刻所有东西。我来回做的是在 Arnold 中测试我的模型并尝试自己提供反馈。
Final sculpt:
最终造型:
The Outfit
服装
As for the clothes, I did a quick sketch in ZBrush by masking a part of her body and extracting it. It was dirty but very quick. Then I went to Marvelous Designer to quickly simulate Jinx's top piece. I would recommend watching a few introductions to Marvelous Designer videos on YouTube to understand the software. However, if you are really new to Marvelous, let me give you a very brief overview of the process:
至于衣服,我在 ZBrush 中做了一个速写,遮住了她身体的一部分并将其提取出来。它很脏但很快。然后我去Marvelous Designer快速模拟Jinx的顶片。我建议在 YouTube 上观看 Marvelous Designer 视频的一些介绍,以了解该软件。但是,如果你真的是 Marvelous 的新手,让我给你一个非常简短的过程概述:
Open or import an avatar as a collision object for the simulation (avatar has to have a real-life scale, and can be measured in your preferred 3D packages.)
打开或导入化身作为模拟的碰撞对象(化身必须具有真实的比例,并且可以在您喜欢的 3D 包中进行测量。)
Draw sewing patterns in the 2D window
在 2D 窗口中绘制缝纫花样
Position the patterns around your avatar in the 3D window
在 3D 窗口中定位您头像周围的图案
Sew the patterns accordingly
相应地缝制图案
Simulate the patterns to your liking
模拟你喜欢的模式
Add variations, and details, before exporting the final geometry
在导出最终几何之前添加变化和细节
Once you import it back to ZBrush, there are many possible treatments you can do depending on what the final result is going to be. I would like to shout out an amazing YouTube channel Outgang by Laura Gallagher. She created an amazing cheat sheet for Marvelous Designer to ZBrush pipeline, I highly recommend checking it out.
将其导入 ZBrush 后,您可以根据最终结果进行许多可能的处理。我想大声喊出Laura Gallagher 的精彩 YouTube 频道 Outgang。她为 Marvelous Designer 到 ZBrush 管道创建了一个惊人的备忘单,我强烈建议您查看一下。
As shown in the screenshot, I had to readjust the overall shape of the top later in ZBrush to get closer to the result I wanted.
如屏幕截图所示,稍后我不得不在 ZBrush 中重新调整顶部的整体形状,以更接近我想要的结果。
Creating Hair
创建头发
Just like the head, I wanted to stay faithful to the original while maintaining the realistic aspect. The first step I did was research, I would look into both real-life hair photography as well as CG hair from movies and games. Finding the right balance between the who would be the perfect approach for me. Then, I moved to ZBrush to quickly block out the primary form before retopo-ing it to create a strong, simple, distinct shape.
就像头部一样,我想忠实于原作,同时保持逼真的一面。我做的第一步是研究,我会研究现实生活中的头发摄影以及电影和游戏中的 CG 头发。在谁对我来说是完美的方法之间找到适当的平衡。然后,我转移到 ZBrush 以快速屏蔽主要形式,然后重新创建它以创建一个强大、简单、独特的形状。
The shape of the blockout itself needed to be very readable so that when I did the quick render test in Maya, it would create the necessary shadow on the rest of the model to see how it would react to the face.
遮挡物本身的形状需要非常易读,这样当我在 Maya 中进行快速渲染测试时,它会在模型​​的其余部分上创建必要的阴影,以查看它对脸部的反应。
A quick tip: In the early stage, try to keep everything as simple as possible. The perfect blocking stage is when you can clearly read the overall shape from afar with very simple geometry.
一个快速提示:在早期阶段,尽量保持一切简单。完美的阻挡阶段是当您可以通过非常简单的几何形状从远处清楚地阅读整体形状时。
Once I was happy with the blockout, I brought it to Maya to create the final strands of the hair using XGen, each using its own scalp geometry. I started my guides off at the front part of the hair and tried to get the overall shape, then started adding rows of guides under the first set with each row overlapping the next.
一旦我对遮挡感到满意,我就将它带到 Maya 中,使用 XGen 创建最后几缕头发,每根头发都使用自己的头皮几何形状。我从头发的前部开始我的指南并尝试获得整体形状,然后开始在第一组下添加几排指南,每一行与下一个重叠。
In Maya, I made a few separate hair descriptions. Several parts for the front bang, main hair, braids, eyebrows, eyelashes, peach fuzz, and also a baby hair, each using its own scalp geometry. Make sure to give enough space between each guide that you place on the surface.
在 Maya 中,我做了一些单独的头发描述。前刘海的几个部分,主要头发,辫子,眉毛,睫毛,桃子绒毛,还有一个婴儿头发,每个部分都使用自己的头皮几何形状。确保在放置在表面上的每个导轨之间留出足够的空间。
For long headhair, I used 3 Clumping modifiers, for the first one I clump to guides, the second is for mid-range clumps and the third is for the tiny clumping that happens to a few individual strands. After this, I used a Cut modifier to soften the ends and then a Noise modifier with different values for the overall hair and the stray hairs with a small expression. The last one is Noise, Noise modifiers are often used last to blend each strand to make them look more natural.
对于长头发,我使用了 3 个结块修饰符,第一个结块到引导,第二个用于中等范围的结块,第三个用于发生在几根单独的股线上的微小结块。在此之后,我使用剪切修改器来柔化末端,然后使用不同值的噪波修改器来处理整体头发和带有小表情的杂散头发。最后一个是噪波,噪波修改器通常最后使用来混合每条线,使它们看起来更自然。
If you want to learn more about grooming, I highly recommend checking out Jesus Fernandez’s YouTube channel, he has some free videos on the very basics of XGen. A perfect way to get started.
如果您想了解有关美容的更多信息,我强烈建议您查看Jesus Fernandez 的 YouTube 频道,他有一些关于 XGen 基础知识的免费视频。一个完美的开始方式。
Texturing
纹理
Substance 3D Painter and ZBrush were used to texture the whole model. I transferred scanned Albedo data to the face in ZBrush using ZWRAP. However, I did leave some errors and artifacts while projecting. I cleaned up everything in SP while also adding several layers of color corrections and hand-painted details on top. Again, I started very simply and slowly got into the finer details.
Substance 3D Painter 和 ZBrush 用于对整个模型进行纹理处理。我使用 ZWRAP 将扫描的 Albedo 数据传输到 ZBrush 中的面部。但是,我在投影时确实留下了一些错误和伪影。我清理了 SP 中的所有内容,同时还在顶部添加了几层颜色校正和手绘细节。再一次,我开始非常简单,慢慢地进入更精细的细节。
Jinx's skin is a little paler than the others as she looks unwell and tired. One particular part of her skin that was fun to texture was her eyes. I would try to find the perfect balance between her exceptionally dark-colored upper and lower eye shadow and eyebags, as well as how wet would the overall eye look due to oil, sweat, and dirt. I would try to mimic a real photo of depressed and sleep-deprived individuals and then exaggerate the intensity accordingly.
金克丝的皮肤比其他人更苍白,看起来很不舒服,很疲倦。她皮肤的一个特别有趣的部位是她的眼睛。我会尝试在她异常深色的上下眼影和眼袋之间找到完美的平衡,以及由于油、汗和污垢导致的整体眼睛看起来有多湿。我会尝试模仿抑郁和睡眠不足的人的真实照片,然后相应地夸大强度。
For the final maps, I used Albedo, Specs, Roughness, and Coat.
对于最终的地图,我使用了 Albedo、Specs、Roughness 和 Coat。
Next were the clothes, I believe her clothes were pretty straightforward, Jinx was wearing a top made out of leather, and considering the way she was raised, I decided to make her top pretty worn out. That means battle damages, scratches, discoloration, and chipped-off edges should be fairly visible. Finding the balance is the key, I tried my best to avoid unnecessary details that would make the whole thing too noisy.
接下来是衣服,我相信她的衣服很简单,金克丝穿着一件皮革做的上衣,考虑到她的成长方式,我决定把她的上衣做的很破旧。这意味着战斗损伤、划痕、变色和切掉的边缘应该是相当明显的。找到平衡是关键,我尽量避免不必要的细节,这会使整个事情变得太吵。
The Final Presentation
最后的演讲
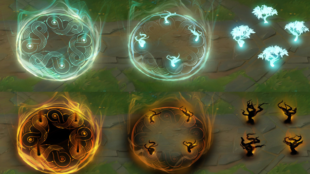
The final presentation was extremely important as it's the very first thing that people see. There are many ways to present your character, but I believe putting your character in a fully lit scene will open up so much more potential in your storytelling. In fact, earlier in the process, I wanted Jinx to be set in a greenish-colored environment which was inspired by the overall vibe of the Undercity from the original series..
最后的演示非常重要,因为这是人们看到的第一件事。有很多方法可以展示你的角色,但我相信把你的角色放在一个完全照明的场景中会在你的故事讲述中打开更多的潜力。事实上,在这个过程的早期,我希望金克丝被设置在一个绿色的环境中,这个环境的灵感来自于原始系列中幽暗城的整体氛围。
However, it ended up being excessive, as it changed the look of her surface too much and killed the realism. So to make it simpler, I decided to play around with different shades of blue.
然而,它最终变得过分了,因为它过多地改变了她的表面外观,扼杀了现实主义。所以为了让它更简单,我决定玩不同深浅的蓝色。
One of the best decisions I did on this project was to ask for feedback from a friend in the middle of the project. It's good to have other people's opinions as more often than not, their opinions will help you tremendously.
我在这个项目上做的最好的决定之一就是在项目中间征求朋友的反馈。经常听取别人的意见是件好事,他们的意见会极大地帮助你。
Another shoutout goes to Örs Bárczy for sparing me some of his precious time to provide me with some really valuable feedback and notes on how I can improve the lighting setup.
另一个感谢 Örs Bárczy为我节省了一些宝贵的时间,为我提供了一些非常有价值的反馈和关于如何改进照明设置的说明。
There was a scene earlier in the series where Jinx showed up in her grown-up state. I loved how monochromatic and gloomy the scene was as it represents Jinx very well and I decided to go with that one.
在该系列的早期有一个场景,金克丝以成年状态出现。我喜欢这个场景的单色和阴暗,因为它很好地代表了金克丝,我决定选择那个。
I found a backplate image from ArtStation and utilized mostly Area Lights in Maya. The scene was made out of one HDRI that serves as an overall atmospheric light, key lights, rim lights, fill lights, and several fake bounce lights.
我从 ArtStation 中找到了一个背板图像,并在 Maya 中主要使用了区域灯。场景由一个用作整体大气光的 HDRI、主光、边缘光、补光和几个假反射光组成。
For the rest of the scene, only a single HDRI was used for each lighting scenario.
对于场景的其余部分,每个照明场景仅使用一个 HDRI。
Conclusion
结论
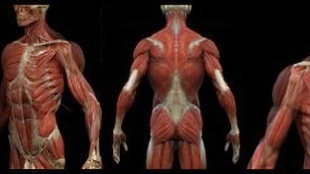
There are billions of people alive, and each person's face has its own unique characteristics. I am not the best at anatomy and facial structure, but I learned how to strategically analyze a character. For this project, I did not use any real human face as a reference, letting me to stay close to the original character and keep improvising as I saw fit.
世上有数十亿人,每个人的脸庞都有自己独特的特征。我在解剖学和面部结构方面不是最好的,但我学会了如何战略性地分析一个角色。在这个项目中,我没有使用任何真实的人脸作为参考,让我保持与原始角色的距离,并在我认为合适的情况下即兴创作。
Here are some of the important points that I learned throughout this project.
以下是我在整个项目中学到的一些要点。
There is no right or wrong, other artists would probably be able to make a very different Jinx yet
still be faithful to the original source material.
没有对错之分,其他艺术家可能会做出非常不同的 Jinx,但仍然忠实于原始素材。
The human face has a very complex structure. Therefore, it takes time, always look for constructive feedback from people around you.
人脸的结构非常复杂。因此,这需要时间,始终寻求周围人的建设性反馈。
It's a trial and error process, keep refreshing your eyes.
这是一个反复试验的过程,不断刷新你的眼睛。
Learn to observe, e.g. eye distance, face length, chin size, next length, etc.
学习观察,例如眼距、脸长、下巴大小、下一个长度等。
Thank you for reading through this interview, I am extremely thankful for the positive response, it is not the most detailed breakdown but I really do hope you were able to learn a thing or two. Thank you 80 Level for this opportunity!
感谢您阅读本次采访,我非常感谢您的积极回应,这不是最详细的细分,但我真的希望您能够学到一两件事。感谢 80 Level 给我这个机会!
|


 评分
评分