您需要 登录 才可以下载或查看,没有账号?注册

x

Introduction
Hi, my name is Andrey Sdobnov and I have polygons in my veins,
I also have 3 years of modelling, 2 years in scanning & 3d printing. I started using Blender at 12 years old.
介绍
嗨,我的名字是Andrey Sdobnov,我的血管里有多边形,
我也有3年的建模经验,2年的扫描和3D打印经验。我在12岁时开始使用Blender。

Goals
As a fan of hard-surface modeling, I wanted to make something with a lot of edges and cavities, with interesting forms and surfaces. I also wanted to practice with Substance Painter to improve my texturing skills and learn something new, like Fusion360. I’m always trying to put something new into my workflow.
目标
作为硬曲面建模的粉丝,我想制作一些有很多边缘和空腔的东西,具有有趣的形式和表面。我还想与Substance Painter一起练习,以提高我的纹理技能并学习新的东西,例如Fusion360。我总是试图在我的工作流程中加入新的东西。
Software
I always use Blender for modeling because of its flexibility and I take to it like a duck to water. ZBrush is for making bevels speeded up, Marmoset Toolbag for baking, Substance Painter for texturing and Fusion360 is for making a sight with a lot of bevelled and curved surfaces.
软件
我总是使用Blender进行建模,因为它的灵活性,我把它当作鸭子一样。ZBrush用于加速斜面,Marmoset Toolbag用于烘焙,Substance Painter用于纹理,Fusion360用于制作具有大量斜面和弯曲表面的瞄准器。
References
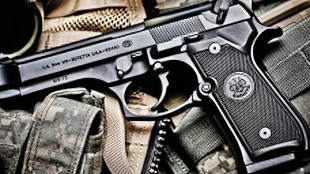
I knew that I needed a firearm to fit my goals, but old firearms like those that predate WW2 weren’t suitable for me, so I spent a lot of time digging through Pinterest and looking for a proper modern firearm. Finally, I found IWI Tavor 7 which is pretty cool, but too curved for me, but the other version of the IWI’s gun, UZI Pro SMG, was just perfect for my purposes. I’m not an objectophile, you know, but this silhouette did make me tremble… Just look at it!
参考资料
我知道我需要一把枪械来满足我的目标,但是像二战之前的旧枪械并不适合我,所以我花了很多时间挖掘Pinterest并寻找合适的现代枪械。最后,我发现IWI Tavor 7非常酷,但对我来说太弯曲了,但是IWI的另一个版本的枪UZI Pro SMG非常适合我的目的。我不是一个亲物主义者,你知道,但这个剪影确实让我颤抖......看看就知道了!
Once I found an object, I started picking up references from YouTube videos, auction boards, Google Pictures, etc. In the end, I had something like this:
一旦我找到了一件物品,我就开始从YouTube视频,拍卖板,谷歌图片等中获取参考资料。最后,我有这样的东西:
Even if this particular picture is not exactly what I want, I still take it and mark it in PureRef to focus on the details. Here are the rules:
First – you want as many references as possible, from multiple angles and with different lighting. I had trouble with this uzi – I couldn’t find a reference that could show me what was going on under the cheek rest so I had to invent it myself.
Second – you want to have a high-resolution close-up of every part of the object to see its material clearly.
即使这张特别的图片不是我想要的,我仍然会把它拿下来并在PureRef中标记它,以专注于细节。规则如下:
首先,您需要从多个角度和不同的照明中尽可能多地参考。我对这个uzi有麻烦 - 我找不到一个可以向我展示脸颊下发生的事情的参考,所以我不得不自己发明它。
其次,您希望对物体的每个部分进行高分辨率特写,以清楚地看到其材料。
Blockout/Modelling
I started with my main reference (the most overall reference), which was this:
Blockout/Modelling
我从我的主要参考(最全面的参考)开始,它是这样的:
I have divided the whole gun into different parts to understand what technique I have to use for every single part. For example, it‘s easier to make a receiver with a bevel modifier in a weight mode, not a subdivision one, and much easier to make a grip with a subdivision (or curves!), not a bevel.
我将整把枪分成不同的部分,以了解我必须为每个部分使用什么技术。例如,在粗细模式下使用斜角修饰符制作接收器更容易,而不是细分模式,并且更容易使用细分(或曲线!)而不是斜角进行抓地。
I prefer to work non-destructively when possible, so I always have ready-to-use lowpoly. But with this one I used standard workflow most of the time, the only things that didn’t apply were bevels and booleans. I didn’t use bevels with a low radius that didn’t affect the form at all since I wanted to make polish in ZBrush.
The most tricky part was the grip because of its non-regular flow so I used a standard subdivision with support loops, creases etc. Also, I usually don’t pay attention to parts that cannot be seen and NGons on flat surfaces – the only important thing is shading.
如果可能的话,我更喜欢非破坏性地工作,所以我总是有现成的低聚。但是有了这个,我大部分时间都使用标准工作流程,唯一不适用的东西是斜角和布尔值。我没有使用低半径的斜角,这完全不会影响形状,因为我想在ZBrush中进行抛光。
最棘手的部分是抓地力,因为它的流动不规则,所以我使用了带有支撑环,折痕等的标准细分。此外,我通常不会注意看不见的部分和平坦表面上的NGons - 唯一重要的是阴影。
I use saves a lot and I always duplicate objects in the “trash“ collection to have a copy of geometry just in case. Here is an iteration:
我使用了很多保存,我总是复制“垃圾箱”集合中的对象,以防万一。下面是一个迭代:
Sometimes it becomes a nightmare when I forget something or make something wrong, so I’ve got a checklist in Notion to remember what I need to do and what should not be forgotten. It contains items such as:
有时,当我忘记某件事或做错事时,它会变成一场噩梦,所以我在Conception中有一个清单,以记住我需要做什么以及不应该忘记什么。它包含以下项目:
Fusion360
Fusion360
I used Fusion360 to make the Mepro m5 because of its bevels and rounded forms. I was not going too deep here, only the basic forms without any decoration elements like engraving, lines on the sides, or “grooves” on the top. All extra details you can make in Blender easily and smooth it in ZBrush later. It is convenient to work non-destructively since it is one of Fusion’s features. I can say that Fusion is a tremendously easy-to-learn software that I highly recommend using.
我使用Fusion360制作了Mepro m5,因为它的斜面和圆形。我在这里并没有太深入,只是基本的形式,没有任何装饰元素,如雕刻,侧面的线条或顶部的“凹槽”。您可以在Blender中轻松制作所有额外的细节,并在ZBrush中平滑它。非破坏性工作很方便,因为它是Fusion的功能之一。我可以说Fusion是一个非常易于学习的软件,我强烈推荐使用。
Highpoly and sculpting
Here I bring all my meshes to ZBrush to make some booleans (if necessary), welds and bevels. Bevels are different for each part of a model, it depends on how this particular piece was made (casting, milling, etc), you can find videos of this process on YouTube. I go through each part masking and polishing and once I’m done, I decimate this and export it in FBX for baking.
高聚和雕刻
在这里,我将所有网格带到ZBrush进行一些布尔值(如有必要),焊缝和斜面。对于模型的每个部分,斜面都是不同的,这取决于这个特定作品的制作方式(铸造,铣削等),您可以在YouTube上找到此过程的视频。我经历了每个部分的遮罩和抛光,一旦完成,我就将其抽取并导出到FBX中进行烘焙。
Lowpoly
At this stage, I’m deleting all unnecessary surfaces that cannot be seen and all inner structures of a model. I’m deleting half or more verticles of circles that don’t affect silhouette, you can notice that the bolt has more verticles around the bottom because you can see its roundness in that place. All the drowned features must be baked and all the stick-out features must be separate from the main mesh.
Lowpoly
在此阶段,我将删除所有看不到的不必要曲面以及模型的所有内部结构。我正在删除不影响轮廓的圆形的一半或更多顶点,您可以注意到螺栓在底部周围有更多的顶点,因为您可以在该位置看到它的圆度。必须烘烤所有淹没的特征,并且所有突出的特征必须与主网格分开。
UVing and baking
There is nothing special – a sharp edge is a seam. Try to make fewer seams. Quadrify shells when possible. Use overlapping on secondary surfaces without unique details like text, engraving, etc. Use add-ons or special software to pack shells (UVPackmaster for Blender is a masterpiece).
UVing和烘
烤 没有什么特别的 - 锋利的边缘是接缝。尽量减少接缝。尽可能对外壳进行四倍化处理。在次级曲面上使用重叠,没有独特的细节,如文本、雕刻等。使用附加组件或特殊软件来包装外壳(用于Blender的UVPackmaster是一个杰作)。
For this model, I divided all meshes into three texture sets to have consistent high texel. (Meshes were divided based on the scale of the shells rather than similar materials, which was not my best decision).
For bake, I divided meshes into groups and adjusted the offset.
对于此模型,我将所有网格划分为三个纹理集,以具有一致的高纹理。(网格是根据壳的大小而不是类似的材料来划分的,这不是我最好的决定)。
对于烘焙,我将网格划分为组并调整偏移量。
“Paint skew” mode can help with distortion on baked surfaces. For the test, I baked Normal Map and AO textures in 2k checked that all were okay and then baked all maps in 4k. The curvature map was baked in Substance Painter because it is much more cleaner.
“油漆倾斜”模式有助于解决烘焙表面上的变形。为了进行测试,我在2k中烘焙了法线贴图和AO纹理,检查了一切正常,然后在4k中烘焙了所有贴图。曲率贴图是在Substance Painter中烘焙的,因为它更干净。
Texturing
The most important part, I suppose. Bad textures can ruin all work you have done. Working with texturing, you need a high-resolution close-up photo to understand what material is in front of you.
I started with base layers with color and roughness to have a basic vision of the model. It helps to compare the colors of different parts of the model. The next step is to set up height texture to see how exactly the material shades and reflects. In general, this work stage aims to get “clean” textures, as if you were seeing an entirely new object, not dirty or used before. Here is mine:
纹理,
最重要的部分。我想。糟糕的纹理会毁掉你做过的所有工作。使用纹理处理时,您需要一张高分辨率的特写照片来了解您面前的材料。
我从具有颜色和粗糙度的基础层开始,以对模型有一个基本的愿景。它有助于比较模型不同部分的颜色。下一步是设置高度纹理,以查看材质的着色和反射效果。一般来说,这个工作阶段的目标是获得“干净”的纹理,就好像你看到的是一个全新的物体,而不是脏的或以前用过的。这是我的:
I wanted to increase the “artiness” of the UZI a bit, so I darkened some areas in separate layers and lightened others. For example, I darkened the deep holes on the model, so that the model looked a little more contrasted. Here you can see the darkening:
我想增加UZI的“艺术性”,所以我在单独的图层中使某些区域变暗,并减轻了其他区域。例如,我将模型上的深孔变暗,使模型看起来更具对比度。在这里,您可以看到变暗:
For these purposes, not only do I usually use generators, but since generators are pretty recognizable and regular, you have to use generators in conjunction with b/w alphas to break regularity. While working, I also used paint layers very often to modify generators’ work, that’s breaking regularity too.
Before I move to dirt masks and other wear, the next step is to break dull surfaces with color variation. I use a common fill layer with a black mask and a lot of alphas with low values so that I can add a slightly barely-see variation of color.
出于这些目的,我不仅通常使用生成器,而且由于生成器非常容易识别和规则,因此您必须将生成器与黑白字母结合使用以打破规律性。在工作时,我还经常使用油漆层来修改生成器的工作,这也打破了规律性。
在我转向污垢面罩和其他磨损之前,下一步是打破颜色变化的暗沉表面。我使用带有黑色蒙版的常见填充图层和许多具有低值的Alpha,以便我可以添加稍微看不见的颜色变化。
For wear, I created a mask with some generators and paint layers to specify where I wanted to show wear. You always have to use references of a real firearm to see which places wear out the most. I painted slight scratches and other types of damage with stencils. I also made some oil spots and roughness variations to break the regularity of glare when I will render it. Most of the time, I use a mix of generators and paint/stencils layers, so I can take advantage of both.
I didn’t go too deep with dirt because it’s not such an old gun. I added the primary dust generator, painted some cavities, and that’s all. The more valuable part of wear is scratches and roughness imperfections which make up the most part of my job.
对于磨损,我用一些生成器和油漆层创建了一个面具,以指定我想显示磨损的位置。您始终必须使用真实枪支的参考资料,以查看哪些地方磨损最大。我用模板画了轻微的划痕和其他类型的损坏。我还做了一些油点和粗糙度的变化,以打破眩光的规律性,当我要渲染它。大多数时候,我混合使用生成器和油漆/模板层,所以我可以利用两者。
我没有太深地接触泥土,因为它不是那么旧的枪。我添加了主要的粉尘发生器,涂上了一些空腔,仅此而已。磨损中更有价值的部分是划痕和粗糙度缺陷,这些缺陷构成了我工作的大部分。
Rendering
I rendered in marmoset and there are no specific steps. I always set the light intuitively to catch beautiful highlights on the subject and highlight interesting places. Most of the time, I use a combination of a few soft lights and hard directional lights. I also used Photoshop to increase the contrast of renders slightly.
渲染
我在狨猴中渲染,没有具体的步骤。我总是直观地设置光线,以捕捉主题上的美丽亮点并突出显示有趣的地方。大多数时候,我使用一些柔和灯和硬定向灯的组合。我还使用Photoshop来略微增加渲染的对比度。
Conclusion
I hope this article was at least a little helpful to you. I didn’t cover many aspects of the working process, so you can always text me by mail or ArtStation, I will help in any way I can. In any case, missed aspects are the reasons to write another one, this time, an ultimate article!
Thanks for reading. Many thanks to Games Artist for inviting me!
结论
我希望这篇文章至少对你有所帮助。我没有涵盖工作流程的许多方面,所以你可以随时通过邮件或ArtStation给我发短信,我会尽我所能提供帮助。无论如何,遗漏的方面是写另一篇的原因,这次,一篇终极文章!
感谢您的阅读。非常感谢游戏艺术家邀请我!
|