您需要 登录 才可以下载或查看,没有账号?注册

x
本帖最后由 姑娘出息点 于 2022-8-24 16:56 编辑


Introduction
Hi! My name is Slava Alpinsky. I’m 35 years old. I’m a self-taught artist. I guess I learned everything related to 3D by watching videos on YouTube – I don’t have an appropriate education. In 2009, I graduated from the technical university with a degree in Computing Systems and Networks but I never become a software engineer.
I started my career in game development 6 years ago, when I was fired from my previous job. Before game development, I was an artist in a design studio. I made boring 3D illustrations for the web and commercials. I didn’t even dream about real game dev. There were no game companies in my town and remote jobs were not a thing back in the days.
介绍
你好!我的名字是斯拉瓦·阿尔平斯基。我今年35岁。我是一个自学成才的艺术家。我想我通过观看YouTube上的视频学到了与3D相关的所有内容 - 我没有适当的教育。2009年,我从技术大学毕业,获得了计算系统和网络学位,但我从未成为一名软件工程师。
6年前,我开始了我的游戏开发职业生涯,当时我被以前的工作解雇了。在游戏开发之前,我是一家设计工作室的艺术家。我为网络和商业广告制作了无聊的3D插图。我甚至没有梦想过真正的游戏开发。我的镇上没有游戏公司,远程工作在当时也不是一件容易的事。
While working in design studios, I made a few game-ready props just to entertain myself. But it helped me find my first job in a European company with an office in my country. And I still work here. Sometimes I work as a part-time artist on different projects for outsourcing companies.
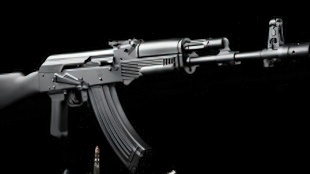
Below, you can see my first game-ready prop. Someone even bought it on 3D stocks.
在设计工作室工作时,我制作了一些游戏就绪的道具,只是为了娱乐自己。但它帮助我在一家在我的国家设有办事处的欧洲公司找到了第一份工作。我仍然在这里工作。有时,我作为兼职艺术家为外包公司的不同项目工作。
下面,你可以看到我的第一个游戏就绪道具。有人甚至在3D股票上购买了它。
Inspiration and References
A few months ago, I made a prop called Tram Controller. While making this prop, I found a handy surface scan in the Quixel library. This was a scan of rusty metal with peeling paint. I projected a scanned Normal map to my model and got a very interesting result.
I thought I should make an entire model with this technique, not just one hole in a paint. So, it became a goal of this project: to make a full model with a projected Normal. I chose a bumper car because there are not many metal parts in it. My previous prop was made of metal. But the bumper car is mostly polypropylene and rubber.
灵感和参考
几个月前,我做了一个名为Tram Controller的道具。在制作这个道具时,我在Quixel库中发现了一个方便的表面扫描。这是一张生锈的金属和剥落的油漆的扫描。我将扫描的法线贴图投影到我的模型上,得到了一个非常有趣的结果。
我想我应该用这种技术制作一个完整的模型,而不仅仅是油漆上的一个洞。因此,它成为这个项目的目标:用投影的法线制作一个完整的模型。我选择了一辆保险杠车,因为它里面没有很多金属零件。我以前的道具是用金属做的。但保险杠车主要是聚丙烯和橡胶。
Quixel scan:
奎克塞尔扫描:
Slava Alpinsky's prop:
斯拉瓦·阿尔平斯基的道具:
I didn’t use any concepts, there was no need. Photos of broken bumper cars are not hard to find. Some of these photos are from Chornobyl. Some images are from other abandoned parks. And I took a few photos myself. I have an 8-year-old kid, it means I have to ride in a bumper car from time to time – a perfect opportunity to make some photos.
我没有使用任何概念,没有必要。破碎的碰碰车的照片并不难找到。其中一些照片来自Chornobyl。一些图像来自其他废弃的公园。我自己拍了几张照片。我有一个8岁的孩子,这意味着我必须不时地乘坐保险杠车 - 这是拍摄一些照片的绝佳机会。
I did not try to make an exact 100% copy of a real car. At first, I started to make this car because I found good reference photos. In the process, I decided to alter the car design.
我没有试图制作一辆真车的100%副本。起初,我开始制作这辆车,因为我找到了很好的参考照片。在这个过程中,我决定改变汽车的设计。
Modeling
There are a few moments that might interest you:
Bended planes like this help me keep the correct shape of a car.
建 模
您可能会对以下几个时刻感兴趣:
像这样的弯曲飞机帮助我保持汽车的正确形状。
When I make a high poly model, I get distorted mesh like this from time to time. I need to straighten it – to do this, I detach a piece of geometry. I use the Freefrom – Comfort & Relax tool to even space between vertexes. I select a brown plane as a reference (the "Paint on" option) and attach it back.
当我制作一个高多边形模型时,我会不时得到像这样扭曲的网格。我需要拉直它 - 要做到这一点,我分离了一块几何体。我使用Freefrom – Comfort & Relax工具来平衡顶点之间的空间。我选择一个棕色平面作为参考(“画图”选项)并将其连接回去。
I try to avoid support edges in high poly modeling. Quad Chamfer modifier is a better option for me. This is a paid plugin for 3Ds Max which adds quad chamfers to selected edges. A pleasant side effect of this modifier is that every chamfer in your model has the same radius.
我试图避免在高多边形建模中使用支撑边缘。四倒角修改器对我来说是一个更好的选择。这是3Ds Max的付费插件,它将四倒角添加到所选边缘。此修改器的一个令人愉快的副作用是,模型中的每个倒角都具有相同的半径。
I don’t spend time in 3Ds Max making smooth intersections between two parts of geometry like this:
我不会花时间在3Ds Max中,在几何体的两个部分之间进行平滑的交集,如下所示:
Instead, I export these parts to ZBrush. Subdivide geometry a few times and then hit the DynaMesh button. This function "melts" two intersected models together and I get a nice smooth intersection for free.
I export a model to an OBJ file. In ZBrush I go to Tools – Geometry – Hit the "Divide" button a few times. Then I go to Tools – Geometry – DynaMesh and press the DynaMesh button. After that, I can add weld and some damage and export it back to 3Ds Max.
相反,我将这些部分导出到ZBrush。细分几何体几次,然后点击DynaMesh按钮。这个函数将两个相交的模型“融化”在一起,我免费得到了一个很好的平滑交叉点。
我将模型导出到OBJ文件。在ZBrush中,我转到工具 - 几何 - 点击“除法”按钮几次。然后,我转到工具 - 几何 - DynaMesh,然后按 DynaMesh 按钮。之后,我可以添加焊缝和一些损坏,并将其导出回3Ds Max。
Blue tape.
蓝色胶带。
In 3Ds Max:
- create a helix spline;
- add a bevel modifier;
- remove unnecessary edges;
- tweak geometry;
- duplicate a few times;
- add Shell + Turbosmooth modifiers;
- move vertexes to add some disorder;
- add the Bend modifier.
在 3Ds Max 中:
- 创建螺旋样条;
- 添加斜角修饰符;
- 删除不必要的边缘;
- 调整几何形状;
- 重复几次;
- 添加壳牌+涡轮平滑修正器;
- 移动顶点以添加一些无序;
- 添加“弯曲”修改器。
In ZBrush:
- chose an alpha “AlphaPaint_Tiling” and set brush mode to “Drag”. (LightBox – Alpha – NPR – AlphaPaint_Tiling);
- press Shift on a keyboard and smooth wrinkles;
- export back to 3Ds Max.
Result:
在ZBrush中:
- 选择一个阿尔法“AlphaPaint_Tiling”,并将画笔模式设置为“拖动”。(LightBox – Alpha – NPR – AlphaPaint_Tiling);
- 按键盘上的Shift键并平滑皱纹;
- 导出回3Ds Max。
结果:
Sculpting
I’m not a big sculpting expert. All I can do is drag some alphas on a surface, and make simple damages and cracks with premade brushes.
Bumper:
雕刻
我不是一个大雕塑专家。我所能做的就是在表面上拖动一些阿尔法,并用预制的刷子进行简单的损坏和裂缝。
缓冲器:
For the body of the car, I used concrete damage brushes:
对于汽车的车身,我使用了混凝土损坏刷:
Topology
I make low poly models, UVs, and bake in 3Ds Max. I try to design a high poly model in such a way that it will be easy to make a low poly model from it. Usually, I have to remove a few edges from a high poly model and low poly is done. These are a high poly model without Turbosmooth and a low poly model derived from it:
拓扑学
我制作低多边形模型,UV,并在3Ds Max中烘焙。我试图设计一个高多边形模型,这样可以很容易地从中制作一个低多边形模型。通常,我必须从高多边形模型中删除一些边缘,然后完成低多边形。这些是没有Turbosmooth的高多边形模型和从中派生的低多边形模型:
While making a low poly model, sometimes it can be hard to decide how many segments of each circle I should make. To quickly solve this issue, I use these colorful circles which have the same polygon size for circles of every radius.
在制作低多边形模型时,有时很难决定我应该制作每个圆的多少段。为了快速解决此问题,我使用这些彩色圆圈,它们对于每个半径的圆圈具有相同的多边形大小。
UVs
This is the most boring part of the production. Back in the days, when ancient people painted their models using Photoshop, packing UVs was an important step. Nowadays, we can use Substance 3D Painter and we don’t care that much about UVs placement.
I try to follow simple rules:
乌布苏
这是制作中最无聊的部分。回到古代,当古代人使用Photoshop绘制他们的模型时,包装UV是重要的一步。如今,我们可以使用Substance 3D Painter,我们不太关心UV的位置。
我尝试遵循简单的规则:
Fewer seams are better;
Try to straighten UVs if necessary;
Respect the padding between UV shells (when you make a model for a real game – don’t bother if you make a model for your portfolio).
接缝越少越好;
如有必要,请尝试拉直UV;
尊重UV shell之间的填充(当你为真实游戏制作模型时 - 如果你为你的投资组合制作模型,请不要打扰)。
I made 4 texture sets for this asset. As you can see, I made straight UVs for the tape on the wheel. It allows me to add directional grunge and additional wrinkles to the tape’s texture.
我为这个资源制作了4个纹理集。如您所见,我为车轮上的胶带制作了直UV。它允许我为磁带的纹理添加定向垃圾和额外的皱纹。
Baking
I bake normals in 3Ds Max. I apply a different material ID to different parts of a mesh and bake an entire model in one run. To help me identify what mesh has what ID, I apply Multy material with different colored sub-materials to a model.
烘
我在3Ds Max中烘烤法线。我将不同的材料ID应用于网格的不同部分,并在一次运行中烘焙整个模型。为了帮助我识别哪个网格具有什么ID,我将具有不同颜色子材质的Multy材质应用于模型。
Texturing
The most interesting part of the textures made for this project is the peeling paint.
纹理
为这个项目制作的纹理中最有趣的部分是剥落的油漆。
If you want to replicate this effect, you need to go to Quixel Megascans and find any scans of peeling paint. It can be any paint on any surface, not just pained metal. These are a few scans I used in my project.
如果你想复制这种效果,你需要去Quixel Megascans并找到任何剥离油漆的扫描。它可以是任何表面上的任何油漆,而不仅仅是疼痛的金属。这些是我在项目中使用的一些扫描。
I made two basic materials: a paint layer and some layer under a paint. Let's call it "rust" in this breakdown.
我做了两种基本材料:一层油漆和油漆下面的一层。让我们在这种故障中称之为“生锈”。
I added a new layer, Projected Normals (not a fill layer!), and placed downloaded maps into appropriate slots in Properties – Projection.
我添加了一个新图层投影法线(不是填充图层!),并将下载的地图放置在“属性 - 投影”中的相应插槽中。
And then, I moved on to paint. I needed only an edge of the paint.
然后,我继续画画。我只需要油漆的边缘。
I recommend painting with all channels. It’s better to disable unnecessary channels later. In this case, you need only Normal and AO channels. Disable Albedo and Roughness.
我建议用所有渠道绘画。最好稍后禁用不必要的通道。在这种情况下,您只需要正常和AO通道。禁用反照率和粗糙度。
Then the most time-consuming part was. I had to mask a hole in the paint manually.
然后最耗时的部分是。我不得不手动遮盖油漆上的一个洞。
I didn’t find an effective way to make this mask automatically. So, I masked every hole myself.
我没有找到一种有效的方法来自动制作这个面具。所以,我自己掩盖了每一个洞。
Then I improved this effect. I placed an Anchor on the Projected Normals layer, created a new Projected Improvements layer with black Albedo and white Roughness, uses the Projected Normals Anchor as a mask, and switched the Reference channel to white.
然后我改善了这个效果。我在投影法线图层上放置了一个锚点,创建了一个具有黑色反照率和白色粗糙度的新投影改进图层,使用投影法线锚点作为蒙版,并将参考通道切换为白色。
You can further improve this material by adding paint bumps. You can use the B/W Grunge map for it, or you can use the same Quixel scan as a paint bump.
您可以通过添加油漆凸块来进一步改进此材质。您可以使用黑白垃圾贴图,也可以使用与油漆凹凸相同的Quixel扫描。
I also added a layer of primer. To do this, I took a paint mask Anchor, applied the Blur Slope filter, and multiplied it by the inverted paint mask.
我还添加了一层底漆。为此,我取了一个油漆蒙版锚点,应用了“模糊坡度”滤镜,并将其乘以倒置的油漆蒙版。
I liked the result as it t looked exactly like a reference!
我喜欢这个结果,因为它看起来完全像一个参考!
It took a lot of time to these holes. It’s better to allocate the hole’s placement according to your photo references.
这些洞花了很多时间。最好根据您的照片参考来分配孔的位置。
You don’t have to repeat the shape of a scanned hole. You can rotate the projection tool while painting Normal on your model.
This was my result:
您不必重复扫描孔的形状。您可以在模型上绘制“法线”时旋转投影工具。
这是我的结果:
In most cases, before starting new material in Substance 3D Painter, I check what can I find online. For metal parts, I found this material in the Quixel library. And I added a green decal from Textures.com.
在大多数情况下,在Substance 3D Painter中开始使用新材料之前,我会检查一下我可以在网上找到什么。对于金属零件,我在Quixel库中找到了这种材料。我从 Textures.com添加了一个绿色贴花。
I didn’t find the appropriate texture or material online, so I made the floor material myself. It’s a combination of premade rust material, clean metal, and paint.
我没有在网上找到合适的纹理或材料,所以我自己制作了地板材料。它是预制防锈材料,清洁金属和油漆的组合。
I'd like to tell you about an interesting effect that can be found in Filters. "Warp" adds uneven edges to your mask.
我想告诉你一个有趣的效果,可以在滤镜中找到。“翘曲”会给蒙版添加不均匀的边缘。
Rubber is a simple black fill layer + dirt generator + dirt trim found on Textures.com. To make it more interesting, I added a few very stretched alphas to simulate paint marks on a bumper.
橡胶是一个简单的黑色填充层+污垢发生器+污垢装饰,在 Textures.com 上发现。为了让它更有趣,我添加了一些非常拉伸的alpha来模拟保险杠上的油漆痕迹。
Creating a Feeling of Abandonment
During the time I work on this project, I learned that this peeling paint takes a lot of time when you want to cover the entire model in it. If you don’t have time to do it, I think you can use more time-saving techniques like this.
Speaking of abandonment, I think the dust layer adds to this feeling. I made this dust effect using Mask Editor – World Space Normal. I also multiplied it by grunge and subtract a few alphas with wipes.
创造一种被遗弃的感觉
在我从事这个项目的过程中,我了解到,当你想要覆盖整个模型时,这种剥落的油漆需要花费很多时间。如果你没有时间去做,我认为你可以使用更多像这样的节省时间的技术。
说到放弃,我觉得灰尘层更增添了这种感觉。我使用蒙版编辑器制作了这种灰尘效果 - 世界空间正常。我还用垃圾颓废将其乘以,并用擦拭子减去几个阿尔法。
Setting Up the Model and Rendering
I didn’t do anything special to render the car. The model is lit by a standard Substance 3D Painter’s HDRI called Bonifacio Street.
设置模型和渲染
我没有做任何特别的事情来渲染汽车。该模型由标准的Substance 3D Painter的HDRI照亮,称为Bonifacio Street。
Originally, I was planning to render this model in Marmoset Toolbag like I always do. But this time I used iRay render in Substance 3D Painter. Actually, I pressed the "Render" button in SP by accident. SP started to render an image and I was pleasantly surprised by the result. There are not many tweaks and settings in this render. You can’t even place your own light sources in a scene. You can only choose an HDRI and tweak post-processing. But in exchange, it is very easy to set up, and you don’t have to export textures to different software.
最初,我计划像往常一样在Marmoset Toolbag中渲染这个模型。但这次我在Substance 3D Painter中使用了iRay渲染。实际上,我意外地按下了SP中的“渲染”按钮。SP开始渲染图像,我对结果感到惊喜。此渲染中没有很多调整和设置。您甚至不能在场景中放置自己的光源。您只能选择 HDRI 并调整后期处理。但作为交换,它很容易设置,您不必将纹理导出到不同的软件。
In Substance 3D Painter, I always set Tone Mapping to Auto. I don’t know why it is set to Linear by default. In every second tutorial, I see advice to switch this setting to Sensitometric. (Auto gives the same result).
在 Substance 3D Painter 中,我总是将“色调映射”设置为“自动”。我不知道为什么默认情况下它设置为线性。在每一秒教程中,我都会看到将此设置切换到 Sensitometric 的建议。(自动给出相同的结果)。
Substance 3D Painter allows saving an image with transparent background. Therefore, I can add my own background in Photoshop. I found a random colorful image online, blurred it, and placed it as a background. Then I added color correction layers to boost contrast and saturation. That’s it.
物质3D画家允许保存具有透明背景的图像。因此,我可以在Photoshop中添加自己的背景。我在网上发现了一个随机的彩色图像,模糊了它,并将其作为背景。然后,我添加了色彩校正层以提高对比度和饱和度。就是这样。
Conclusion
I think the main key to creating an appealing prop is time. I can’t make a good model fast. I must spend time trying different techniques and see what works and what doesn’t. And the main challenge is to find free time to practice and not burn out during the process.
The next important thing is experience. When you make something for the first time, you rarely can make it good. So, practice!
结论
我认为创造一个吸引人的道具的主要关键是时间。我不能快速制作一个好的模型。我必须花时间尝试不同的技术,看看哪些有效,哪些无效。主要的挑战是找到空闲时间练习,而不是在这个过程中精疲力竭。
下一件重要的事情是经验。当你第一次做某样东西时,你很少能把它做好。所以,练习!
|


 评分
评分