您需要 登录 才可以下载或查看,没有账号?注册

x
If a flower has a face -- dandelion character making
如果一朵花有了脸——蒲公英角色制作
by:BAJ Singh
BAJ Singh analyzed the steps of dandelion, a game character model he recently made using 3ds Max and ZBrush, including carving, making decorations, making texture maps, etc.
Baj Singh对他最近使用3ds Max 以及Zbrush制作的游戏角色模型——蒲公英进行了步骤解析,包括雕刻,制作装饰物,制作纹理贴图等。
The idea behind the work
Initially, I planned to create a small game prototype in unreal 4, focusing on glass containers and small creatures living in them. However, I realized that it would take a lot of time, so I focused on developing a single character in the series (actually my favorite character).
作品背后的想法
最初,我计划在Unreal 4中创建一个小型游戏原型,重点放在玻璃容器和生活在其中的小型生物。但是,我意识到这将花费大量时间,因此我转而专注于开发这个系列中的单个角色(其实就是我最喜欢的那个角色)。
For all the characters in the intended universe, the two most important parts are to ensure that they integrate some kind of flower element (finally named after them), and their clothes and accessories represent their proportion and size. If you've ever seen movies like the borrowers and Arrietty, then you know what I mean. These characters are only a few inches tall, so the items they use (and their construction) should reflect their size and proportion (take a chestnut, use a sewing needle as a sword).
对于设计预期的宇宙中的所有角色来说,最重要的两个部分是确保它们融合了某种花卉的元素(最终以它们的名字命名),并且他们的衣服和配饰代表了他们的比例大小。如果你曾经看过《The Borrowers’》和《Arrietty》等电影,那么你就懂我意思了。这些角色只有几英寸高,因此它们使用的物品(及其构造)应该能体现它的大小和比例(举个栗子,用缝衣针当剑使)。
Preliminary carving
In terms of carving, the process is still very simple. First, I will use 3D Max and ZBrush to make the large shape of each object. The workflow of using these two software together in the engraving and hard surface stage is still relatively traditional. I know that many artists are turning to ZBrush to make hard surface props (using zmodeller), but I still prefer to mix Max and ZBrush to make main shapes in 3DMAX, and then use ZBrush's Boolean operation and zremesher / ZProject to make a clean basic model for subsequent carving.
初步雕刻
雕刻方面,过程还是非常简单的。首先,我会使用3d Max和Zbrush把每个物件的大形制作出来。我在雕刻和硬表面阶段联合使用这两个软件的工作流程还是比较传统的。我知道很多艺术家正在转向使用Zbrush制作硬表面道具(使用ZModeller),但是我还是倾向把Max和Zbrush混合起来使用的方法,在3dMax中制作主要形状然后使用Zbrush的布尔运算和ZRemesher/ZProject来制作一个干净的基础模型用来进行后续的雕刻。
this is the most important part of the carving process because it is the basis of your character. If you don't have a good shape, you may spend months carving characters, and the proportion may be completely incorrect (it will only take you more time). The foundation shape is very important.
制作大形有助于我确定角色的比例,在我看来,这是雕刻过程中最重要的部分,因为它是你角色的基础。如果没有良好的大形,你可能要花费数月的时间来雕刻角色,而且比例可能完全不正确(这只会耗费你更多的时间)。基础大形非常重要。
After that, it is the combination of sculpture and MD. Marvelous designer has always been one of my weaknesses, so I want to spend more time at this stage (especially backpack and scarf).
之后,就是雕刻和MD的结合。Marvelous Designer一直是我的弱项之一,因此我想多花一些时间在这个阶段(尤其是背包和围巾)。
The hairs rendered in ZBrush are temporary substitutes - they give me a sense of what I think of as characters that can eventually be used in the game. I used Fibermesh to create hair and reused some of these elements when baking transparent hair patches for low mold.
在ZBrush中渲染出的毛发都是暂时替代品——它们能让我感觉到我想象中的最终可用于游戏中的角色的样子。我使用FiberMesh创建毛发,并在为低模烘焙透贴发片时重复利用了其中的一些元素。
Cloth accessories
I paid attention to this backpack, but I wasn't sure how to do it at first. I think it will be a very interesting challenge if I try to do it all in marvelous designer, which is almost what I have done. First, I created the pattern of the backpack in marvelous to make all the plates, and then imported a model from 3ds max, which will be used as the filler of the backpack. In order to correctly fold, I want to make sure that there is some gravity acting on the bag (this is the function of the filler).
布制配件
我很注重这个背包,但最初不确定该如何做。我想如果在Marvelous Designer中尝试把它全部做出来将是一个很有趣的挑战,这也几乎就是我所做了的事情。首先,我在Marvelous中创建了背包的图案来制作所有板片,然后从3ds Max导入了一个模型,这个模型将用作背包的填充物。为了正确的褶皱,我想确保里面有某种重力作用在袋子上(这就是填充物的作用)。
The stitches on the backpack were made with a curve brush in ZBrush. I made a simple stitch in 3ds max, exported it to ZBrush, and then created an insert brush. Adjust the curve settings so that I can create a brush that can be dragged on the surface and then adjusted with the move brush.
The advantage of using a separate model to make stitches is that it is easier to separate them on the texture (using ID mapping) than carving directly on the model. By assigning them different ID colors, you can easily configure them with different textures in the substance painter (different from manual painting above).
背包上的针脚是在ZBrush中使用曲线笔刷制作的。我在3ds Max中制作了一个简单的针脚,将它导出到ZBrush,然后创建了插入笔刷。调整曲线设置,让我可以创建一个可以在表面上拖动并且之后可以使用move画笔进行调整的画笔。
与在模型上直接雕刻相比,对使用单独的模型制作针脚好处在于可以更容易地将它在纹理上分开(使用ID贴图)。通过给它们分配不同的ID颜色,你可以在Substance Painter中轻松地给它们配置不同的纹理(与在上面手工绘制不同)。
The blanket rolled up at the top is another story. To make it work, I have to make a long piece of fabric, and then roll it up manually in marvelous designer to achieve the effect I want (a good tutorial follows):
顶部卷起的毛毯就是另外一个故事了。为了让它行得通,我必须制作一条长条织物,然后在Marvelous Designer中手动将它卷起来以实现我要的效果(下面有一个很好的教程):
Texture making
The workflow of making texture is also a standard ordinary process. I used substance painter. In most materials, I try to keep the details small. In order to make hair and translucency better as much as possible, I used the secondary scattering (SSS) and fluff effect in marmoset toolkit.
纹理制作
制作纹理的工作流程也是标准的普通流程,我使用了Substance Painter。在绝大多数材料上,我尝试着让细节保持微小。为了尽可能多地让毛发和半透明效果好一点,我使用了Marmoset Toolbag中的次级散射(sss)和绒毛效果。
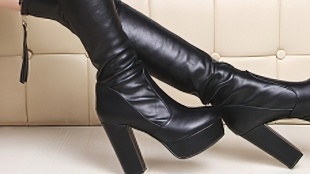
I like the tiny details of texture very much, so I use material and color differentiation to guide the viewer's visual center. In this case, the Yellow buttons on the character's boots and purple bottoms will lead the viewer's eyes to the head (using the scarf as a catalyst).
我非常喜欢纹理的细微细节,所以我使用材质和颜色差异来引导观众的视觉中心。在这种情况下,角色靴子上的黄色按钮和紫色底裤将引导观众的眼睛看向头部(使用围巾作为催化剂)。
Hair
Hair is actually easy to make, but it takes a lot of time to put everything together. I made some prototypes of the shape and length (all to ensure that the scale of the original base model is correct). When I know how long each flower stem is, I first make only one flower stem, then copy and place it manually (the end is a transparent patch, similar to the hair used to save the number of faces).
头发
头发实际上很容易制作,但是要花很多时间将所有东西放在一起。我对形状和长度进行了一些原型制作(这一切都是为了确保原始的基础模型的比例是正确的)。当我知道每根花茎要多长的时候,我就先只做一根花茎,然后复制并手动摆放它(末端是透贴片,类似于用来节省面数的毛发)。
The fluffy effect comes from blurring the alpha slightly and using the fuzzy setting in marmoset toolkit. Overall, I feel the effect is very good.
毛茸茸的效果来自于使alpha稍微模糊以及使用了Marmoset Toolbag中的Fuzz设置。总的来说,我感觉效果害挺好。
Challenge
To be honest, I think the biggest challenge of this model is not in technology, but in the time and patience required to complete it. Unfortunately, I have little time to do things at home these days, and I almost use up all my time to finish dandelion. I really rested for a long time in the important milestone stage of the period, because in this way I can return to character production with a new vision.
Well, this is the process of the anthropomorphic role dandelion. I'll see you next time!
挑战
老实说,我认为这个模型的最大挑战不是在技术方面,而是完成它所需要的时间和耐心。不幸的是,这些天我很少有时间在家做东西,而且完成蒲公英也几乎把这些时间用光了。在期间的重要里程碑阶段,我确实休息了很久,因为这样我才能以崭新的眼光回到角色制作上。
好了这就是拟人角色——蒲公英的流程了,我们下次见哦!'
- End -
|


![[中英]Book of the Dead: Photogrammetry Assets](https://pic.element3ds.com/forum/threadcover/de/bc/402972.jpg)


 评分
评分