您需要 登录 才可以下载或查看,没有账号?注册

x
 [翻译] : Hi, my name is , a 4th-year Art Game student at Rubika Supinfogame in France. I discovered Substance Designer in my second year through seniors' recommendations and YouTube tutorials. As someone not comfortable with 2D graphics, Substance Designer allowed me to express myself in a 3D context. The community aspect is valuable for sharing workflows and tips, like explaining how to create leaf veins or shape-changing bricks. [翻译] : Hi, my name is , a 4th-year Art Game student at Rubika Supinfogame in France. I discovered Substance Designer in my second year through seniors' recommendations and YouTube tutorials. As someone not comfortable with 2D graphics, Substance Designer allowed me to express myself in a 3D context. The community aspect is valuable for sharing workflows and tips, like explaining how to create leaf veins or shape-changing bricks.
The project involved overcoming challenges such as adapting a hexagonal-tile system for the game design. For mountains, I initially drew inspiration from Emrecan Çubukçu's work but needed to modify it for the stylized Civilization 6 mountains. I created hexagonal tilings, used distance nodes with noise, and followed similar methods to Emrecan's for the mountain formation.
Creating trees involved creating heightmaps and using exposed parameters for variations. For dirt and stones, I made simple shapes and combined them with splatter shapes. Water was modeled with procedural fog that adapted to terrain, and I took cues from Zahar Scherbov's Mediterranean Water Material for a convincing effect.
The fog of war was another significant challenge, using a fog mask generated with noise and adjusting its color according to the map. I also tackled the tracing effect with heightmap inputs and ambient occlusion.
The biggest challenge was adapting features to the hexagonal tiling while maintaining believability. I learned the importance of setting boundaries, organizing my nodes, and tidying up throughout the project.
In conclusion, Substance Designer played a crucial role in bringing my vision to life, and I'd encourage others to explore, learn from others' work, and experiment to find their own workflow.
本帖最后由 秋令6689 于 2022-6-14 21:45 编辑
-授权微元素发布-
https://ducrocq_hugo.artstation.com/


IntroductionHello, my name is Hugo, I am a 4th year Art game student at Rubika Supinfogame in the north of France. The only company I worked for was Appeal Studio in Belgium during a two-month internship last summer, which made me realize that I wanted to be a material artist. 介绍你好,我的名字是 雨果,我是法国北部Rubika Supinfogame的艺术游戏四年级学生。去年夏天,我唯一工作的公司是比利时的Al appeal Studio,在为期两个月的实习期间,这让我意识到我想成为一名材料艺术家。 Working in Substance Designer以Substance Designer工作
I discovered Substance Designer in the second year by listening to students from the upper years, who told me that it was a magical software, so I decided to try it out with YouTube tutorials like many other people. Since I am not very comfortable with 2D graphics, this kind of software was a universe where I could express myself. The Substance Designer community is special to me because it is very easy to share your work, your workflow, all you need is a screen of your graph, a "node combo" to explain how to add small veins on leaves or how this brick can change its shape, for example. So everyone quickly shares their work, and this project is an example of it. I’ve been inspired by many artists, looking at their Arstation profiles, breakdowns, buying and analyzing materials, reading articles... this is what allowed me to progress, and make the project interesting! So if I have some advice for everyone who wants to get into Substance Designer: get inspired by the work of others, their workflows and combine these to create your own workflow and fully express yourself! 我在第二年通过听高年级的学生发现了 Substance Designer,他们告诉我这是一个神奇的软件,所以我决定像许多其他人一样在YouTube教程中尝试它。由于我对2D图形不是很满意,所以这种软件是一个我可以表达自己的世界。Substance Designer社区对我来说很特别,因为它很容易分享你的工作,你的工作流程,你所需要的只是一个图表的屏幕,一个“节点组合”来解释如何在树叶上添加小纹理,或者这块砖如何改变它的形状,例如。所以每个人都很快分享他们的工作,这个项目就是一个例子。我受到许多艺术家的启发,查看他们的Arstation个人资料,故障,购买和分析材料,阅读文章......这让我取得了进步,并使项目变得有趣!因此,如果我对每个想要进入Substance Designer的人有一些建议:从其他人的工作,他们的工作流程中获得灵感,并结合这些来创建自己的工作流程并充分表达自己! First of all, there is a very important point of Civilization 6 that I absolutely wanted to respect, the game is based on a hexagonal-tile system, each building, each unit is built and moves on a hexagonal tile. 处理元素首先, 《文明6》有一点非常重要,我绝对想尊重它,游戏是基于一个六边形的瓦片系统,每个建筑,每个单位都是在六边形的瓦片上建造和移动的。
This was the first and one of the biggest challenges of this project. First of all, the basic hexagons of Substance Designer fit into a square, and therefore it does not tile exactly: they are deformed, and I had to solve the problem. 这是该项目的第一个也是最大的挑战之一。 首先,Substance Designer的基本六边形适合一个正方形,因此它不能完全平铺:它们是变形的,我必须解决这个问题。
I found a YouTube video that explains this problem and shows how to solve it by creating a function in the tiling parameter of the tile generator and in the interface parameters x/y of the tile generator.
我找到了一个 YouTube 视频,其中解释了这个问题,并演示如何通过在切片生成器的平铺参数和切片生成器的接口参数 x/y 中创建一个函数来解决它。
I suggest you check the video in question if you have a similar problem. I could now create a hexagonal tiling and change the number of tiles without any deformation. I decided to organize myself as follows: A general subgraph, where I group and mix all the elements I need, and subgraphs, where I create each element independently with exposed parameters. 我现在可以创建一个六边形的瓷砖,并在没有任何变形的情况下改变瓷砖的数量。 我决定按如下方式组织自己:一个通用的子图,我在其中分组和混合我需要的所有元素,以及子图,其中我使用公开的参数独立创建每个元素。
For the mountains, which have been a big challenge, I first thought of creating unique shapes that I will place on the hexagonal tiles, but the Civilization 6 mountains extend over several squares and create a mountain range. 对于山脉来说,这是一个很大的挑战,我首先想到的是创造独特的形状,我将把它们放在六角形的瓷砖上,但是文明6山脉延伸到几个正方形上,创造了一个山脉。
As I said earlier, I was directly inspired by Emrecan Çubukçu's work because the base of his mountains was very interesting. 正如我之前所说,我直接受到埃姆雷坎·丘布克苏(Emrecan Çubukçu)作品的启发,因为他的山脚非常有趣。
But it didn't fit perfectly to me because the mountains of Civilization 6 are stylized, so I modified them accordingly. I start from a cross shape that I tile before plugging in a Distance Node with noise to create an interesting base. 但它并不完全适合我,因为《文明6》的山脉是程式化的,所以我相应地修改了它们。 我从一个十字形开始,然后用噪音插入一个距离节点,以创建一个有趣的基础。
Then, I use a similar method to as Emrecan Cubukcu for the mountains, he explains it very well in the following article. Finally, to create this marked edge that creates the mountain range, I start from a polygon tile sampler that I flood fill to create a gradient and the mountainsides. 然后,我使用与Emrecan Cubukcu类似的方法来登山,他在 下面的文章中很好地解释了这一点。 最后,为了创建这个创建山脉的标记边缘,我从一个多边形图块采样器开始,我用它进行泛洪填充以创建渐变和山坡。
Finally, I mix the two and then I mix it again on itself with ambient occlusion to reinforce the sharp effect of the mountains.
最后,我将两者混合在一起,然后用环境光遮蔽再次混合,以加强山脉的锐利效果。
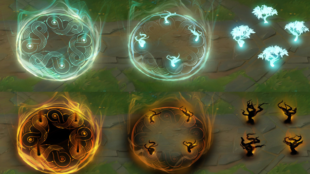
It is very important to work permanently with references: open on the PuRef and keep it open right next to your graph. For trees, for example, I noticed that the shape was separated into several "starts". 永久使用引用非常重要:在PuRef上打开并保持它在图形旁边打开。 例如,对于树木,我注意到形状被分成几个“开始”。
So, I started from a simple shape that I shrunk and juxtaposed to create the heightmap, then, thanks to a simple parameter I was able to create 4 variations that I added in a tile generator. The whole thing is colored with a simple gradient map. I then noticed that there were dirt and stones near the trees, so I created simple stones in a subgraph with exposed warp parameters to create variants that I then included in a splatter shape; so I also exposed the parameters to create variants. 因此,我从一个简单的形状开始,我缩小并并置以创建高度图,然后,由于一个简单的参数,我能够创建我在瓷砖生成器中添加的4个变体。整个事情都用一个简单的渐变贴图着色。 然后我注意到树木附近有泥土和石头,所以我在带有暴露的翘曲参数的子图中创建了简单的石头,以创建变体,然后将其包含在飞溅的形状中;所以我也公开了参数来创建变体。 Thanks to the basic mask of the trees, which I subtract the trees, I can easily place stones and add the ground. 多亏了树木的基本面具,我减去了树木,我可以很容易地放置石头并添加地面。 It is very important to expose simple parameters of your subgraphs to create variants. Before I talk about water, I would first like to talk about the Fog of War, which was a big challenge and was important to me. In Civilization 6, there is a fog of war that is important for the gameplay, and I wanted to transcribe that into the texture with a procedural fog that adapts to the terrain, whose size and shape could be adjusted. 公开子图的简单参数以创建变体非常重要。 在我谈论水之前,我想先谈谈战争之雾,这是一个很大的挑战,对我来说很重要。 在《文明6》中,有一种战争迷雾对游戏玩法很重要,我想用适应地形的程序雾将其转录到纹理中,其大小和形状可以调整。 For the mask of the fog, I created a simple noise with a base shape and a warp that I tile in a sample, I then contrast it to the maximum and, finally, I vector it and then morph it to a flow map to give the worn, burnt effect of the map. 对于雾的蒙版,我创建了一个简单的噪声,带有基本形状和翘曲,然后将其平铺在样本中,然后将其对比到最大值,最后,我对其进行矢量化,然后将其转换为流图,以提供贴图的磨损,烧焦效果。
So for the color of the fog, I simply vary color according to a cloud mask, then I add in low opacity with input the color of the map. 因此,对于雾的颜色,我只需根据云遮罩改变颜色,然后通过输入地图的颜色添加低不透明度。
Then for the tracing effect of the old map, I create an input of the heightmap and play with ambient occlusion. I had the heightmap in a quantize node, then I take out an ambient occlusion and merge the two ambient occlusions, and I had a good base!
然后,为了获得旧地图的追踪效果,我创建了高度图的输入并进行了环境光遮蔽。我在量化节点中设置了高度图,然后我取出了一个环境光遮蔽并合并了两个环境光遮蔽,我有一个很好的基础!
Then for the water of the fog, I take out the height map of the water that I use as a mask between two colors, and then I add it to the base color, so no matter what the configuration of the map is the fog always adapts itself.
然后对于雾中的水,我拿出我用作两种颜色之间的蒙版的水的高度图,然后将其添加到基色中,因此无论地图的配置是什么,雾总是会自我适应。
I also created wave patterns, which are placed in the water mask to add this old-map effect also presented in civilization 6:
我还创建了波浪图案,这些图案被放置在水面罩中,以添加文明6中也呈现的旧地图效果:
For the water, I was inspired by an 80 level article by the wonderful Zahar Scherbov who made a breakdown on his Mediterranean Water Material.
对于水,我的灵感来自一篇80级的文章,由出色的Zahar Scherbov撰写,他对他的地中海水材料进行了分解。
I based myself entirely on his material because I had no idea how to make convincing water, and I invite you to go and see this article, which is very interesting. I then adapted it to my project by integrating my water mask, it was necessary that the foam is deposited on the edges of the coasts, and for that, I simply invert the mask that I subtracted from it to create a border that I then warp and which serves as a mask for the foam.
我完全基于他的材料,因为我不知道如何制作令人信服的水,我邀请你去看这篇文章,这很有趣。然后,我通过集成我的水面罩将其调整到我的项目中,有必要将泡沫沉积在海岸的边缘,为此,我只是将我从中减去的面罩反转为创建一个边界,然后翘曲并用作泡沫的掩模。
I quickly added waves on the normal water to break the repetition of the ocean tiling.
我迅速在正常水面上添加波浪,以打破海洋瓷砖的重复。
I also recovered the mask of the foam that I enlarged to obtain the mask for the sand surrounding the water.
我还恢复了泡沫的面罩,我将其放大以获得水周围沙子的面膜。
CustomizationFor the parameters, they all come from particular nodes in the main graph but also in subgraphs. 定制对于参数,它们都来自主图中的特定节点,但也来自子图中的特定节点。
For the basic biomes, most of the parameters come from the random masks of the tile generators, which themselves generate the biome masks, the biome masks are then added one on top of the other, so that the biomes do not overlap, and the water mask takes priority over all the other masks to make it easier.
对于基本生物群系,大部分参数来自图块生成器的随机蒙版,这些图块生成器本身生成生物群系蒙版,然后将生物群系蒙版一个地添加到另一个之上,这样生物群系就不会重叠,并且水面具优先于所有其他蒙版以使其更容易。
The main problem is the following: "how to make the mask understand and define itself according to a hexagonal tiling? " and that's where my best friend intervenes during this project : FloodFill and the grayscale flood fill, which allows me to input a noise, for example, and the grayscale flood fill will interpret this noise as a mask but according to the hexagonal tiling.
主要问题是:“如何使蒙版根据六边形平铺来理解和定义自己?”这就是我最好的朋友在这个项目中干预的地方:FloodFill和灰度洪水填充,例如,它允许我输入噪声,灰度洪水填充会将此噪声解释为掩码,但根据六边形平铺。
Many of the parameters exposed are simple Perlin noises, histograms or amounts on x and y of a tile sampler (trees, for example). For this kind of project, I advise you to tidy up your nodes as quickly as possible, to classify them and to break them down as much as possible, so you will be not lost like I was! There is no secret in this project, it all works simply, thanks to its masks that are intimately linked, it's a kind of big headache, where you have to go slowly and test every time you add a feature. 然后,由于像噪声无序这样的简单参数,我可以生成水面罩,其底部是带有直方图扫描的简单柏林噪声。 暴露的许多参数是瓷砖采样器(例如树)的x和y上的简单柏林噪声,直方图或数量。对于这类项目,我建议您尽快整理节点,对它们进行分类并尽可能地分解它们,这样您就不会像我一样迷失方向! 鉴于项目的复杂性,我在组织自己时遇到了很多麻烦。 这个项目没有秘密,一切都很简单,这要归功于它的面具紧密相连,这是一种令人头疼的问题,每次添加功能时,你都必须慢慢去测试。
For the city:
对于城市:
I generated two small buildings starting from a simple shape that I blend For the colors, I used one of the basic set. In order to make the windows appear, I use the technique of Emrecan Çubukçu, which consists in simply making a line of pixels on the wall, with the tesselation, the window will appear on the wall. 我从一个简单的形状开始生成了两个小建筑,我混合了 对于颜色,我使用了一个基本的集合。为了使窗户出现,我使用了Emrecan Çubukçu的技术,它包括简单地在墙上制作一行像素,随着镶嵌,窗户将出现在墙上。 For the main building, there was the same principle: this task was very repetitive because I placed each building, and each building was colored by hand with transform and blends, with hindsight, I probably could have done it better. 对于主楼,有相同的原则:这个任务非常重复,因为我放置了每座建筑,每座建筑都是用变换和混合手工着色的,事后看来,我本可以做得更好。 Then for the fields, I generated squares that surround the city with tile samplers, I then created an edge to detect that I use as a mask to add trees between fields to make it more convincing. I exposed the parameters in order to be able to adjust the size of the fields etc., then I blend them with the city and here we are. 然后,对于字段,我生成了用瓷砖采样器包围城市的正方形,然后我创建了一个边缘来检测,我将其用作遮罩,在字段之间添加树木,使其更具说服力。 我公开了参数,以便能够调整字段的大小等,然后我将它们与城市混合在一起,我们就在这里。
For the borders, I reuse the flood fill technique to generate a line, the color of which I can change to create the borders.
对于边框,我重用泛洪填充技术来生成一条线,我可以更改该线的颜色以创建边框。 At first, I wanted to add the main city procedurally, but I soon realized it would be way too complicated, so I instead added it manually. I decided to place it a little reluctantly with a transformed material, where I blend the height of the city with that of the map, and the same for the color, I add the mask of the water, so that the fields or the city can not appear in the water, and the trick is done! 起初,我想在程序上添加主城市,但我很快意识到它太复杂了,所以我转而手动添加它。 我决定用一个变形的材料稍微不情愿地放置它,在那里我将城市的高度与地图的高度混合在一起,对于颜色,我添加了水的面具,使田野或城市不能出现在水中,并且技巧就完成了!
Finally, I refused to do anything in Photoshop (even the interface), so I made the city titles and resource icons in Substance Designer.
最后,我拒绝在Photoshop中做任何事情(甚至是界面),所以我在Substance Designer中制作了城市标题和资源图标。 Gears: 齿轮: Corn: 玉米: Graph of the resources: 资源图表: Graph of the titles: 标题图表: The result: 结果:
The Biggest ChallengesThe biggest challenge of this project was to create a convincing fan art by adapting each feature into the hexagonal tiling. It complicated my task very often but also made it very interesting, just like the way the mountains are placed or how to create the fog, there are features that took me a long time to do, because it was a real headache, but it made the task exciting! I would have liked to improve a lot of things. If I hadn't listened to my friends, I would have tried to integrate the whole game, but it was honestly impossible: for example, I added the tundra when I was already rendering in Marmoset, which wasn't very wise. Also, I would have liked to tidy up from the beginning of the project, rename each frame, comment everything... because in this kind of project and in general, it is imperative and essential to tidy up for you and for your colleagues who can potentially retouch your files! I learned one thing it is to set limits in projects and not to over scope, otherwise you get lost quickly in details and waste a lot of time. 最大的挑战该项目的最大挑战是通过将每个特征改编成六边形瓷砖来创建令人信服的粉丝艺术。它经常使我的任务复杂化,但也使它变得非常有趣,就像山脉的放置方式或如何创建雾一样,有些功能需要我很长时间才能完成,因为这是一个非常令人头疼的问题,但它使任务令人兴奋! 我本来想改进很多东西。如果我没有听我的朋友的话,我会尝试整合整个游戏,但老实说这是不可能的:例如,当我已经在Marmoset中渲染时,我添加了苔原,这并不是很明智。 另外,我本来想从项目一开始就整理,重命名每个框架,评论一切......因为在这种类型的项目中,一般来说,为您和您的同事整理文件是当务之急和必不可少的! 我学到了一件事,那就是在项目中设置限制,不要超出范围,否则你会很快迷失在细节上,浪费很多时间。 | 


 评分
评分