您需要 登录 才可以下载或查看,没有账号?注册

x

Introduction
Hello! My name is Artur Romanov and I love creating stylized 3D art
介绍
你好!我的名字是阿图尔·罗曼诺夫,我喜欢创作风格化的3D艺术

Project & Goals
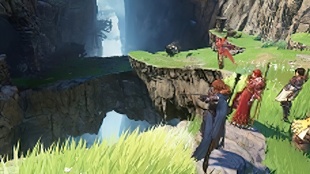
As my experience with Unreal grew I felt more comfortable tackling more ambitious projects and this time I knew I wanted it to be a stylized scene, mostly because I’ve been a huge fan of stylized art and games ever since I started my journey with 3D.
I pretty much browse ArtStation every day and keep new project ideas in collections, so by the time I finished the previous project I had a full list of potential next projects waiting for me to choose.
项目与目标
随着我对 Unreal 的经验的增长,我对处理更雄心勃勃的项目感到更加自在,这一次我知道我希望它成为一个程式化的场景,主要是因为自从我开始 3D 之旅以来,我一直是程式化艺术和游戏的忠实粉丝.
我几乎每天都在浏览 ArtStation,并将新的项目创意保存在收藏夹中,所以当我完成上一个项目时,我有一个完整的潜在下一个项目列表等待我选择。
My main goal was to make a scene rich in detail at every corner and I felt like artwork by was perfect for that, especially since I’ve been a fan of souls games for a long time. To be honest, I would enjoy making all of his artworks in 3D because they just look so fun to make, but at the time I was really impressed by that single piece.
我的主要目标是让场景的每个角落都有丰富的细节,我觉得杜邦正的作品非常适合这一点,特别是因为我长期以来一直是灵魂游戏的粉丝。老实说,我很喜欢用 3D 制作他的所有作品,因为它们看起来很有趣,但当时我对那件作品印象深刻。
I also wanted it to be rendered in Unreal, record some videos, make it feel alive and add some of my own touches to it. Sometimes I find myself trying too hard to recreate the main reference 1 to 1, but it’s not always the best option.
我还希望它在虚幻中渲染,录制一些视频,让它感觉生动,并添加一些我自己的触感。有时我发现自己太努力地重新创建 1 对 1 的主要参考,但这并不总是最好的选择。
References
The main artwork was pretty straightforward, but sometimes it was harder to figure out what I was dealing with. For example, some assets were too simplified in illustration and I had to either look for in-game references that it was based on to get a better grasp or come up with something myself. Mostly I just tried to make it look cool and not stress too much about it.
I used PureRef which is a godsend for collecting references.
参考
主要的艺术作品非常简单,但有时很难弄清楚我在处理什么。例如,有些资产在插图中过于简化,我不得不寻找游戏中的参考资料以更好地掌握它,或者自己想出一些东西。大多数情况下,我只是想让它看起来很酷,而不是太强调它。
我使用了 PureRef,它是收集参考的天赐之物。
Blockout
This was one of the most important parts of this project. I started off by blocking out the biggest pieces of environment in Blender to get a general feeling of the shapes and composition. Lots of changes at this stage happened and sometimes I would redo whole segments, but it’s important to make sure you’re satisfied with the result before moving on to polishing.
阻挡
这是该项目最重要的部分之一。我首先在 Blender 中屏蔽了最大的环境片段,以获得对形状和构图的总体感觉。在这个阶段发生了很多变化,有时我会重做整个片段,但重要的是要确保你对结果感到满意,然后再进行抛光。
To help me out I used a very useful addon called which was recommended to me by my buddy (check him out). It pretty much allowed me to match my camera in Blender to get a similar perspective as in the illustration which in turn made my block outing phase way easier. Of course, it’s not perfect and sometimes you just can’t recreate illustration 1 to 1, so you have to improvise.
为了帮助我,我使用了一个非常有用的插件,名为https://www.artstation.com/bazar推荐给我的(看看他)。它几乎让我可以在 Blender 中匹配我的相机,以获得与插图中相似的视角,这反过来又使我的块郊游阶段变得更容易。当然,它并不完美,有时您无法重新创建插图 1 对 1,因此您必须即兴创作。
Sometimes I would use an addon called GroupPro which allowed me to duplicate objects and edit them both at the same time. It’s great because you can still keep your modifiers unlike if you used the default method in Blender called “Duplicate Linked”.
For example below the sword would be much harder to edit if it stayed rotated, but thanks to GroupPro I could keep a straight copy and edit it with no issues.
有时我会使用一个名为 GroupPro 的插件,它允许我复制对象并同时编辑它们。这很棒,因为您仍然可以保留修改器,这与使用 Blender 中称为“重复链接”的默认方法不同。
例如,如果剑的下方保持旋转状态,编辑起来会困难得多,但多亏了 GroupPro,我可以保留一个直接的副本并毫无问题地对其进行编辑。
Exporting
What helped me a lot with exporting was an addon called Batex, thanks to it I could export my assets without worrying about pivot placement. What I would also do a lot was parenting lots of assets to a single asset and then exporting just a parent through batex, so once it’s imported into Unreal it’s just a single asset, but in Blender, it’s still separate so I can tweak it much easier. I saved lots of time working this way.
出口
对我的导出有很大帮助的是一个名为 Batex 的插件,多亏了它,我可以导出我的资产而不必担心枢轴位置。我还会做很多事情是将大量资产作为单一资产的父级,然后通过 batex 仅导出一个父级,因此一旦将其导入 Unreal,它就只是一个单一资产,但在 Blender 中,它仍然是独立的,因此我可以对其进行很多调整更轻松。我以这种方式节省了很多时间。
Just remember to select “combine meshes” while importing to Unreal.
只要记住在导入虚幻引擎时选择“组合网格”即可。
Polishing
Once I was satisfied with blockout I started working from bottom to top on polishing assets, adding more geometry, setting up UVs, etc. That was probably the most time consuming part of the whole project.
To help with UVing I used UVPackmaster for quick packing and to calculate proper texel I used Texel Density Checker.
抛光
一旦我对遮挡感到满意,我就开始从下到上打磨资产、添加更多几何体、设置 UV 等。这可能是整个项目中最耗时的部分。
为了帮助 UVing,我使用 UVPackmaster 进行快速打包并计算正确的纹素,我使用了纹素密度检查器。
To save on time I used a single mesh decal with baked damage on a normal map for most of my surfaces to add a little bit more polish to the scene. You can see on the Blender screenshot that I used it pretty much everywhere I could. Check out this tutorial from how to make it.
为了节省时间,我在法线贴图上为我的大部分表面使用了带有烘焙损坏的单个网格贴花,为场景添加了更多的润色。您可以在 Blender 屏幕截图中看到,我几乎在所有可以使用的地方都使用了它。查看的本教程如何制作它。
ZBrush
I still ended up sculpting some assets like rocks, statues and gravestones, but I didn’t want to spend too much time on these since I was still miles away from finishing and focusing too much on a single asset is not the best idea, especially while working on such a big scene. I think it’s best to move forward as fast as you can and come back later if you think an asset needs additional tweaking.
ZBrush
我最终还是雕刻了一些资产,比如岩石、雕像和墓碑,但我不想在这些上花费太多时间,因为我离完成还有很长的路要走,过分关注单一资产并不是最好的主意,尤其是在处理这么大的场景时。我认为最好尽可能快地前进,如果您认为资产需要额外调整,请稍后再回来。
When it comes to brushes I generally use the Orb package, hPolish, TrimDynamic and ClayBuildup. For rocks I highly recommend using TrimSmoothBorder brush with square alpha.
说到画笔,我通常使用 Orb 包、hPolish、TrimDynamic 和 ClayBuildup。对于岩石,我强烈推荐使用带有方形 alpha 的 TrimSmoothBorder 笔刷。
UDIM’s
For some of the bigger assets, I used UDIMs to save time (). It’s generally not advised to use UDIMs for game asset production because it’s very expensive. In my case, it helped a lot with the seamless texturing of big assets like rocks and dragon.
UDIM
对于一些较大的资产,我使用 UDIM 来节省时间(https://www.youtube.com/watch?v=PJQpB_q4Yl0)。通常不建议将 UDIM 用于游戏资产制作,因为它非常昂贵。就我而言,它对岩石和龙等大型资产的无缝纹理有很大帮助。
Characters
For characters I downloaded a simple base mesh I found online, adjusted proportions and set up basic armature for posing. Once I was happy with the pose I moved on to making clothes and accessories for every character.
人物
对于角色,我下载了一个我在网上找到的简单基础网格,调整了比例并设置了基本骨架来摆姿势。一旦我对这个姿势感到满意,我就开始为每个角色制作衣服和配饰。
Shaders
The main shader is actually very simple, all I needed was some color manipulation, tile editing and an easy way to quickly adjust values of other textures like roughness and normal map.
着色器
主着色器实际上非常简单,我所需要的只是一些颜色处理、平铺编辑以及快速调整其他纹理值(如粗糙度和法线贴图)的简单方法。
I ended up using simple tileable textures with overlaid color through the shader, so I could get lots of color variations with a small number of textures.
我最终通过着色器使用了带有叠加颜色的简单可平铺纹理,因此我可以通过少量纹理获得大量颜色变化。
Water shader is very simple, nothing mind blowing.
水着色器很简单,没什么大不了的。
And here’s waterfall’s shader, what it basically does is just panning texture in Y-axis with some vertex transformation from grayscale texture, again, nothing too fancy. Once I was satisfied with the result I moved on quickly to another thing.
这是瀑布的着色器,它基本上只是在 Y 轴上平移纹理,并从灰度纹理进行一些顶点转换,再一次,没什么太花哨的。一旦我对结果感到满意,我就迅速转向另一件事。
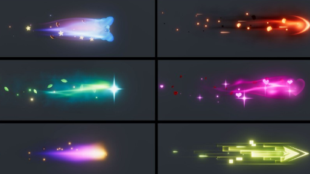
VFX
Getting into VFX with Niagara was rough at first, especially for someone like me that never got to do much VFX before, but after working with it for this project I realized it’s actually not that bad! I watched a few videos explaining essential stuff and the rest was just me figuring stuff out from various videos and googling.
视觉特效
刚开始使用 Niagara 进行 VFX 很艰难,尤其是对于像我这样以前从未做过太多 VFX 的人来说,但是在为这个项目使用它之后,我意识到它实际上并没有那么糟糕!我看了一些视频来解释基本的东西,剩下的只是我从各种视频和谷歌搜索中找出东西。
If you’re looking to get a specific effect I highly recommend checking out youtube tutorials and just try following them, but adjust settings however you wish to get the desired result.
如果您希望获得特定效果,我强烈建议您查看 youtube 教程并尝试按照它们进行操作,但可以根据您希望获得所需结果调整设置。
To get started I recommend these videos:
https://www.youtube.com/watch?v=fwKQyDZ4ark
https://www.youtube.com/watch?v=VEG-Xp92cBk
https://www.youtube.com/watch?v=1Ow0HrPMnbs
https://www.youtube.com/watch?v=ERGmD0PY3Dw
https://www.youtube.com/watch?v=Zbwqmenw7pA&t=1s
https://www.youtube.com/watch?v=erIc7rcsmps
https://www.youtube.com/watch?v=Odx0aEn2yEE
That’s basically all I watched to help me with making VFX.
这基本上就是我观看的所有内容,以帮助我制作 VFX。
Post Process
Post-process has been something I kept adjusting as the project went on. I generally wanted to have a little bloom, saturation and contrast and I tried to avoid pitch-black shadows.
后期处理
随着项目的进行,我一直在调整后期处理。我通常希望有一点光晕、饱和度和对比度,并试图避免漆黑的阴影。
Lighting
Lighting was challenging for sure and honestly, I’m not an expert when it comes to that, so this was the step I tried to gather as much feedback as possible.
I had Key Light from the left side, Fill Light from the right side, some lights from the back to help highlight edges of the scene and then used small point lights to highlight smaller areas.
In the end, this setup worked for me, but I can’t say if it’s generally a good approach for this type of scene. Didn’t bake any lightmaps, just Lumen.
灯光
照明确实具有挑战性,老实说,在这方面我不是专家,所以这是我试图收集尽可能多的反馈的步骤。
我有左侧的主光,右侧的填充光,后面的一些灯有助于突出场景的边缘,然后使用小点灯突出较小的区域。
最后,这个设置对我有用,但我不能说它是否适合这种场景。没有烘焙任何光照贴图,只是流明。
Conclusion
I had a lot of fun with this project and I’m very satisfied with how it came out. I hope you find the article informative and thank you for reading!
It was a very time-consuming process for me, especially while working full-time and trying to beat Elden Ring, but I always tried at least to spend 1 hour each day If I could and this is my advice to anyone that struggles with finishing projects – If there’s a day that you don’t feel like working on your personal project I recommend just opening up your 3D software and try to spend 10 minutes modeling and if you really don’t want to keep going after that just take a break and try again tomorrow.
I had days when I just dreaded thinking about opening Blender, but once I did and started working it was much easier to keep the flow going.
Another piece of advice I can give is to always keep looking for feedback on your work and listen to people with experience, join discord groups, share your work and most importantly – do what you enjoy. Lots of thanks to GamesArtist for reaching out to me and giving me this opportunity to share my work and knowledge, if you have any questions feel free to message me at or .
结论
我在这个项目中玩得很开心,我对它的结果非常满意。我希望你能发现这篇文章内容丰富,感谢你的阅读!
这对我来说是一个非常耗时的过程,尤其是在全职工作并试图击败 Elden Ring 时,但如果可以的话,我总是尝试每天至少花 1 小时,这是我对任何难以完成的人的建议项目——如果有一天你不想做你的个人项目,我建议你打开你的 3D 软件,试着花 10 分钟建模,如果你真的不想继续做,那就休息一下明天再试一次。
曾经有几天我只是害怕考虑打开 Blender,但是一旦我这样做并开始工作,保持流程就容易多了。
我可以给出的另一条建议是,始终不断地寻找对你工作的反馈,倾听有经验的人的意见,加入不和谐的小组,分享你的工作,最重要的是——做你喜欢的事。非常感谢 GamesArtist 与我取得联系,让我有机会分享我的工作和知识,如果您有任何问题,请随时在https://www.artstation.com/uberone或https://www.linkedin.com/in/artur-romanov-806293142/给我留言。
|


 评分
评分