您需要 登录 才可以下载或查看,没有账号?注册

x
本帖最后由 秋令6689 于 2022-4-8 17:10 编辑
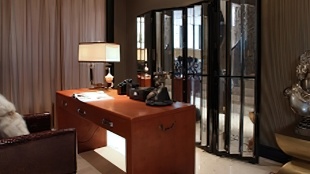
NOVA III Space Station – Environment Breakdown – Maxime Larivière NOVA III空间站 – 环境分解 – 马克西姆·拉里维耶尔

Intro Hi everyone. Today I’ll talk a bit about , the main purpose of this project was to learn and play with some workflow, a kind of sandbox for where rules aren’t really defined. I saw this project as a kind of digital paint where you start to draw some shapes in grey values then you start to see things from them and finally you refine until it becomes something. I had nothing defined in mind at the beginning, this project was more about experiments. At the same time, I was playing a lot with , and some other Blender addons, and I really wanted to see how to use them outside of Blender. 介绍 大家好。今天我将谈谈NOVA III空间站,这个项目的主要目的是学习和玩一些工作流程,这是一种没有真正定义规则的沙箱。我把这个项目看作 是一种数字绘画,你开始用灰色值绘制一些形状,然后你开始从中看到东西,最后你改进,直到它变成某种东西。一开始我脑子里没有定义任何 东西,这个项目更多的是关于实验。与此同时,我经常使用贴花机,Hardops和其他一些Blender插件,我真的很想看看如何在Blender之外使用它 们。 What software did you use? 使用了什么软件? In term of software, Blender is my main modeling tool for some years now, all the addons ecosystem help to create a software that fit your needs so much that I’ll probably be lost on a fresh Blender setup, if you need a tool, look at blenderartists.org someone has probably already made something for that. For decals and signs, I use another great free and open-source software… and Finally Substance Painter for procedural masks, smart materials and roughness textures also for baking and painting props like the drone. 在软件方面,Blender是我几年来的主要建模工具,所有的插件生态系统都有助于创建一个适合您需求的软件,以至于我可能会在新的Blender设 置中迷失方向,如果你需要一个工具, 看看 blenderartists.org 有人可能已经为此做了一些东西。对于贴花和标志,我使用Krita 另一个伟大的免费和开源软件...最后是用于程序面 具的物质画家,智能材料和粗糙纹理,也用于烘焙和绘画无人机等道具。 References/Inspiration 参考/灵感 Even if I like almost everything from medieval castles to tiny stylized houses, I’ve always been attracted by sci-fi: straight lines, curves, pipes, slick materials, mix between design and industrial elements, I spend a lot of time analyzing some scenes and object from various artworks or games, like Doom, star citizen, unreal tournament maps and many others. For this project, I gather references from those artworks, even If I try to design elements from scratch, I can’t think about every tiny detail, having PureRef on a side monitor is always a must-have. 即使我喜欢几乎所有的东西,从中世纪的城堡到小的风格化的房子,我总是被科幻小说所吸引:直线,曲线,管道,光滑的材料,设计和工业元 素之间的混合,我花了很多时间分析各种艺术品或游戏中的一些场景和物体,如Doom,Star Citizen,虚幻的锦标赛地图等等。对于这个项目, 我从这些艺术品中收集参考资料,即使我试图从头开始设计元素,我也不能考虑每一个微小的细节,在侧面显示器上拥有PureRef总是必须的。 Planning 规划 I would love to show you my Trello, but in fact, there was not any plan for this project, it was just like taking time to read a book, or play some games. Most of my side projects were props, bots, or things I can achieve in a small amount of time, but this one was more long term, at one point I wasn’t sure if I wanted to push it or just delete the project folder, it’s not always easy to keep motivation over time, and I think it’s important to remember that you go forward piece by piece. I should probably thank my friends too for honest feedbacks and for giving me the motivation to get it to the end. Starting a project without even a blurry deadline or the vision of what you want to create is not something I can recommend. This is probably the best way to never get it finished. 我很想给你看我的Trello,但实际上,这个项目没有任何计划,就像花时间读一本书,或者玩一些游戏。我的大多数副项目都是道具,机器人或 我可以在很短的时间内实现的东西,但这个是更长期的,在某一时刻我不确定我是想推动它还是只是删除项目文件夹,随着时间的推移保持动力 并不总是那么容易,我认为重要的是要记住你一点一点地前进。我可能也应该感谢我的朋友诚实的反馈,并给了我动力让它走到最后。在没有模 糊的截止日期或你想要创建的东西的愿景的情况下开始一个项目,这不是我可以推荐的。这可能是永远不完成它的最佳方式。 Blockout/Modelling 屏蔽/建模 For the Nova Space Station, it starts with modular walls, then some tests into Unreal and make some rooms to play with modularity and space and see if everything behave as expected. I quickly made placeholders for tests then add new modules until I was able to have enough liberty to build the layout. 对于新星空间站,它从模块化墙壁开始,然后对虚幻引擎进行一些测试,并腾出一些空间来玩模块化和空间,看看一切是否都按预期运行。我快 速为测试制作了占位符,然后添加新模块,直到我能够有足够的自由来构建布局。 Once I started to have something I put on some lights and see how it react, I like to put some lights in my blocking process, it helps to have a better idea of volumes, space, and see where you might land in your scene, most of the directions I took were based on feeling at this point. At the same time, Things start to get out of the dark, talking and showing my progress to my friends was helpful to see what people think this place can be. I start to think about some stories and functions of these rooms, it helps to define the props I’ll need. another element that led the list of objects is the relationship between the walls, the ceiling and the floor, I needed some objects to create a kind of ripples that connect the whole assembly. 一旦我开始有东西,我就会放一些灯,看看它的反应如何,我喜欢在我的阻挡过程中放一些灯,这有助于更好地了解体积,空间,并查看你可能 在场景中的位置,我采取的大多数 方向都是基于此时的感觉。与此同时,事情开始走出黑暗,与我的朋友交谈和展示我的进步有助于了解人们认为这个地方可以是什么样子。我开 始思考这些房间的一些故事和功能,这有助于定义我需要的道具。导致对象列表的另一个元素是墙壁,天花板和地板之间的关系,我需要一些对 象来创建一种连接整个组件的涟漪。 In terms of the modeling process, I started with simple shapes to see how they take place within the scene, then I refine the geometry and split materials according to my needs, at this point I start adding decals and plugs like wire tubes and go back to the model when needed. I used Hardops and (Blender Addons) as a part of the modeling process for chamfers and other great features those addons have to offer, then I cleaned Ngons and add a Weighted normal modifier to straighten normals on meshes. Each Asset contains most of the time 3 materials for surfaces and Decals material: one main material which covers most of the surface, then another that can be metallic part of the colored element to give some accent, and finally, the last one which contains decal material. Here is a simplified example of the different steps: 在建模过程中,我从简单的形状开始,看看它们在场景中是如何发生的,然后我根据需要优化几何形状和分割材料,此时我开始添加贴花和插头 ,如钢丝管,并在需要时返回模型。我使用Hardops和(Blender Addons)作为倒角和这些插件必须提供的其他强大功能的建模过程的一部分,然 后我清理了Ngons并添加了加权法线修饰符以拉直网格上的法线。每个资源在大部分时间包含3种表面和贴花材料材料:一种主要材料覆盖大部分 表面,另一种可以是彩色元素的金属部分以提供一些口音,最后一种是包含贴花材料的最后一种材料。 以下是不同步骤的简化示例: Uving / Baking UVing was almost straightforward, DecalMachine took care to unwrap trims on poly strips, then put all the rest of UV’s into an empty space within the trim texture within a single click, I had to use a second UV set to map tileable roughness and normal with the right ratio. In the beginning, I planned to bake everything to generate blend mask textures for layered materials but finally, I went with basic baking for the drone, the crate, and some other props. For the rest, I used Geometry decals that shared the same textures and trim textures that make the process way faster. 紫外线/烘焙 UV几乎是直截了当的,DecalMachine小心翼翼地打开聚乙烯条上的装饰,然后在一次点击中将所有剩余的UV放入修剪纹理内的空白空间中,我不 得不使用第二个UV集来映射可平铺的粗糙度和正常比例。一开始,我计划烘焙所有内容,为分层材料生成混合蒙版纹理,但最终,我选择了无人 机,板条箱和其他一些道具的基本烘焙。对于其余部分,我使用了共享相同纹理的几何贴花和修剪纹理,使流程更快。 For trims, I Create Geometry on a plane then I baked materials IDs, AO and Normal. Material ID were used as masks to set different colors/roughness within unreal material. Tilable roughness texture is added within UE material with an exposed Texcoord multiplier parameter in order to be tweaked afterward according to object scale. 对于修剪,我在平面上创建几何图形,然后我烘焙材料ID,AO和法线。材质 ID 用作蒙版,以在虚幻材质中设置不同的颜色/粗糙度。可平铺粗糙 度纹理通过暴露的 Texcoord 乘法器参数添加到 UE 材质中,以便之后根据对象比例进行调整。 Materials For materials, nothing complex, most of the time, I made a simple master material which contains many parameters to tweak roughness, colors, textures slots. It’s easy to make fine adjustments later in the process. there were some materials that use masks and emissive stuff like flickering and panning but, everything was still simple. I wanted the details to be seen up close and for the silhouette to take over, and then the decals and/or vertex paint to break the repetition. Textures within these materials are most of the time, composed of a tileable roughness and normal map, colors are driven by a constant three vector which allows me to change color easily if I need to. 材料 对于材料,没有什么复杂的,大多数时候,我做了一个简单的母版材料,其中包含许多参数来调整粗糙度,颜色,纹理槽。在此过程的后期很容 易进行微调。有一些材料使用面具和闪烁和平移等发光的东西,但是,一切都很简单。我希望细节可以近距离观察,让轮廓占据主导地位,然后 贴花和/或顶点油漆来打破重复。这些材质中的纹理大部分时间由可平铺的粗糙度和法线贴图组成,颜色由恒定的三个矢量驱动,使我能够在需要 时轻松更改颜色。 Megascans MegaScans assets were helpful to fill outskirt with rocks, I didn’t want it to be too much present in the scene as I wanted to focus on the interior, but it helps to give some clues about the environment, I also use some surfaces imperfections and leaks textures from their library. Even if most of my materials were slick, adding some to the roughness makes the surface more attractive. 巨型扫描 MegaScans资源有助于用岩石填充郊区,我不希望它在场景中出现太多,因为我想专注于内部,但它有助于提供有关环境的一些线索,我还使用了 一些表面缺陷和从他们的库中泄漏纹理。即使我的大多数材料都很光滑,在粗糙度上添加一些瑕疵也会使表面更具吸引力。 Shaders/Technical In addition to Meshes Decals, I used vertex paint on materials where each RGB channel drives rake, roughness texture blend or grey lines, for edges wear and adding extra details across modules. I used the same technique on the ground for puddles and dirt. once more, nothing complex here, just lerp textures with Vertex colors. I used Spline Meshes blueprints for pipes, small wires and decals like footsteps or ground lines, it’s really convenient to dress some parts or surfaces, there are plenty of tutorials about how to make it, like this . 着色器/技术 除了网格贴花之外,我还在材料上使用顶点油漆,其中每个RGB通道驱动前角,粗糙度纹理混合或灰色线条,用于边缘磨损并在模块之间添加额外 的细节。我在地面上对水坑和泥土使用了相同的技术。再一次,这里没有什么复杂的,只是带有顶点颜色的lerp纹理。我使用样条网格蓝图来制 作管道,小电线和贴花,如脚步声或地面线,对某些零件或表面进行修饰非常方便,有很多关于如何制作的教程,就像这个样。 Polish/Final pass With slick materials and tileable textures, I used a lot of decals too, but not within meshes this time: dirt, leaks, signs footsteps… helps to break repetitions across modules and add a new layer of details. For ground stripes and footsteps, I used spline mesh with a decal material. Add some world particles helps du give more depth to the scene, even more, when you plan to make the camera traveling. 波兰语/最终通过 对于光滑的材料和可平铺的纹理,我也使用了很多贴花,但这次不在网格内:污垢,泄漏,标志脚步声......有助于打破跨模块的重复,并添加 新的细节层。对于地面条纹和脚步声,我使用了带有贴花材料的样条网格。添加一些世界粒子有助于在计划让摄像机行驶时为场景提供更多深度 ,甚至更多。 Lighting As mentioned earlier, I started with directional light at an early stage just to have an idea of windows locations, ceiling holes, then I start to put some light fixtures on darker areas. I like to set my directional a bit warm because that kind of environment seems cold (metal, rubber and slick materials don’t help). To give more atmosphere, I played with some volumetric fog with warm color too, everything started to be ‘orange’, so I added some blue colors for the walls, some light fixtures and emissive elements. The difficulty here was to get a lot of light from outside but avoid dark spots and keep things readable. I spent a lot of time on this step by tweaking lights, colors and intensity and re-bake everything with Lighmass. 照明 如前所述,我在早期阶段就开始使用定向光,只是为了了解窗户的位置,天花板孔,然后我开始在较暗的区域放置一些灯具。我喜欢把我的方向 设定得有点暖和,因为那种环境看起来很冷(金属,橡胶和光滑的材料无济于事)。为了营造更多的氛围,我玩了一些带有暖色调的体积雾,一 切都开始是“橙色”的,所以我为墙壁添加了一些蓝色,一些灯具和发光元素。这里的困难是要从外面获得大量的光线,但要避免黑点并保持事 物的可读性。我花了很多时间在这一步上调整灯光,颜色和强度,并用Ligghmass重新烘焙一切。 Rendering I discovered a YouTube channel from full of useful information about lighting and rendering and cameras. I tried MovieRenderQueue and it’s a great tool that allows you to have control of your render, I also used some Sharpen post process and color adjustment within the Engine. 渲染 我发现了一个YouTube频道,里面充满了有关照明、渲染和摄像机的有用信息。我尝试了MovieRenderQueue,这是一个很棒的工具,可以让你控制 你的渲染,我还在引擎中使用了一些锐化后期处理和颜色调整。 Conclusion This project was fun to do, and it’s nice to practice and test new things, however, it’s not always easy to stay motivated over time, especially for a side project when you can only allow a small amount of time by day. In any case, I am happy with the result and even if I could probably have pushed further, I was able to learn new things, which remains my main goal. 结论 这个项目很有趣,练习和测试新事物很好,但是,随着时间的推移,保持动力并不总是那么容易,特别是对于一个副业项目,当你每天只能留出 少量时间时。无论如何,我对结果感到满意,即使我本可以进一步推动,我也能够学习新事物,这仍然是我的主要目标。
| 
 显示全部 7