您需要 登录 才可以下载或查看,没有账号?注册

x
本帖最后由 秋令6689 于 2022-5-17 15:36 编辑
Samurai Mercenary – Character Breakdown – Robin-Julian Lee 武士佣兵 – 角色分解 – 罗宾-朱利安·李
Introduction Hey! I’m Robin-Julian Lee, currently a Junior 3D artist at Elite3d, where I have worked on a couple of AAA productions over the past years. In this article, I want to show you the workflows and techniques I used to create my latest project, the Samurai Mercenary. With this project, I wanted to go through the whole pipeline of the creation of armor, from conception to the final renders. Since I am used to doing props and environments at work it was really refreshing to do something new and different. 介绍 嘿!我是Robin-Julian Lee,目前是Elite3d的3D艺术家,在过去的几年里,我在那里工作过几部AAA级作品。在本文中,我想向您展示我用来创 建最新项目“武士雇佣兵”的工作流程和技术 。通过这个项目,我想经历盔甲创作的整个流程,从概念到最终的渲染。由于我习惯于在工作中做道具和环境,所以做一些新的和不同的事情真 的很令人耳目一新。
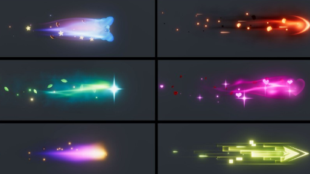
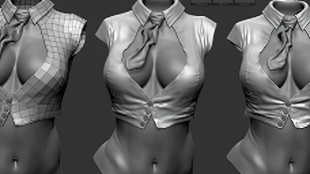
Planning 规划 Like any other project, I started with collecting ideas and references. I knew from the beginning that I wanted to integrate the owl theme into the Armor in some way. I especially found a huge fascination with the barn owl, whose colours would determine the dye of the Samurai. 像任何其他项目一样,我从收集想法和参考资料开始。我从一开始就知道我想以某种方式将猫头鹰主题融入盔甲中。我特别对谷仓猫头鹰产生了 极大的迷恋,它的颜色决定了武士的染料。 The first major issue I encountered during the planning stage, was the design of the Armor plates. I just didn’t feel very happy with the ones I had in my reference sheet. After looking around for a bit longer, I came to the conclusion that it would be better to design them myself. 我在规划阶段遇到的第一个主要问题是装甲板的设计。我只是对参考表中的那些感到不太满意。在环顾四周后,我得出的结论是,最好自己设计 它们。 Modelling Workflow 建模工作流程 Moving onto the modelling and blocking. Here you can see one of the methods I utilized to design the shoulder plates. I am a huge fan of non-destructive iterative workflows. They allow you to make quick changes in your design and keep your meshes clean and consistent. In this case, I used the array and lattice modifiers a lot. This allowed me to have a good preview of what the end result will look like while working on a non-deformed simple mesh. In my case I used Blender but there are ways to replicate these results in other 3d software. 进入建模和阻止。在这里,您可以看到我用来设计肩板的方法之一。我是非破坏性迭代工作流的忠实粉丝。它们允许您快速更改设计,并保持网 格的清洁和一致。在本例中,我经常使用数组和格修饰符。这使我能够很好地预览在处理非变形的简单网格时最终结果的外观。在我的情况下, 我使用了Blender,但有一些方法可以在其他3D软件中复制这些结果。 I highly advise you to explore the capabilities of each toolset for a more effective workflow, it really helps. Always be open to finding new ways of doing things, never settle with your current pipeline. This practice will also help you a lot when dealing with working in the industry. Things here are always changing. 我强烈建议您探索每个工具集的功能,以实现更有效的工作流程,这确实很有帮助。始终乐于寻找新的做事方式,永远不要满足于当前的管道。 在处理在行业中工作时,这种做法也会对你有很大帮助。这里的事情总是在变化。 In this project, I did a lot of the pre-work in Blender, before putting it into ZBrush to add the final details. I just feel more comfortable blocking things out in my modelling software. But I can see myself shifting more towards Zbrush for the blocking in the future. 在这个项目中,我在Blender中做了很多前期工作,然后把它放到ZBrush中以添加最终的细节。我只是觉得在我的建模软件中屏蔽东西更舒服。但 我可以看到自己将来会更多地转向Zbrush进行阻止。 Clothing 服装 For the clothing, I used Marvellous designer. I was quite fortunate to find some good patterns online, which helped me a lot, especially with the pants. The biggest challenge though came after creating all the patterns, let me tell you, it was a painstaking process of getting the shape and folds in the correct way. In the end, I used extra meshes which I modelled in Blender to support the shape. 对于服装,我使用了Marvellous设计师。我很幸运在网上找到了一些好的模式,这对我帮助很大,尤其是裤子。然而,最大的挑战是在创建所有 图案之后,让我告诉你,这是一个以正确的方式获得形状和褶皱的艰苦过程。最后,我使用了我在Blender中建模的额外网格来支持形状。 This part was for me more like a trial and error, of changing some settings and pressing the simulate button. I am really not too proud of the way I had to do things here but was nonetheless happy with the result I got in the end. 对我来说,这部分更像是一次试错,改变一些设置并按下模拟按钮。我真的不太为我在这里做事的方式感到自豪,但仍然对我最终得到的结果感 到满意。 Sculpting in ZBrush 在 ZBrush 中雕刻 After feeling happy with the shapes and the overall block out it was time to throw everything into ZBrush. Here I started adding details like folds and ornaments. I used a lot of different alphas and custom brushed for this part. 在对形状和整体块感到满意之后,是时候将所有内容都扔进ZBrush了。在这里,我开始添加褶皱和装饰品等细节。我为这部分使用了很多不同的 alpha和自定义刷子。 The by far biggest challenge was the chest piece. I really wanted to improve my sculpting skills. So the huge area gave me the perfect opportunity to do something big. To create the Owl and the clouds I started by masking out the main shapes and extruding them layer after layer to give the sculpt some depth. 到目前为止,最大的挑战是胸部。我真的很想提高我的雕刻技巧。因此,这个巨大的区域给了我一个做大事的绝佳机会。为了创造猫头鹰和云朵 ,我首先遮盖了主要形状,并将它们一层一层地挤出,以赋予雕塑一定的深度。 Afterward, I sculpted in the fine details. I really fell in love here with the Slash2 Brush which came in handy for sculpting the feathers. 之后,我雕刻了精细的细节。我真的爱上了这里的Slash2刷子,它可以用来雕刻羽毛。 Texturing 纹理 Now I want to get a bit more into detail on the texturing. While working on the textures I always switch between the different channels, mainly the albedo and the roughness. That gives you a different perspective on your Asset and really helps to improve your final result. I usually like adding dirt and leak types with different roughness values, that will make your textures instantly more interesting and give them more depth. For the colour palette, I chose to go with the colours of the barn owl as mentioned before. 现在我想更详细地介绍一下纹理。在处理纹理时,我总是在不同的通道之间切换,主要是反照率和粗糙度。这为您提供了对资产的不同视角,并 真正有助于改善您的最终结果。我通常喜欢添加具有不同粗糙度值的污垢和泄漏类型,这将使您的纹理立即更有趣,并赋予它们更多的深度。对 于调色板,我选择使用前面提到的谷仓猫头鹰的颜色。 Less is more. The issue which popped up already in the early stages of the texturing was the uniformity of the Armor plates. It made the whole Armor look really boring. My solution was to select some of the rows and give them a different colour. The result was ok, but I was still not satisfied here. To push it even further, I selected random tiles and gave them a small tint. That really made the overall colours more interesting and added some storytelling to it. As plates would be replaced over time. 少即是多。在纹理加工的早期阶段已经出现的问题是装甲板的均匀性。这让整个盔甲看起来真的很无聊。我的解决方案是选择一些行并给它们不 同的颜色。结果还可以,但我在这里仍然不满意。为了进一步推动它,我选择了随机的瓷砖,并给它们一个小色调。这确实使整体颜色更加有趣 ,并增加了一些故事讲述。因为随着时间的推移,板材将被更换。 Be careful though not to overdo this, you don’t want to end up with a sparkling rainbow samurai. Keep the tints subtle and don ’t make all the plates individual. You want some variation not an explosion of colours. 要小心,但不要过度这样做,你不想以一个闪闪发光的彩虹武士结束。保持微妙的色调,不要让所有的盘子都是单独的。你想要一些变化,而不 是颜色的爆炸。 To push the materials even further, it really helps to think about the way the materials work, how they are layered and how they were created. Think about the way your materials would wear overtime etc. At this point I would like to recommend the hand-drill tutorial by Jason Ord on Artstation learning – , I used a lot of his texturing techniques and it really helped me to improve the overall quality of my project. There is really not much I can add to his course. 为了进一步推动材料的发展,思考材料的工作方式,它们的分层方式以及它们是如何创建的,这确实很有帮助。 pushing-your-texturingfurther/chapters/d3J/introduction,我使用了很多他的纹理技术,这真的帮助我提高了项目的整体质量。我真的没有 太多可以添加到他的课程中。 Rigging and Posing 索具和姿势 Now, this is where your character really comes to life. For the posing, I went with some generic samurai poses. I really like the results I was able to get out of here. For the Rig I used the standard Rig which comes with Blender, I just had to adjust it a bit, but overall there were no major issues. Since the Armor consists mainly out of plates the weight painting was done rather quickly and easily. After completing the setup I could start with the fun part of posing the character. 现在,这是你的角色真正栩栩如生的地方。对于姿势,我选择了一些通用的武士姿势。我真的很喜欢我能从这里得到的结果。 对于Rig,我使用了Blender附带的标准Rig,我只需要稍微调整一下,但总的来说没有大问题。由于盔甲主要由板材组成,因此重量绘画相当快速 和容易地完成。完成设置后,我可以从摆姿势角色的有趣部分开始。 Rendering 渲染 Finally, I rendered my result in Marmoset Toolbag 4. For the lighting, I used a combination of hard and soft lights. Nothing special here, soft lights from the HDRI and the directional lights and hard lights from the spotlights to highlight certain areas. For my usual setup, I create for each individual shot an extra camera and a sky. This may sound a bit tedious but it really helps to push the quality of each shot. When I am satisfied with the result I render the image out in a super high resolution and give it some postprocessing in photoshop. 最后,我在Marmoset Toolbag 4中呈现了我的结果。对于照明,我使用了硬光和软光的组合。这里没什么特别的,HDRI的柔和灯以及聚光灯的定 向灯和硬灯可以突出某些区域。对于我通常的设置,我为每个单独的镜头创建一个额外的相机和一个天空。这听起来可能有点乏味,但它确实有 助于提高每个镜头的质量。当我对结果感到满意时,我会以超高分辨率渲染图像,并在photoshop中对其进行一些后处理。 Final Advice 最终建议 Now you will hear this quite often but I wouldn’t say it again if it wasn’t important. Never shy away to ask for feedback, especially when you are working on a project for over several months. Over time it is easy to develop tunnel vision and become oblivious to the most obvious mistakes. I know that it can be really soul-crushing sometimes but to have those extra eyes really helps to push the project to the Next Level. 现在你会经常听到这个,但如果它不重要,我不会再说一遍。永远不要回避寻求反馈,特别是当你在一个项目上工作超过几个月时。随着时间的 流逝,人们很容易发展出隧道视野,并忘记最明显的错误。我知道有时候可能会让人心碎,但拥有这些额外的眼睛确实有助于将项目推向下一个 层次。 Outro 奥特罗 This concludes the breakdown of my project. I know how hard it is sometimes to go through an entire article, so if you made it this far you have really earned my respect. I tried to keep it short and simple, highlighting the more important aspects of my workflows. I hope that you had some fun reading this small summary of my journey. Finally, I would like to thank the team at GamesArtist.co.uk for giving me this opportunity to write about my project. I had a lot of fun doing this and it also gave me some time to reflect on my journey. 我的项目崩溃到此结束。我知道有时通读整篇文章有多难,所以如果你做到了这一点,你真的赢得了我的尊重。我试图保持简短和简单,突出我 的工作流程中更重要的方面。我希望你读到我旅程的这篇小总结时玩得开心。 最后,我要感谢 GamesArtist.co.uk 的团队给我这个机会来写我的项目。我做这件事很有趣,这也给了我一些时间来反思我的旅程。
| 
 显示全部 7