您需要 登录 才可以下载或查看,没有账号?注册

x
本帖最后由 七月纪旅。 于 2022-8-9 13:38 编辑

Introduction
Hi there! My name is Anna Stopina and I live in Toronto. Right now I am in my final year of the Game – Art Program at George Brown College. Game Environments always amazed me, so when I started my time in college, I already knew I wanted to be an environment artist and I never doubted my decision.
介绍
嘿,你好!我的名字是Anna Stopina,我住在多伦多。现在,我正处于乔治布朗学院游戏艺术课程的最后一年。游戏环境总是让我感到惊讶,所以当我开始上大学时,我已经知道我想成为一名环境艺术家,我从不怀疑我的决定。
After my second year in college, I wanted to work on my own scene over the summer. Unfortunately, I didn’t have much progress with it because I was constantly making adjustments and tweaks, solving problems that were not the priority at that stage of the project.
I realized that I needed help with my work approach and started looking for professional help. On social media, I stumbled upon the SkillTree platform. Since I am a fan of Billy Matjiunis’ artistic vision and I was also familiar with his effective teaching approach from the college, I decided to get mentorship from him.
大学二年级后,我想在夏天创作自己的场景。不幸的是,我没有取得太大进展,因为我不断进行调整和调整,解决项目阶段不是优先事项的问题。
我意识到我需要工作方法的帮助,并开始寻求专业帮助。在社交媒体上,我偶然发现了SkillTree平台。由于我是比利·马蒂尤尼斯(Billy Matjiunis)艺术视野的粉丝,而且我也熟悉他在学院的有效教学方法,所以我决定从他那里获得指导。
My main goals for the mentorship were to improve my skill in composition, work on the color palette of the scene, along with visual storytelling. I also wanted to establish visually interesting and appealing cinematic shots.
From a technical standpoint, I wanted to get better in texturing (both in the quality of the textures and in selecting the method of texturing).
我的主要指导目标是提高我的构图技巧,在场景的调色板上工作,以及视觉叙事。我还想建立视觉上有趣和吸引人的电影镜头。
从技术角度来看,我想在纹理方面做得更好(无论是在纹理的质量方面还是在选择纹理方法方面)。

Planning and Blocking
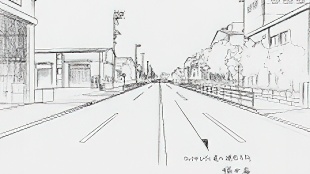
From the beginning, I knew that I wanted to create a scene with a strong nostalgic feeling and with an emphasis on storytelling.
规划和阻止
从一开始,我就知道我想创造一个具有强烈怀旧感并强调讲故事的场景。
I took a lot of inspiration from this collection of photographs.
我从这组照片中得到了很多灵感。
I started with a rough blockout of the main shapes to see how the space feels. I also placed a couple of cameras to see the space through their lenses.
我从主要形状的粗略块开始,看看空间的感觉。我还放了几台相机,通过他们的镜头看到这个空间。
Initially, I started with creating what, at that moment, I considered the most important props – a parlor stove and a chair. I also took a little bit of time and sculpted wood for the fireplace.
With Billy’s guidance, the approach has been shifted, and the first thing I did was to organize my reference board (props, materials, lighting, mood, particles, etc.), block-out everything, including small props.
When I did it, everything became way clearer – what to focus on first, where to put more details, what materials need to be created, what props should be modeled, etc. Here’s a small portion of my reference board.
最初,我开始创作一些东西,在那一刻,我认为是最重要的道具 - 客厅炉子和椅子。我还花了一点时间为壁炉雕刻木头。
在比利的指导下,方法已经发生了变化,我做的第一件事就是组织我的参考板(道具,材料,灯光,情绪,粒子等),将所有东西都屏蔽掉,包括小道具。
当我这样做时,一切都变得更加清晰 - 首先要关注什么,在哪里放置更多细节,需要创建哪些材料,应该对哪些道具进行建模等。这是我参考板的一小部分。
As a placeholder, on the wallpaper, I used a pattern extracted from a reference image, I don’t remember its source, I had it on my PC for a long time before I had a chance to use it.
作为占位符,在壁纸上,我使用了从参考图像中提取的图案,我不记得它的来源,在我有机会使用它之前,我在PC上放了很长时间。
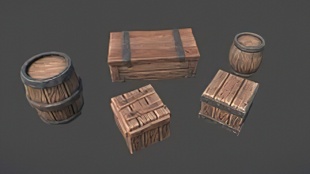
Modeling and Texturing
The next step was modeling and texturing the props.
建模和纹理
下一步是道具的建模和纹理。
All scene props were divided into two parts in terms of texturing, which affected their further creation: props that would use unique textures and tileable textures. More complex props would use unique textures, more generic would use tileable textures.
In my project, I had to break the rule in some cases because I don’t have a sufficient material library yet. Therefore, it was significantly faster to give a mesh an individual texture instead. Often, several small props shared one texture set.
所有场景道具在纹理方面分为两部分,这影响了它们的进一步创作:使用独特纹理和可平铺纹理的道具。 更复杂的道具将使用独特的纹理,更通用的道具将使用可平铺的纹理。
在我的项目中,在某些情况下,我不得不打破规则,因为我还没有足够的材料库。因此,为网格提供单独的纹理要快得多。通常,几个小道具共享一个纹理集。
The main advantage of texturing a prop with a unique texture is endless possibilities to give a prop a more elaborate story, more character by adding several layers of unique details, you’re not limited by the number of textures you can use in the engine. The main drawback, however, is that it is a time-consuming process.
On the other hand, the main advantage of using tileable textures and masks is its speed. A lot of the time was spent in Substance 3D Designer creating decent textures. As soon as I had the texture I needed on hand, I was pretty much halfway there.
用独特的纹理纹理道具的主要优点是无限的可能性,通过添加多层独特的细节来赋予道具更精细的故事,更多的角色,你不受可以在引擎中使用的纹理数量的限制。然而,主要缺点是这是一个耗时的过程。
另一方面,使用可平铺纹理和蒙版的主要优点是它的速度。很多时间都花在 Substance 3D Designer 上,创造了体面的纹理。一旦我手头上有我需要的质地,我就差不多完成了一半。
For objects with individual textures, I used a standard high to low poly workflow. I would model a base mesh in 3ds Max, sculpt details in ZBrush, make a low poly version in 3ds Max, and finally bake maps and texture a model in Substance 3D Painter. Here, I should mention that since it was my personal project, I used some extra polygons for my low poly to achieve a better silhouette of a prop.
对于具有单个纹理的对象,我使用了标准的从高到低的多边形工作流程。我会在3ds Max中对基本网格进行建模,在ZBrush中雕刻细节,在3ds Max中制作低多边形版本,最后在Substance 3D Painter中烘焙贴图和纹理模型。在这里,我应该提到,由于这是我的个人项目,我为我的低多边形使用了一些额外的多边形,以实现更好的道具轮廓。
I only scratched the surface of RGBA Masks workflow before and I wanted to learn it more in-depth and practice it in my project.
To create tileable textures, I used Substance 3D Designer. The chosen texel density for the scene was 2048x2048 for 1.5 square meters, and all my materials were created with this texel density in mind.
我之前只触及了RGBA Masks工作流程的表面,我想更深入地了解它并在我的项目中进行实践。
为了创建可平铺纹理,我使用了 Substance 3D Designer。为场景选择的纹素密度为 2048x2048,为 1.5 平方米,我的所有材质都是在考虑这种纹素密度的情况下创建的。
Since it’s a similar approach for all props I textured with tileable textures, I will take the dresser from the scene as an example.
I divided my texturing process with tileable materials and RGBA masks into three stages.
由于对于我使用可平铺纹理进行纹理纹理的所有道具,这都是类似的方法,因此我将以场景中的梳妆台为例。
我将使用可平铺材料和RGBA面具的纹理加工过程分为三个阶段。
1. Create a base mesh. Create materials. Create a proxy mesh for Substance 3D Painter.
Before making anything, I had to decide what would be modeled and what would be added by using textures and decals.
1. 创建基础网格。创建材质。为物质 3D 绘制器创建代理网格。
在制作任何东西之前,我必须决定使用纹理和贴花对哪些内容进行建模以及添加哪些内容。
For the dresser, I decided that the body will be a mid poly model, it will need clean and damaged wood textures and some damaged wood decals.
However, since I wanted to give some extra details for the dresser pulls and decals, which I would not be able to achieve using this method, I assigned them separate material IDs. I had 3 material IDs for the dresser in total.
对于梳妆台,我决定车身将是中聚模型,它需要干净和损坏的木材纹理和一些损坏的木材贴花。
但是,由于我想为梳妆台拉动和贴花提供一些额外的细节,而使用此方法我无法实现这些细节,因此我为它们分配了单独的材料ID。我总共有3个梳妆台的材料ID。
The body of a dresser I modeled in 3ds Max. To give my base mesh a high poly look, I chamfered all my hard edges and applied the Weighted Normals Modifier.
我在3ds Max中建模的梳妆台的机身。为了给我的基础网格一个高多边形外观,我倒角了所有的硬边,并应用了加权法线修改器。
For the pulls, I did a sculpt in ZBrush and baked the Normal map in Substance 3D Painter.
为了拉动,我在ZBrush中进行了雕刻,并在Substance 3D Painter中烘焙了法线贴图。
After the dresser was modeled and I was sure I would not need to make any changes in the model, I started preparing the mesh for blend masks. I duplicated my UV to the second UV channel and packed it there in 0-1 UV space. I duplicated my mesh, moved my UV from the second UV channel to the first, and exported the latter for further baking in Substance 3D Painter.
在梳妆台建模后,我确信我不需要对模型进行任何更改,我开始为混合蒙版准备网格。我将UV复制到第二个UV通道,并将其包装在0-1 UV空间中。我复制了我的网格,将UV从第二个UV通道移动到第一个UV通道,并导出后者以在Substance 3D Painter中进一步烘焙。
2. Apply blend-masks.
I did a bake in Substance 3D Painter using my base proxy mesh. Using information from the black and white channels as masks (Metallic, Roughness, Ambient Occlusion, Opacity), I determined where I want to have extra details – in this case, damaged wood and dirt. Then I used channel-packed masks to expose this information in the engine.
2. 涂抹混合面膜。
我使用我的基本代理网格在Substance 3D Painter中进行了烘焙。使用来自黑白通道的信息作为蒙版(金属色,粗糙度,环境光遮蔽,不透明度),我确定了我想要额外细节的位置 - 在这种情况下,损坏的木材和污垢。然后,我使用通道打包的掩码在引擎中公开此信息。
3. Apply details that cannot be added with tileable materials.
For decals, I composed an atlas in Photoshop that I used for several other models. Since I wanted to achieve the most realistic look, I used reference pictures of chipped veneer furniture to compose my atlas of damaged veneer. It is worth mentioning that for other types of decals (they were used on the bench, the entrance, and the chair), I sculpted damaged wood in ZBrush and then baked, textured, and masked in Substance 3D Painter.
3. 应用无法用可平铺材料添加的详细信息。
对于贴花,我在Photoshop中编写了一个地图集,用于其他几个模型。由于我想获得最逼真的外观,因此我使用碎裂的单板家具的参考图片来构成损坏的单板图集。值得一提的是,对于其他类型的贴花(它们用于长凳,入口和椅子),我在ZBrush中雕刻损坏的木材,然后在Substance 3D Painter中烘烤,纹理和遮罩。
To add decals to more complex shapes, like the dresser’s leg, I duplicated the geometry where I need a decal to be, very slightly offset it to avoid Z-fighting, and mapped it on my damaged wood decal atlas. On a flat surface, decals were just small mapped planes sitting on top.
This is my final stage of a prop:
为了将贴花添加到更复杂的形状(如梳妆台的腿)中,我复制了我需要贴花的几何图形,非常轻微地偏移它以避免Z战斗,并将其映射到我损坏的木贴花地图集上。在平坦的表面上,贴花只是坐在顶部的小地图平面。
这是我的道具的最后阶段:
For the modeling itself, I didn’t do anything special. The only thing I always make sure I do is chamfering hard edges and applying weighted normals modifier in 3ds Max. This works like magic. Those several extra polygons make a model look significantly better.
对于建模本身,我没有做任何特别的事情。我唯一要确保做的就是倒角硬边,并在 3ds Max 中应用加权法线修改器。这就像魔术一样。这几个额外的多边形使模型看起来明显更好。
I also try to bring my model to the engine as early as possible and update it several times as I progress with it. I found that the way my model looks on its own in 3ds Max could be quite different from how it looks in the engine and as a part of the scene. These several minutes for the update could potentially save many hours of fixing stuff and a headache.
我还尝试尽早将我的模型带到引擎中,并在使用模型的过程中对其进行多次更新。我发现我的模型在 3ds Max 中的外观可能与它在引擎中的外观以及作为场景的一部分的外观完全不同。这几分钟的更新可能会节省许多小时的修复内容和头痛。
Also, an important thing to keep in mind is the direction of your texture while unwrapping models. To make my life a little bit easier, I decided that all my wood materials would be oriented horizontally.
此外,要记住的重要一点是打开包装模型时纹理的方向。为了让我的生活更轻松一点,我决定我所有的木材材料都将水平定向。
Working in Unreal Engine 5, Lighting, and Post-Processing
The biggest feature of UE5, Lumen, worked perfectly for my scene. Initially, I started the project in UE4 and just out of curiosity tested my lighting in UE5, and it was marvelous. It instantly gave my scene the feeling I was after.
在虚幻引擎5、光照和后期处理中工作
UE5最大的功能是Lumen,它非常适合我的场景。最初,我在UE4中启动了这个项目,只是出于好奇在UE5中测试了我的照明,这真是太棒了。它立即给了我的场景我所追求的感觉。
However, when I was lighting my scene, I encountered a couple of issues.
First, the light didn’t pass my curtains through and the shadows were off on some objects. The solution was extremely simple – I made sure I didn’t use virtual shadow maps in the Project Settings.
但是,当我为场景点亮时,我遇到了几个问题。
首先,光线没有穿过我的窗帘,一些物体上的阴影也消失了。解决方案非常简单 - 我确保我没有在项目设置中使用虚拟阴影贴图。
Second, Lumen did not work properly with the HDRI dome. To fix this, I disabled "Affect Distance Field Lighting" in the Editor Sky Sphere. I found out about this from William Faucher's YouTube Channel.
其次,Lumen不能与HDRI半球摄像机一起正常工作。为了解决这个问题,我在编辑器天空球体中禁用了“影响距离场照明”。我从William Faucher的YouTube频道中发现了这一点。
In terms of lighting, I mostly relied on a directional light. I also added a couple of very subtle highlights. For example, I added just a subtle orange lighting spot in front of the stove to give it an extra touch of warm orange light. I also added a little bit of light to the corner area because originally it was slightly dark.
在照明方面,我主要依靠定向光。 我还添加了几个非常微妙的亮点。例如,我只是在炉子前面添加了一个微妙的橙色照明点,以使其具有额外的温暖橙色光。我还在角落区域添加了一点光线,因为最初它略暗。
I didn’t do anything special for post-processing in the engine, just simple color grading. However, to enhance the cinematic feeling of the scene, I did the final pass in Photoshop. My favorite thing there was adding a noise overlay layer (setting a blend mode to screen and opacity about 30-40%). It adds cinematic graininess and ties everything together.
我没有为引擎中的后期处理做任何特别的事情,只是简单的颜色分级。 但是,为了增强场景的电影感,我在Photoshop中进行了最后的传递。我最喜欢的是添加一个噪点叠加层(将混合模式设置为屏幕和不透明度约30-40%)。它增加了电影的颗粒感,并将所有内容联系在一起。
The new lighting system of UE5 significantly streamlined my workflow. My lighting system was fully dynamic, and I didn’t have to spend time on baking lighting. Bouncing light gave my scene a more natural look. It felt great to make changes on the fly.
UE5的新照明系统大大简化了我的工作流程。我的照明系统是完全动态的,我不必花时间在烘焙照明上。反射光线使我的场景看起来更自然。即时进行更改感觉很棒。
Final Thoughts
Getting mentorship was one of my best decisions in 2021. It was beneficial in every aspect I can think of. Feedback from my mentor was extremely helpful. Billy pointed out things I hadn't noticed before, showed me new approaches, and really boosted my morale.
最后的思考
获得指导是我2021年最好的决定之一。这在我能想到的方方面面都是有益的。我导师的反馈非常有帮助。比利指出了我以前没有注意到的事情,向我展示了新的方法,并真正提高了我的士气。
Working on this scene helped me detect flaws in the way I approach my environments. I know where I should be extra careful and where I should stop overthinking and overcomplicating things (sometimes you have to just stop, take a break, or even call something done).
In conclusion, I would say that planning and polishing are the two most important stages. I learned to plan everything carefully: plan your composition, plan your materials so you can reuse them, plan your atlas so you can map your details later, etc. It might seem like you’re not working while planning, whereas, in fact, you are doing one of the most crucial things.
在这个场景中工作帮助我发现了我接近环境的方式中的缺陷。我知道我应该在哪里格外小心,在哪里我应该停止过度思考和过度复杂化的事情(有时你必须停下来,休息一下,甚至把事情做好)。
最后,我想说,规划和打磨是最重要的两个阶段。我学会了仔细规划一切:规划你的构图,规划你的材料,以便你可以重复使用它们,计划你的地图集,这样你以后就可以绘制你的详细信息,等等。看起来你在计划时没有工作,而事实上,你正在做最关键的事情之一。
Also, I learned that it’s important to get to your polishing stage as fast as possible. Adding details is a hard and long process, but this is what makes your scene interesting and full of life.
As I mentioned at the beginning of the article, this is my final year of college, and I can’t wait to start my career in games.
此外,我了解到尽快进入抛光阶段非常重要。添加细节是一个艰难而漫长的过程,但这就是使您的场景变得有趣和充满生机的原因。
正如我在文章开头提到的,这是我大学的最后一年,我迫不及待地想开始我的游戏生涯。
|


 评分
评分