您需要 登录 才可以下载或查看,没有账号?注册

x

Introduction
Hello everyone! My name is Anton Bång, and I am an aspiring game artist in Malmö, Sweden. I am currently a student at The Game Assembly (TGA) in Malmö, attending my second year of game art.
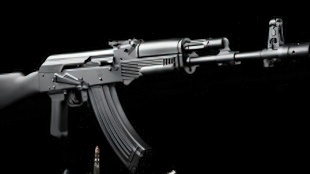
I am fascinated by the simple, yet complex inner workings of firearms and think they are a great study of storytelling.
I prefer to model 20th-century weapons over many modern firearms, due to their crude and elegant nature, which tells a far more interesting story in my opinion.
介绍
大家好!我的名字是Anton Bång,我是瑞典马尔默的一名有抱负的游戏艺术家。我目前是马尔默游戏大会(TGA)的学生,正在攻读游戏艺术的第二年。
我对枪支的简单而复杂的内部运作着迷,并认为它们是讲故事的伟大研究。
我更喜欢模拟20世纪的武器,而不是许多现代枪支,因为它们的粗糙和优雅的性质,在我看来,这讲述了一个更有趣的故事。

Planning/Goals
This project started off as a personal project but later turned into a piece for my portfolio course at TGA. I set out to improve my wood and metal texturing and wanted to do it in the form of a first-person rifle. When researching new weapons to model, I usually just use Wikipedia. I saw an image of the early FG42 prototypes, and immediately found true love!
规划/目标
这个项目最初是一个个人项目,但后来变成了我在TGA的投资组合课程的一部分。我开始着手改进我的木材和金属纹理,并希望以第一人称步枪的形式做到这一点。在研究新的武器建模时,我通常只使用维基百科。我看到了早期FG42原型车的图片,立刻找到了真爱!
Software used
I use subdivision modeling in Maya to make my basic shapes and Zbrush for booleans and additional high-poly details. The lowpoly is modeled in Maya. Baking & rendering is done in Marmoset Toolbag 4. I use Substance 3D painter for all my textures, and PureRef to organize my references.
使用的软件
我在 Maya 中使用细分建模来制作基本形状,并使用 Zbrush 来制作布尔值和其他高多边形细节。低聚在 Maya 中建模。烘焙和渲染在Marmoset Toolbag 4中完成。我使用Substance 3D Painter来制作我的所有纹理,并使用PureRef来组织我的参考。
Research/References
In my opinion, research is the most important step of the process. A good understanding of the prop is going to save hours of unnecessary work. I also like to have a basic understanding of how the weapon works beforehand, so if / when I have to make changes to better fit the game environment, I can do so in a believable way.
研究/参考
在我看来,研究是这个过程中最重要的一步。对道具的良好理解将节省数小时的不必要工作。我也喜欢事先对武器的工作原理有一个基本的了解,所以如果/当我必须做出改变以更好地适应游戏环境时,我可以以一种可信的方式做到这一点。
For my modelling reference, I like to use YouTube and google images as a source. I can especially recommend you check out the Forgotten Weapons (Gun Jesus) YouTube channel, as he often takes you through the story behind the firearm, while also providing lots of camera angles that would be hard to find anywhere else. Another good source of reference is traditional literature. I often referred to “Death from Above” by Thomas B. & R. Blake Stevens Dugelby when I had trouble understanding the individual components or functionality.
作为我的建模参考,我喜欢使用YouTube和Google图像作为来源。我特别推荐你看看被遗忘的武器(枪耶稣)YouTube频道,因为他经常带你了解枪支背后的故事,同时还提供许多在其他任何地方都很难找到的相机角度。另一个很好的参考来源是传统文学。我经常提到Thomas B. & R. Blake Stevens Dugelby的“Death from Above”,当时我无法理解各个组件或功能。
For my material reference (not just for weapons), auction sites are a goldmine! They often have a plethora of very high-resolution images, and from a lot of different angles. Restoration videos can also be a good source for understanding how layers of wear accumulate.
对于我的材料参考(不仅仅是武器),拍卖网站是一座金矿!它们通常具有大量非常高分辨率的图像,并且来自许多不同的角度。修复视频也可以成为了解磨损层如何积累的良好来源。
Maya Highpoly
I start off modeling by blocking out the primary proportions and basic shapes. I like to spend a little extra time on this step, as it will prevent any major mistakes further down the pipeline. That said, I am always checking my reference, and usually do find proportion mistakes later, but the goal is to catch as many errors as possible early on.
玛雅高地
我从遮挡主要比例和基本形状开始建模。我喜欢在此步骤上花费一点额外的时间,因为它可以防止管道中的任何重大错误。也就是说,我总是检查我的参考,并且通常会在以后发现比例错误,但目标是尽早发现尽可能多的错误。
I also set up an FPS camera here, so I could view the model from the player’s point of view.
我还在这里设置了一个FPS相机,这样我就可以从玩家的角度查看模型。
When the basic blocking is done, I move on to the refined block-out, which is basically a glorified way of saying: good forms with bad topology. My focus here is to establish most of my secondary forms, without necessarily worrying about the topology.
当基本的阻塞完成时,我转到改进的块,这基本上是一种美化的说法:好的表格和坏的拓扑结构。我在这里的重点是建立我的大多数次要形式,而不必担心拓扑。
The refined block out provides me with a base to start adding support loops, and get into subdivision modelling. I will use the polish deformer in Zbrush to soften my edges later, so I like to go a little sharper in Maya, just to be safe. I don’t worry about making the models airtight either, because I’m also going to dynamesh it in Zbrush.
精细的块为我提供了一个基础,可以开始添加支撑循环,并进入细分建模。稍后我将使用Zbrush中的抛光变形器来软化我的边缘,所以为了安全起见,我喜欢在Maya中更锋利一点。我也不担心使模型密闭,因为我也将在Zbrush中对其进行动态网格化。
Now I start planning out my booleans, and assign another material to the negative shapes, just to separate them in my mind. I use booleans if I think it will be quicker than simply modelling it by hand. The extraction port for example, is an area that would be much harder to model, rather than just subtracting – so I decided to boolean it.
现在我开始计划我的布尔值,并为负片形状分配另一种材料,只是为了在我的脑海中将它们分开。如果我认为布尔值比简单地手动建模更快,我会使用布尔值。例如,提取端口是一个更难建模的区域,而不仅仅是减去 - 所以我决定布尔化它。
Now it is time to export everything over to Zbrush! I don’t use any special export settings, but just make sure that my scaling is correct.
现在是时候将所有内容导出到Zbrush了!我不使用任何特殊的导出设置,但只需确保我的缩放正确。
Zbrush Highpoly
兹布拉什高聚
The first thing I do after importing the models from Maya is to organize the sub-tools into two folders. One for all the prop components, and one for the boolean shapes. I subdivide the meshes a couple of times and dynamesh them together into their respective parts. I highly recommend getting your hands on Dynamesh Utility, as it will grant you way more control over your dynamesh resolution.
从 Maya 导入模型后,我要做的第一件事就是将子工具组织到两个文件夹中。一个用于所有 prop 组件,一个用于布尔形状。我将网格细分了几次,并将它们动态地混合在一起,形成各自的部分。我强烈建议您动手使用Dynamesh Utility,因为它将使您对Dynamesh分辨率有更多的控制权。
I perform my booleans in folders so that I don’t get a brand-new tool for every operation.
我在文件夹中执行布尔值,这样我就不会为每个操作获得全新的工具。
After I boolean, I dynamesh it again, making sure to keep my polygroups as they will be useful when it is time to soften the edges. I strongly urge you to avoid polishing the edges until the very end, as it is very hard to sharpen them again later.
(Not like I had to redo the whole receiver because I smoothed it too much… **cough cough**)
在我布尔值之后,我再次动态网格化它,确保保留我的多元组,因为它们在软化边缘时会很有用。我强烈建议您避免抛光边缘直到最后,因为以后很难再次锐化它们。
(不像我不得不重做整个接收器,因为我平滑了它太多......**咳嗽咳嗽**)
With all the booleans done, it is time to smooth the edges with the polish deformer. I save a copy beforehand, so I can always go back.
完成所有布尔值后,是时候使用抛光变形器平滑边缘了。我事先保存了一份副本,所以我可以随时回去。
First, I mask out the area I want to polish, then apply the deformer. This is where the polygroups come in use, so I won’t have to mask everything out by hand. To select a polygroup, hold Ctrl + Shift + LMB. Invert selection by holding Ctrl + left-clicking outside the model. Blur the mask with Ctrl + LMB.
首先,我遮盖出要抛光的区域,然后应用变形器。这就是使用多组的地方,所以我不必手动掩盖所有内容。要选择多边形组,请按住 Ctrl + Shift + LMB。通过按住 Ctrl + 在模型外部单击鼠标左键来反转选择。使用 Ctrl + LMB 模糊蒙版。
When making high polys for games, I like to exaggerate the softness of the edges. A lot of edge information will be lost in baking & texturing, so I want to make sure that they are still able to catch highlights in-game.
Also notice that I made the handguard smoother than the rest of the weapon since it is made from a softer material.
在为游戏制作高多边形时,我喜欢夸大边缘的柔和度。在烘焙和纹理中会丢失很多边缘信息,因此我想确保它们仍然能够在游戏中捕捉到亮点。
还要注意的是,我使护手比武器的其余部分更光滑,因为它是由更柔软的材料制成的。
I get nicer results if I press the “circle” (right side of the Polish button.)
如果我按“圆圈”(波兰语按钮的右侧),我会得到更好的结果。
Next up, I like to do a little sculpting to define my materials further. Some areas are too tricky to achieve in texturing, so I just sculpt them instead. It’s a good idea to save a copy before this stage too, just in case.
接下来,我喜欢做一些雕刻,以进一步定义我的材料。有些区域在纹理制作中太棘手了,所以我只是雕刻它们。在此阶段之前保存副本也是一个好主意,以防万一。
When the highpoly is finished, I like to import it into Maya, so I have a reference when building the lowpoly. But 40 million polygons are a little too much for Maya to handle, so I use the Decimation Master to reduce it to something like 3 – 5 million polys instead. Decimation optimizes the mesh while preserving the form, so the resulting mesh should look identical to the previous one. I usually set it to something between 10 – 20%.
The last step before exporting is to assign vertex colours to each sub-tool, so that I can bake out some ID masks. I go through all the models and make each separate piece into its own polygroup. This can be done with the Autogroups button.
I then use the Polypaint From Polygroups button to assign each polygroup its own colour.
当高聚完成时,我喜欢将其导入Maya,因此在构建低聚时我有一个参考。但是 4000 万个多边形对于 Maya 来说有点太多了,所以我使用抽取主数据将其减少到大约 300 万到 500 万个多边形。抽取会优化网格,同时保留形状,因此生成的网格应与前一个网格相同。我通常将其设置为10-20%之间。
导出之前的最后一步是为每个子工具指定顶点颜色,以便我可以烘焙一些 ID 蒙版。我遍历了所有模型,并将每个单独的部分制作成自己的多元组。这可以通过“自动分组”按钮完成。
然后,我使用“来自 Polygroups 的 Polypaint”按钮为每个 Polygroups 分配自己的颜色。
ID masks save a lot of time, due to the fact that you don’t have to mask everything out manually later. If you right click on a mask in Substance Painter, there is an option called Add Color Selection, which lets you pick a colour from the ID mask, and spare you the trouble of painting everything out by hand.
ID掩码可以节省大量时间,因为您以后不必手动遮盖所有内容。如果右键单击物质画器中的蒙版,则有一个名为“添加颜色选择”的选项,可让您从ID蒙版中选择一种颜色,并省去手动绘制所有内容的麻烦。
I export the mesh with FBX Export / Import, under Zplugin. I usually uncheck sNormals to avoid potential normal artifacts.
我使用FBX导出/导入导出网格,在Zplugin下。我通常会取消选中 sNormals 以避免潜在的正常伪影。
Lowpoly/UVs
I reduce the subdivision meshes that I modeled in Maya and build the rest of the lowpoly by hand. I also use a lot of booleans in my lowpoly workflow to speed up the process. Usually, I just reduce the boolean meshes that I made before exporting to ZBrush and use them to boolean the lowpoly. With this workflow, the lowpoly tends to be one of the faster parts of the process for me.
低聚/UV
我减少了在 Maya 中建模的细分网格,并手动构建了低聚的其余部分。我还在低聚工作流中使用了很多布尔值来加快流程。通常,我只是在导出到ZBrush之前减少我所做的布尔网格,并使用它们来布尔化低聚。有了这个工作流程,对我来说,低聚往往是流程中更快的部分之一。
I follow the philosophy, that if a form doesn’t affect the silhouette, it can usually be optimized and baked into the normal map. However, large holes tend to look weird when baked in, so I give some extra topology to those areas too.
我遵循这样的理念,即如果一种形式不影响轮廓,它通常可以被优化并烘焙到法线地图中。但是,大孔在烘烤时往往看起来很奇怪,所以我也为这些区域提供了一些额外的拓扑结构。
Because the FG42 is intended to be used as an FPS weapon, I know which angle the player is most likely going to view it, and can optimize accordingly. The rear sight, for example, will be right up in the player’s face and will therefore need more polygons to refine the silhouette compared to the stock.
因为FG42打算用作FPS武器,所以我知道玩家最有可能从哪个角度观看它,并且可以进行相应的优化。例如,后视镜将正好在玩家的脸上,因此与枪托相比,需要更多的多边形来完善轮廓。
To avoid adding edge loops going all the way down the stock, I bevel edges that affect the silhouette, and quickly resolved them into tris. Because the model isn’t going to be deformed by animation, clean edge flow doesn’t matter as much as it does on, say a character.
为了避免添加沿毛坯向下移动的边缘环,我斜面边缘会影响轮廓,并迅速将它们解析为三角形。因为模型不会被动画变形,所以干净的边缘流并不像它在角色上那样重要。
I then go through the model again, softening and hardening edges. A good rule of thumb is that edges sharper than 45° should be hardened.
然后,我再次浏览模型,软化和硬化边缘。一个好的经验法则是,锋利度超过45°的边缘应该变硬。
I do all my UVs in Maya, but I’ve heard great stuff about Rizom UV too – and will probably check it out in the near future.
我所有的UV都是在玛雅完成的,但我也听说过关于Rizom UV的很棒的东西 - 并且可能会在不久的将来检查出来。
I should mention that I use the Automatic Layout tool to place most of my UVs. I don’t intend on wasting hours playing Tetris when Maya can do it for me in a fraction of the time. I leave around 8 pixels of padding between my shells, and make sure to straighten everything out, to save space and avoid antialiasing.
我应该提到,我使用自动布局工具来放置我的大多数UV。我不打算浪费时间玩俄罗斯方块,因为Maya可以在很短的时间内为我做这件事。我在外壳之间留下了大约8个像素的填充,并确保将所有东西都拉直,以节省空间并避免抗锯齿。
When doing weapons for FPS, I like to give UV shells closer to the camera more texel density. For example, the rear sight has more resolution than the grip, because it will constantly be up in the player’s face.
在为FPS制作武器时,我喜欢给离相机更近的UV炮弹更多的纹理密度。例如,后视镜比握把具有更高的分辨率,因为它会不断出现在玩家的脸上。
To save space, I also stack as many shells as possible.
为了节省空间,我还堆叠了尽可能多的外壳。
Then, I export the lowpoly to begin the baking process.
然后,我导出低聚物以开始烘焙过程。
Baking
I bake in Marmoset Toolbag 4, so I get more control over skewing and general cage difficulties. I create a new baking project and load the highpoly and lowpoly. Marmoset will create baking groups automatically if you have given your models the _low and _high suffixes beforehand.
烘
我在狨猴工具袋4中烘烤,所以我可以更好地控制倾斜和笼子的一般困难。我创建了一个新的烘焙项目,并加载了高多和低聚。如果您事先为模型提供了_low并_high后缀,Marmoset将自动创建烘焙组。
I set my output path and choose which maps I want to bake. (Normals, AO, Curvature and Vertex Color) I always bake in 4k, so I won’t have to re-bake if I would like to up my resolution in the future. I also set samples to 16x and soften them by 0.02.
我设置了输出路径并选择要烘焙的地图。(法线、AO、曲率和顶点颜色)我总是用4k烘焙,所以如果我将来想提高我的分辨率,我就不必重新烘焙了。我还将样本设置为16x,并将它们软化0.02。
The thing I love about baking in Toolbag is that you get a lot of control over skewing. If you press Paint Skew under any baking group, you can paint away from the skewing with black, and bring it back by painting white. You also get control over the cage offset per baking group, instead of just having one slider for the whole model – like in Substance Painter.
我喜欢在工具袋中烘焙的一点是,您可以对歪斜进行很多控制。如果在任何烘焙组下按“油漆倾斜”,则可以用黑色从倾斜中绘画,并通过绘制白色将其带回来。您还可以控制每个烘焙组的笼子偏移,而不是像在Substance Painter中那样为整个模型设置一个滑块。
I repeat the process for each baking group and also go back to fix any potential mistakes with the lowpoly or UVs.
When I’m happy with the bake, I like to open the normal map in photoshop and fix any artifacts. A tip is to use the smudge tool in photoshop to straighten out wobbly lines! Special thanks to Jakub Mrówczyński for showing me that trick!
我为每个烘焙组重复这个过程,并回去修复低聚或UV的任何潜在错误。
当我对烘焙感到满意时,我喜欢在photoshop中打开普通地图并修复任何伪影。提示是使用Photoshop中的污迹工具来拉直摇摆不定的线条!特别感谢Jakub Mrówczyński向我展示了这个技巧!
Texturing
I load my lowpoly model into Painter and import all my baked maps. When setting up my scene, I like to change the environment map to something with as few colours as possible, so I can work without always compensating for the environment colours. Studio Tomoco is the one I prefer. I also change the Tone Mapping Function to Sensitometric, and the Colour Profile to sRGBf, for balanced colours and lights.
纹理
我将低聚模型加载到 Painter 中,并导入所有烘焙地图。在设置场景时,我喜欢将环境贴图更改为颜色尽可能少的内容,这样我就可以在不总是补偿环境颜色的情况下工作。托莫科工作室是我更喜欢的。我还将色调映射功能更改为感测,并将颜色配置文件更改为sRGBf,以实现平衡的颜色和灯光。
I like to set up my rendering scene in Marmoset Toolbag as early as possible, so I can easily hop back and forth to compare results.
My texturing process is pretty simple. I start off by making the base material without any wear as if the surface would be factory new. Then I create another subfolder, which contains all the wear and tear.
I also like to add a layer above everything with a sharpen filter and set the blend mode to pass through. This will make your textures just a little sharper, and appear more high-res.
我喜欢尽早在Marmoset Toolbag中设置我的渲染场景,这样我就可以很容易地来回跳跃来比较结果。
我的纹理过程非常简单。我首先制作没有任何磨损的基础材料,就好像表面是工厂新表面一样。然后,我创建另一个子文件夹,其中包含所有磨损。
我还喜欢使用锐化滤镜在所有内容上方添加一层,并将混合模式设置为通过。这将使您的纹理更清晰一些,并显示更高分辨率。
I usually spend most of my time looking at the albedo and roughness map. I like to make sure that both are interesting enough to stand on their own. It needs to look good in the material view also, of course, but when tweaking values, I’m looking at the individual maps.
我通常把大部分时间花在看反照率和粗糙度图上。我喜欢确保两者都足够有趣,可以独立存在。当然,它也需要在材质视图中看起来不错,但是在调整值时,我正在查看各个地图。
Texturing the Metal
When creating the base material for the metal, I create a bunch of fill layers to add some subtle roughness and albedo variation. I also create a layer to add subtle noise, which further breaks up the surface.
金属纹理化
在为金属创建基材时,我创建了一堆填充层,以添加一些微妙的粗糙度和反照率变化。我还创建了一个图层来添加细微的噪点,这进一步打破了表面。
The brushed metal is pretty simple. I use anisotropic noise and add variation with a paint layer. I only add a little bit of height to the fill layer, but most of the effect will be carried by roughness once I start playing around with dust and dirt layers. I add an anchor point so that I can reference the mask later on when adding wear & tear.
拉丝金属非常简单。使用各向异性噪声,用油漆层添加变化。我只在填充层上增加了一点点高度,但是一旦我开始玩弄灰尘和污垢层,大部分效果就会被粗糙所承载。我添加了一个锚点,以便以后在添加磨损时可以参考面罩。
When creating the wear & tear, the reference becomes crucial!
在造成磨损时,参考变得至关重要!
I usually start off by doing some edge wear. What most people get wrong about guns is that they are not painted, but coated. A lot of WW1 / WW2 guns go through a process called blueing, which is performed to protect the metal from rust. A thin layer of black oxide is applied to the surface, making the metal darker. This coating is around 0.002 mm thick.
When making edge wear, or any surface wear for that matter, I don’t use much height information – if any at all. Instead, I let the albedo and roughness do most of the heavy lifting.
我通常从做一些边缘磨损开始。大多数人对枪支的错误在于,它们不是涂漆的,而是涂漆的。许多WW1 / WW2枪都经过一种称为蓝化的过程,该过程是为了保护金属不生锈而进行的。在表面施加一层薄薄的黑色氧化物,使金属变暗。该涂层的厚度约为0.002毫米。
在制作边缘磨损或任何表面磨损时,我不会使用太多高度信息-如果有的话。相反,我让反照率和粗糙度完成了大部分繁重的工作。
I add a few fill layers to create dust and dirt. I start off with a dirt generator and add several fill layers set to multiply, to break it up and make it feel more organic. I also do a lot of painting by hand, to add specific details that I can observe from my references. But the key is to add lots and lots of breakup and avoid the “procedural” feeling that is very easy to fall into.
我添加了一些填充层来产生灰尘和污垢。我从污垢发生器开始,并添加几个填充层以乘以增加,以将其分解并使其感觉更有机。我也手画了很多画,以添加我可以从参考资料中观察到的具体细节。但关键是要增加很多很多的分手,避免很容易陷入的“程序化”感觉。
Next up, I add some grease layers to emulate fat and oil build-up. Guns are pretty oily, which is going to accumulate lots of dust. Combine that with the fact that they are regularly touched, and you get a large range of roughness variation. The grease layers are primarily to
add roughness information, but I will also set my albedo value to something very dark and put the layer at 2-4% opacity. Almost everything done in the roughness is mirrored in the albedo in some way – and vice versa – so that the information is still there regardless of the lighting setup.
接下来,我添加一些油脂层来模拟脂肪和油脂的积聚。枪是相当油腻的,这将积累大量的灰尘。再加上它们经常被触摸的事实,你会得到很大范围的粗糙度变化。润滑脂层主要用于
添加粗糙度信息,但我也会将反照率值设置为非常暗的值,并将层设置为2-4%的不透明度。几乎所有在粗糙度上完成的工作都以某种方式反映在反照率中 - 反之亦然 - 因此无论照明设置如何,信息仍然存在。
The last step is to add specific details, such as dried oil, trigger wear, heat damage, etc. Basically, things that are way too specific for the other layers to achieve.
最后一步是添加具体细节,如干油、扳机磨损、热损伤等。基本上,对于其他层来说太具体的事情无法实现。
Texturing the Wood
The wood follows roughly the same process as the metal. The big difference here is the base material. For wood, I usually start off with a base texture, and this time I used one from textures.com.
To tweak the colours of the wood texture, I add a fill layer and set it to pass through. I add a contrast filter and a gradient filter. I up the contrast before applying a gradient so that it becomes easier to tweak the positions of the colours.
木材纹理化
木材遵循与金属大致相同的过程。这里最大的区别是基础材料。对于木材,我通常从基础纹理开始,这次我使用了 textures.com。
为了调整木材纹理的颜色,我添加了一个填充层并将其设置为通过。我添加了对比度滤镜和渐变滤镜。在应用渐变之前,我提高了对比度,以便更容易调整颜色的位置。
Now the texture is pretty flat, but I will rebuild the material with some custom alphas to fit my references better than the original texture did. For this project, I primarily used alphas from Milad Kambari’s “”.
现在纹理非常平坦,但是我将使用一些自定义的 alpha 重新构建材质,以便比原始纹理更适合我的参考。对于这个项目,我主要使用了Milad Kambari的“https://www.artstation.com/marketplace/p/XmGVv/100-wood-sten ... gn=homepage&utm_term=marketplace”中的alphas。
I create a layer for striping by adding a fill layer to the mask. I apply the custom wood alpha and set the fill to the planar project, which lets me play around with different angles to achieve my desired result. Afterward, I tweak the look with some blur & level filters.
我通过向蒙版添加填充层来创建用于条带化的图层。我应用自定义木材阿尔法并将填充设置为平面项目,这让我可以用不同的角度来达到我想要的结果。之后,我用一些模糊和水平滤镜调整外观。
To break up the surface even more, I add some soft bumps, or scratches.
为了进一步分解表面,我添加了一些柔软的凸起或划痕。
The last step before the wear & tear is to do some old varnish. To achieve the saturated effect, I add a Color Correct Filter to a fill layer set to passthrough, and up the saturation. I add a little bit of height, some discoloration and subtle brush strokes.
磨损之前的最后一步是做一些旧清漆。为了实现饱和效果,我将“颜色校正”滤镜添加到设置为直通的填充图层,并提高饱和度。我增加了一点高度,一些变色和微妙的笔触。
For the wear and tear I follow the same process as for the metal, observing my reference closely and trying to replicate it to the best of my ability. Below are the layers used for the wood wear.
对于磨损,我遵循与金属相同的过程,密切观察我的参考,并试图尽我所能复制它。以下是用于木材磨损的层。
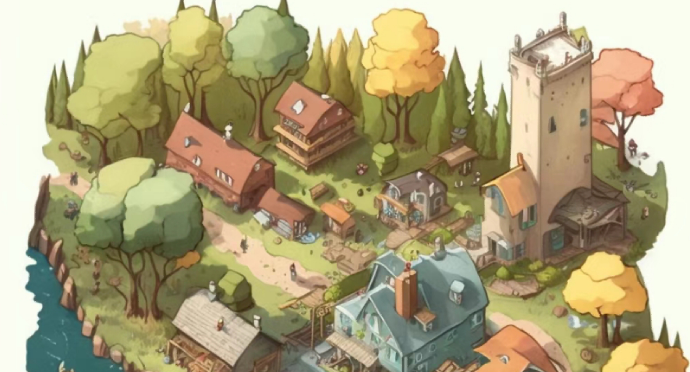
Presentation
I prefer to present my props in an environment or context and place it in some kind of story. I like the “floating guns” as much as the next person, but I also like to include at least one shot when the prop is presented in an environment. It also gives me an opportunity to play more with composition, and guide the viewer’s eye.
介绍
我更喜欢在环境或语境中呈现我的道具,并将其放置在某种故事中。我喜欢“漂浮的枪”,就像下一个人一样,但我也喜欢在道具在环境中呈现时至少包括一个镜头。这也给了我一个机会来更多地玩构图,并引导观众的眼睛。
For the environment, I made a quick carpet in Marvelous Designer and modelled the medal in Maya. For the wood background, I sculpted some planks in Zbrush, then baked them onto a plane.
I usually just use a variation on the three-point light setup when lighting my models. (Key, fill and rim light.) It’s simple, but does the job!
为了环境,我在Marvelous Designer中快速制作了地毯,并在Maya中模拟了奖牌。对于木头背景,我在Zbrush中雕刻了一些木板,然后将它们烤到飞机上。
在为模型点亮时,我通常只使用三点光源设置的变体。(键、填充和轮辋灯。这很简单,但可以完成工作!
|


 评分
评分