您需要 登录 才可以下载或查看,没有账号?注册

x
本帖最后由 对bu起 于 2022-8-18 15:34 编辑
Introduction
Hello! I’m Karim Yasser, I have been working as a Level and Lighting Artist for almost 3 years. I started my career in the games industry with different studios located in Egypt. After that, I worked in the film industry for a company called Post Office, based in Cairo, Egypt.
介绍
你好!我是Karim Yasser,我已经担任关卡和照明艺术家近3年了。我的职业生涯始于游戏行业,在埃及的不同工作室工作。之后,我在一家名为邮局的公司从事电影行业工作,该公司总部位于埃及开罗。
This summer, I will return to the game industry, as I will be working with Myrkur Games, which is located in Reykjavík, Iceland, as a Level and Lighting Artist for their new upcoming IP The Darken Echoes of The End. I have worked on many projects but most of them haven’t either been finished yet, or I don’t have the right to make them public. That is why my portfolio has only personal projects for now, but once these projects are done, I will publish them!
今年夏天,我将回到游戏行业,因为我将与位于冰岛雷克雅未克的Myrkur Games合作,为他们即将推出的新IP The Darken Echoes of The End担任关卡和灯光艺术家。我参与过许多项目,但其中大多数还没有完成,或者我没有权利公开它们。这就是为什么我的投资组合现在只有个人项目,但一旦这些项目完成,我将发布它们!

When it comes to learning, I usually depend on self-learning to acquire new skills, but I also believe that asking for feedback from experienced artists is pretty helpful. Also, I do some research about the jobs related to what I do to have then a solid understanding of what these companies need to have in their candidates.
Also, if I am targeting a specific company, I search well for their projects trying to know what is their art direction or more specifically, their game's genre so I can then highlight some projects in my portfolio to fit their needs to be a better candidate or just create new projects relevant to what they are doing.
在学习方面,我通常依靠自学来获得新技能,但我也相信向有经验的艺术家征求反馈是非常有帮助的。此外,我对与我所做的事情相关的工作进行了一些研究,然后对这些公司需要从候选人身上得到什么有了深刻的了解。
此外,如果我针对的是一家特定的公司,我会很好地搜索他们的项目,试图知道他们的艺术方向是什么,或者更具体地说,他们的游戏类型是什么,这样我就可以突出显示我的投资组合中的一些项目,以满足他们成为更好的候选人的需求,或者只是创建与他们正在做的事情相关的新项目。

Career Beginnings
Before I started learning Unreal Engine, I was really confused about which software to use – Unreal Engine or Unity?! Many people told me that Unreal is harder to learn as there were fewer resources than Unity at that time but I decided to choose Unreal as I believed that the more challenging software or something you are going to learn, the more it will make you better and unique from others.
I saw how amazing many projects were made with it and how many artists used it to create awesome projects which inspired me a lot in making a decision. I learned from many resources such as YouTube channels, the learning portal of Unreal Engine, and Unreal Engine Documentation.
事业起步
在我开始学习虚幻引擎之前,我对使用哪种软件感到困惑——虚幻引擎还是Unity?!许多人告诉我,虚幻引擎更难学习,因为当时的资源比Unity少,但我决定选择虚幻引擎,因为我相信,你要学习的软件或东西越具有挑战性,它就越会让你变得更好,与其他人不同。
我看到用它制作了许多惊人的项目,有多少艺术家用它来创建令人敬畏的项目,这给了我很多决定的灵感。我从许多资源中学习,例如YouTube频道,虚幻引擎的学习门户和虚幻引擎文档。
Victorian Street: Idea and Planning
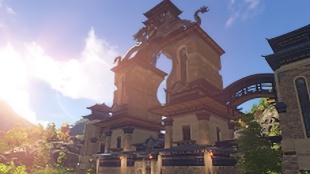
The idea and the inspiration were from Assassin’s Creed: Syndicate's E3 Cinematic Trailer. When I watched it, I was so impressed! The project started with some kind of medieval building style but then I decided to create the main building using assets that look like the Victorian era and are relevant to the trailer.
I started getting some frames from the trailer to get a better visualization of details, scene composition, crowd, lighting, etc. I always use PureRef to collect all these references together and split them into categories.
维多利亚街:创意与规划
这个想法和灵感来自《刺客信条:辛迪加》的E3电影预告片。当我观看它时,我印象深刻!该项目从某种中世纪建筑风格开始,但后来我决定使用看起来像维多利亚时代并与预告片相关的资产来创建主建筑。
我开始从预告片中获取一些帧,以便更好地可视化细节,场景构图,人群,照明等。我总是使用PureRef将所有这些引用收集在一起并将它们分成几类。
Blockout and Setting Main Scene Elements
For blocking out the scene, I just use the primitives of Unreal Engine (Cube, Cylinder, Plane, etc) just to have a rough idea of what I am doing and test the scale of the scene as if it is off-scale, many other kinds of stuff will be affected then such as lighting, texture stretching and other issues like this. As I use PBR materials and lighting, I have to be aware of the scale of these assets.
遮挡和设置主场景元素
为了遮挡场景,我只是使用虚幻引擎的基元(立方体,圆柱体,平面等),只是为了大致了解我正在做的事情,并测试场景的规模,就好像它是超比例的一样,许多其他种类的东西都会受到影响,例如照明,纹理拉伸和其他类似的问题。当我使用PBR材质和照明时,我必须了解这些资产的规模。
For the landscape, I first tried to add material from the Megascans library, it was good but not as perfect as I wished. It was very flat and needed a lot of materials on top of it. So, I had 2 options – using Virtual Heightfield Mesh to generate Displacement on the landscape and also adding other materials to paint manually in the landscape shader or to replace the landscape with static meshes. I did go with the second option as it’s more controllable and it will give me the results I need like the trailer of AC: Syndicate.
I wanted to have a ground of cobblestone with many layers of it as leafy grass, mud and soil, water puddles, and other rocky ground. So, in terms to achieve this approach, I used the Modeling Tools inside Unreal to create a very basic plane and then used Displace tool to add a Displacement Map on top of the SubDivided mesh. This approach is very heavy on performance but, thankfully, we have Nanite, the new Virtualized Geometry System, that gives us the ability to render pixel scale detail whilst having a very high poly-count in the scene in a very good framerate. I also uploaded a video on my YouTube channel in which I explained in detail each step I did go through to create these high poly meshes:
对于景观,我首先尝试从Megascans库中添加材料,它很好,但并不像我希望的那样完美。它非常平坦,需要很多材料。因此,我有 2 个选项 – 使用虚拟高度场网格体在景观上生成置换,并添加其他材质以在景观着色器中手动绘制或用静态网格体替换景观。我确实选择了第二个选项,因为它更易于控制,它将给我所需的结果,就像AC:Syndicate的预告片一样。
我想有一块鹅卵石地面,上面有很多层,如绿叶草,泥土,水坑和其他岩石地面。因此,为了实现这种方法,我使用虚幻引擎中的建模工具创建了一个非常基本的平面,然后使用置换工具在细分网格的顶部添加了置换贴图。这种方法在性能上非常重,但值得庆幸的是,我们有Nanite,新的虚拟化几何系统,它使我们能够渲染像素级的细节,同时在场景中以非常好的帧速率获得非常高的多边形数量。我还在我的YouTube频道上上传了一个视频,其中我详细解释了我创建这些高多边形网格所经历的每个步骤:
https://youtu.be/5NVd-5iK_ac
Some Nanite meshes I generated for the landscape:
我为景观生成的一些 Nanite 网格:
Set-Dressing the Scene
Having a huge library from Quixel is something amazing, getting all these assets and materials for free is unbelievable! So, to use this huge library sufficiently, I picked up first some assets from collections such as Neo-Baroque Modular Building, Tundra, and some other materials for the ground (Cobblestone, Water Puddles, Dry Leafy Ground, Soil, etc), and as I explained before, I used my approach to convert these materials into Nanite meshes and placing all of them together and top of each other created a superb blending as Nanite automatically does that for you.
布景-布景
拥有来自Quixel的巨大库是一件了不起的事情,免费获得所有这些资产和材料令人难以置信!因此,为了充分利用这个庞大的库,我首先从新巴洛克式模块化建筑,苔原和其他一些地面材料(鹅卵石,水坑,干燥的绿叶地面,土壤等)中挑选了一些资源,正如我之前解释的那样,我使用我的方法将这些材料转换为Nanite网格,并将它们放在一起并相互叠加,从而创建了一个极好的混合,因为Nanite会自动为您做到这一点。
Using Megascans assets is very helpful in creating stunning environments in a few days and as I focus mainly on set-dressing levels and also creating different lighting scenarios, I heavily depend on this library, as it saves much time compared to the other workflow in which we create high/low poly version of each asset for baking and then texture it. Quixel Megascans library is just like a key for artists to push their limits in a shorter time with higher quality.
使用Megascans资源在几天内创建令人惊叹的环境非常有帮助,并且由于我主要关注布景修整级别并创建不同的照明场景,因此我非常依赖此库,因为与其他工作流程相比,它节省了大量时间,在其他工作流程中,我们为每个资源创建高/低多边形版本以进行烘焙,然后对其进行纹理处理。Quixel Megascans库就像艺术家在更短的时间内以更高的质量突破极限的钥匙。
Lighting
Lighting is the most important element of your scene, it can pop up your work or ruin it, even if you did a great effort in your models, added a huge amount of details and your lighting isn’t good enough, it will ruin all of that. So, when it comes to lighting, I spend enough time trying different lighting scenarios and maybe each one has other sub-options. Actually, in this project, I had multiple lighting scenarios.
照明
光照是场景中最重要的元素,它可以弹出你的工作或破坏它,即使你在模型中做了很大的努力,添加了大量的细节,而你的光照不够好,它也会毁掉所有这些。因此,在照明方面,我花了足够的时间尝试不同的照明场景,也许每个场景都有其他子选项。实际上,在这个项目中,我有多个照明场景。
Before I start lighting, I create sub-levels inside Unreal Engine. Each level has the lighting actors inside it so, it becomes flexible and easy to switch between them and also edit each one on its own without affecting the other levels. The same approach could be applied when enabling world partition using Data Layers but, as I didn’t use World Partition for this project, I just used the standard workflow of the previous streaming method.
在开始光照之前,我会在虚幻引擎中创建子关卡。每个关卡都有灯光演员,因此,在它们之间切换变得灵活和容易,并且还可以自己编辑每个关卡而不会影响其他关卡。使用数据层启用世界分区时,可以应用相同的方法,但是,由于我没有在此项目中使用世界分区,因此我只使用了以前流式处理方法的标准工作流。
I also gathered some references from AC: Syndicate Trailer (for sunset and night lighting) and also from the Blade Runner 2049 movie (for overcast lighting) using PureRef.
As UE5 has its new Dynamic Global Illumination solution which is called Lumen, I surely turned it on to use Dynamic GI and Reflections. It’s quite easy to set up, I just enable it in the project settings, and also, I make sure to enable Generate Mesh Distance Field and Use Hardware Raytracing When Available as well to get the best possible results.
我还从AC:Syndicate Trailer(用于日落和夜间照明)以及使用PureRef的Blade Runner 2049电影(用于阴天照明)中收集了一些参考资料。
由于UE5有其新的动态全局照明解决方案,称为Lumen,我肯定会将其打开以使用动态GI和反射。它很容易设置,我只是在项目设置中启用它,而且,我确保启用生成网格距离字段并在可用时使用硬件光线追踪,以获得最佳结果。
Getting References for Lighting
As usual, I used PureRef to collect all these references together but where can I actually get these references? Well, I use some websites for that. To get references from films, for example, I use a website called ShotDeck, it’s really handy and useful website to search and collect huge amount of references and explore cinematography. ArtStation! It’s for sure the artist’s friend, tons of artworks there for concept arts, 3D artwork, and more.
获取照明参考
像往常一样,我使用PureRef将所有这些引用收集在一起,但是我实际上在哪里可以获得这些引用?好吧,我为此使用了一些网站。例如,为了从电影中获取参考资料,我使用了一个名为ShotDeck的网站,这是一个非常方便和有用的网站,可以搜索和收集大量参考资料并探索电影摄影。艺术站!这肯定是艺术家的朋友,那里有大量用于概念艺术,3D艺术品等的艺术品。
Another website I use is called DeviantArt, many awesome concept arts there for almost any genre you need to create. Also, browsing oil paintings on Pinterest is very helpful. I usually browse these websites when I have some free time so when I’m working on a project then, I go back to these and download what I need to add it to my mood board in PureRef.
我使用的另一个网站叫做DeviantArt,那里有许多很棒的概念艺术,几乎可以满足你需要创建的任何类型。此外,在Pinterest上浏览油画也非常有帮助。我通常在有空闲时间时浏览这些网站,所以当我处理一个项目时,我会回到这些网站并下载我需要的东西,将其添加到PureRef中的情绪板中。
General Workflow Applied to All Lighting Scenarios
In this project, I used Physically Based Lighting values so, to set it up properly, I first set my Exposure Compensation method in the Post Process Volume to “Manual” and leave it at ‘1’. You will notice the scene becomes black even if you added a directional light, that’s because the intensity of the sunlight isn’t enough so I set it to 3000.0 LUX and the Exposure Compensation to 2.5 to get more highlights (in case of sunset lighting) and feel like it’s an actual sun. Using Physically Based Lighting is impressive in calculating indirect lighting with Lumen to get better bounces and indirect diffused light and indirect shadow because of these light rays’ bounces.
应用于所有照明场景的常规工作流
在这个项目中,我使用了基于物理的光照值,因此,为了正确设置它,我首先将后期处理体积中的曝光补偿方法设置为“手动”,并将其保留为“1”。即使您添加了定向光,您也会注意到场景变黑,这是因为阳光的强度不够,所以我将其设置为3000.0 LUX,并将曝光补偿设置为2.5以获得更多高光(在日落照明的情况下),感觉就像是真正的太阳。使用基于物理的光照在计算流明间接光照时令人印象深刻,由于这些光线的反弹,可以获得更好的反射和间接漫射光和间接阴影。
In the case of Overcast lighting, I use the same pipeline but in terms to get low contrast between light and shadow (very soft light), in the Sky Atmosphere Actor, I increase the Mie Scattering Scale (while enabling Support Sky Atmosphere Affecting Height Fog) it gives the desired result of the foggy soft-looking without having highlights and contrast.
In Night lighting, the same workflow was used but there is a difference in that lighting scenario. I used here another source of light which is the street lamp. Street lamps tended to have warm yellow and soft light, which had been achieved by using a point light that has a Source Radius value of 50 to get rid of these hard shadows. The same was applied to the Main building’s door lamps and that overall gave a very nice result when it was used with Volumetric Fog and make some of these point lights cast volumetric shadows to get more realistic results.
在阴天照明的情况下,我使用相同的管道,但就获得光和阴影之间的低对比度(非常柔和的光线)而言,在天空大气Actor中,我增加了Mie散射比例(同时启用支持天空大气影响高度雾),它给出了雾柔和外观的所需结果,而没有高光和对比度。
在夜间照明中,使用了相同的工作流程,但该照明方案存在差异。我在这里使用了另一个光源,那就是路灯。路灯往往具有温暖的黄色和柔和的光线,这是通过使用源半径值为50的点光源来消除这些硬阴影来实现的。这同样适用于主楼的门灯,当它与体积雾一起使用时,总体上给出了非常好的结果,并使其中一些点光源投射体积阴影以获得更逼真的结果。
Deep Dive Into Each Lighting Scenario
Sunset: As I got the reference for this lighting mood from AC: Syndicate trailer, I didn’t spend too much time searching for more references. In this one, I wanted to achieve what is much closer to the Complementary Color palette. The sunlight, which is my key (source) light, has a warm color, and I decided to make the sky looks cooler (blueish) as well as the shadows to make it closer to a golden hour.
深入了解每个照明场景
日落:当我从AC:Syndicate预告片中获得这种照明情绪的参考时,我没有花太多时间寻找更多的参考。在这一个中,我想实现更接近互补色板的东西。阳光是我的关键(源)光,具有温暖的色彩,我决定使天空看起来更冷(蓝色)以及阴影,以使其更接近黄金时刻。
Overcast: References for these two were from the Blade Runner 2049 film. The color palette for them was Analogous so I have then the opportunity and freedom to use one color with multiple tints and shades. I applied that approach in yellow color and blue color. The advantage of overcast lighting is it makes the objects pop up and show their true colors if the lighting was used correctly.
低沉:这两部电影的参考资料来自《银翼杀手2049》电影。他们的调色板是类似的,所以我有机会和自由地使用一种颜色和多种色调和阴影。我用黄色和蓝色应用了这种方法。阴天照明的优点是,如果照明使用得当,它使物体弹出并显示其真实颜色。
Night: its reference was also from AC: Syndicate trailer but I wanted to make it have lower exposure than the trailer. Also, going with a Complementary Color palette (as sunset) but the difference here is that the key or the source light has a blue color (cool) instead of the orange sunlight. Also, having practical lights in the scene which were street lamps was very important to create another focal point for the viewer.
Night:它的参考也来自AC:Syndicate预告片,但我想让它的曝光率低于预告片。此外,使用互补色板(如日落),但这里的区别在于键或源光源具有蓝色(冷)而不是橙色阳光。此外,在场景中拥有实用的灯光(路灯)对于为观众创造另一个焦点非常重要。
Adding Another Layer of Detail with Fog Cards
After the lighting pass is done, I still feel like it’s some kind of flat lighting, many details are still hidden and didn’t really pop up. So, I start adding multiple layers of fog cards which is simply a cloud texture inside a material applied to a plane, it gives more realistic results and it gives more control in creating a local fog effect and also like another layer of exponential height fog so the colour palette will have tinted and shaded colour of the tone I use. For example, in the second overcast lighting the sky itself looks very flat with just one color so by adding fog sheets and adjusting its brightness and color, the sky will have actually 2 colors to have then a gradient effect in colors so it looks more interesting to look at.
使用雾卡添加另一层细节
照明通过完成后,我仍然觉得它是某种平面照明,许多细节仍然隐藏起来,并没有真正弹出。因此,我开始添加多层雾卡,这只是应用于平面的材料内部的云纹理,它提供了更逼真的结果,并且在创建局部雾效果方面提供了更多的控制,并且还像另一层指数高度雾一样,因此调色板将具有我使用的色调的着色和阴影颜色。例如,在第二次阴天照明中,天空本身看起来非常平坦,只有一种颜色,因此通过添加雾片并调整其亮度和颜色,天空实际上将具有2种颜色,然后在颜色中具有渐变效果,因此它看起来更有趣。
Post-Process
When it comes to post-processing, it’s really important to balance the colors and adjust the brightness and contrast amount each one related to the other. I mainly use it to adjust Exposure Compensation and add some little color grading work for Highlights, Midtones, and shadows. Also, to control the base of screen effects and atmospherics like Bloom, and Vignetting. Also, it gives me the opportunity to control Lumen in terms of Quality, distance to trace, etc. There is a small option I use to improve the Lumen reflections in post-process volume, there is something called Ray Lighting Mode under Reflections in the Post Process Volume. By default, it’s set to Surface Cache. Ideally, I like to set it to Hit Lighting for Reflections as it adds specular highlights on the reflective surfaces which are more realistic but at the same time, it’s more expensive than Surface Cache.
后处理
在后期处理方面,平衡颜色并调整彼此相关的亮度和对比度非常重要。我主要用它来调整曝光补偿,并为高光、中间调和阴影添加一些小的颜色分级工作。此外,还可以控制屏幕效果和氛围(如“绽放”和渐晕)的基础。此外,它还使我有机会在质量,跟踪距离等方面控制流明。我使用一个小选项来改善后处理体积中的流明反射,在后处理体积的反射下有一种称为光线照明模式的选项。默认情况下,它设置为“表面缓存”。理想情况下,我喜欢将其设置为反射的命中照明,因为它在反射表面上添加了镜面高光,这些高光更逼真,但同时,它比表面缓存更昂贵。
So, the post-processing for me is like a color balancing tool to get more realistic-looking results to use during the post-production stage.
因此,对我来说,后期处理就像一个色彩平衡工具,可以在后期制作阶段获得更逼真的效果。
Rendering
As we have Movie Render Queue plug-in in Unreal, it has been most widely used for production rather than the regular render we had before. It gives the artist more freedom to control multiple things to improve the final results. Before I start adding the queue to the movie render queue, I create an OCIO config to convert my color space from Linear sRGB to ACEScg as the Linear sRGB doesn’t give a high dynamic range of colors so the highlights then wouldn’t be as intended. By using this technique or disabling the Tone Curve in the Color Output setting inside Movie Render Queue, I will be able then to get the actual value of the pixels that have a value more than ‘1’. Additionally, I need then to get a format that can support all this stuff, so I decided to go with an EXR format and keep its compression as its default (PIZ). Also, as I wanted to get sharper images, under the Anti-Aliasing Setting, I increased the Temporal Sample Count to 32 and overridden the method to None. 32 Samples were enough as I rendered them in 1080p resolution. I also used some Console Variables to control motion blur quality and depth of field quality. All these console variables are found in the documentation of the Movie Render Queue.
渲染
由于我们在虚幻引擎中有电影渲染队列插件,因此它被最广泛地用于制作,而不是我们之前的常规渲染。它为艺术家提供了更多的自由来控制多个事物,以改善最终结果。在开始将队列添加到影片渲染队列之前,我创建了一个OCIO配置,以将我的色彩空间从线性sRGB转换为ACESCG,因为线性sRGB不能提供高动态范围的颜色范围,因此高光不会像预期的那样。通过使用这种技术或在影片渲染队列中的“颜色输出”设置中禁用色调曲线,我将能够获得值大于“1”的像素的实际值。此外,我需要获得一种可以支持所有这些内容的格式,因此我决定使用EXR格式并将其压缩保留为其默认值(PIZ)。此外,由于我想获得更清晰的图像,在抗锯齿设置下,我将时态样本计数增加到32,并将该方法覆盖为无。32个样本就足够了,因为我以1080p分辨率渲染它们。我还使用了一些控制台变量来控制运动模糊质量和景深质量。所有这些控制台变量都可以在影片渲染队列的文档中找到。
Conclusion
The project was very challenging for me as I wanted to achieve a cinematic trailer quality and I did then what is applicable to my skills. I believe that difficult and big challenges can be overcome by splitting them into many small tasks so, going through each step will definitely progress the entire process until it’s done. So, my advice is to keep trying even if you fail. Your persistence and dedication in what you are doing will certainly improve you and make you able to create something bigger and more challenging, it is just about taking the risk to be in a better situation then.
For Unreal Engine specifically, it may take a longer time to master compared to other software, so keep yourself motivated about what you are doing and never get disappointed even if your work wasn’t absolutely amazing, we were all started from the zero point and our work wasn’t perfect so, insisting on improving your skills is the most important matter in your career!
结论
这个项目对我来说非常具有挑战性,因为我想达到电影预告片的质量,然后我做了适用于我技能的事情。我相信,通过将困难和重大挑战分成许多小任务,可以克服困难和重大挑战,因此,完成每个步骤肯定会推进整个过程,直到完成为止。所以,我的建议是,即使你失败了,也要继续尝试。你对你正在做的事情的坚持和奉献精神肯定会提高你,让你能够创造更大,更具挑战性的东西,这只是为了冒险处于更好的境地。
特别是对于虚幻引擎来说,与其他软件相比,掌握起来可能需要更长的时间,所以要对自己正在做的事情保持动力,即使你的工作不是绝对惊人的,也不要失望,我们都是从零点开始的,我们的工作并不完美,所以,坚持提高你的技能是你职业生涯中最重要的事情!
|