您需要 登录 才可以下载或查看,没有账号?注册

x


Introduction
Hi, my name is Kirill Kliat, I am currently a CG supervisor at Vivix. I am a generalist with over 10 years of experience. When I was about 15 years old, I got interested in art. I formed my folk metal music band, started to learn Photoshop (designed UI for music software, for example), and used to write poetry. The next step was taking part in video shooting and editing, which later on led me to computer graphics. I had a variety of tasks from modeling, rigging, and compositing to FX design and animation.
介绍
嗨,我的名字是Kirill Kliat,我目前是Vivix的CG主管。我是一名多面手,拥有超过10年的经验。当我大约15岁的时候,我对艺术产生了兴趣。我组建了我的民谣金属乐队,开始学习Photoshop(例如,为音乐软件设计的UI),并曾经写过诗歌。下一步是参与视频拍摄和编辑,后来这使我转向了计算机图形学。我承担了从建模、装配和合成到特效设计和动画的各种任务。
Today artists have access to educational videos on YouTube, tutorials, articles on websites, and specialized forums. But in the past, it was not easy to find good sources, and junior artists had to solve problems on their own. As a result, they had to experiment with the tools and gain expertise. And now, I feel confident and ready for challenging tasks, and every day I try to improve my work and apply new technologies. In my carrier, I have had an opportunity to participate in the production of such films as Legend of Kolovrat, Frontier, as well as various series, advertising, and game engines. But personally, I feel the greatest pleasure and enthusiasm doing character creation.
如今,艺术家可以访问YouTube上的教育视频,教程,网站上的文章和专业论坛。但在过去,要找到好的来源并不容易,初级艺术家必须自己解决问题。因此,他们必须试验这些工具并获得专业知识。现在,我对具有挑战性的任务充满信心,并准备好了,每天我都试图改进我的工作并应用新技术。在我的航空公司中,我有机会参与制作诸如《科洛夫拉特传奇》,《边境》以及各种系列,广告和游戏引擎等电影。但就我个人而言,我对角色创作感到最大的乐趣和热情。
The Eye Close-Up Project
Today, I would like to tell you about my Eye Close-Up work, which is actually a part of a major future project Keiko based on a Japanese actress. In the project, I continue working on posing and lighting and I am ready to share this work with you later when it is finished. It started as usual from the desire to make my art better, more realistic than the previous one. I have spent a lot of time and effort because I think the eyes of a model are the most complicated part, and, as the saying goes, the eyes are the reflection of the soul.
眼睛特写项目
今天,我想告诉你们我的眼睛特写工作,这实际上是基于日本女演员的一个主要未来项目的Keiko的一部分。在项目中,我继续从事摆姿势和照明工作,并准备在完成后与您分享这项工作。它像往常一样始于使我的艺术比前一个更好,更逼真的愿望。我花了很多时间和精力,因为我认为模特的眼睛是最复杂的部分,而且,俗话说,眼睛是灵魂的反射。
The world has changed after we got access to HQ textures from companies such as Texturing XYZ and 3dscanstore. I have used both sources: for the eyes – XYZ, for the skin – 3dscanstore. The skin was done using the wrapping workflow: I transferred it with R3DS WRAP (you can see some tutorials on 3dscanstore) and adjusted it until I liked the result.
I can show you a trick: I do not like using HD Geometry in ZBrush, but often, you just can't work without it because the limit for SubTools is 100 million polygons. The solution is to have your basemesh (1st subdiv level) in a poly count of fewer than 25000 polygons. That value lets you subdivide it one more time.
在我们从Texturing XYZ和3dscanstore等公司访问总部纹理后,世界已经发生了变化。我使用了两个来源:眼睛 - XYZ,皮肤 - 3dscanstore。皮肤是使用包装工作流程完成的:我使用R3DS WRAP(您可以在3dscanstore上看到一些教程)将其转移并进行调整,直到我喜欢结果。
我可以向您展示一个技巧:我不喜欢在ZBrush中使用HD Geometry,但通常,如果没有它,您将无法工作,因为SubTools的限制是1亿个多边形。解决方案是将基本网格(第 1 个子分区级别)置于少于 25000 个多边形的多边形计数中。该值允许您再次细分它。
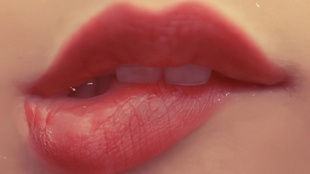
I made the head and the hands denser than the body hidden under the clothes, plus you can always remove the head if you need. Besides, I have a collection of custom brushes/alphas gathered from the internet and made by myself, they help to make my artwork more unique. For example, lips often look the same in different artworks, but custom brushes solve that problem. Anyway, I strongly recommend working with the details at the very end. First, you should pay attention to the anatomy and proportions and then switch to the details and textures.
我让头部和手比隐藏在衣服下面的身体更密集,而且如果需要,您可以随时取下头部。此外,我有一系列从互联网上收集并由我自己制作的自定义画笔/alpha,它们有助于使我的作品更加独特。例如,嘴唇在不同的艺术品中通常看起来相同,但自定义画笔可以解决这个问题。无论如何,我强烈建议在最后处理细节。首先,您应该注意解剖结构和比例,然后切换到细节和纹理。
The Skin
The skin shader settings are pretty obvious, except for maybe Caustics and Indirect Diff/Spec settings. But the secret is in correct textures, such as Roughness, Subsurface Scattering weight, etc. The main challenge is how to get proper values: for example, you have made a render and see that there are not enough pores on the skin, so you add them through blend modes to the color texture and so on. It is very important how all these nuances change the impression.
皮肤
皮肤着色器设置非常明显,除了焦散和间接比较/规范设置。但秘诀在于正确的纹理,如粗糙度,地下散射重量等。主要的挑战是如何获得正确的值:例如,您已经制作了一个渲染,并且看到皮肤上没有足够的毛孔,因此您可以通过混合模式将它们添加到颜色纹理中,依此类推。所有这些细微差别如何改变印象是非常重要的。
I downloaded 3dscanstore textures, then added procedural noises in Mari, added displacement details to the Color and Roughness maps, added makeup layers, and did a lot of tests. I always use Microdisplacement maps designed by XYZ. Last year, I actively used the ACES workflow, it's great that it is supported by default in the latest versions of Maya now.
It is very important how your assets are modeled: for example, if an ear thickness is incorrect, the results in the skin shader will be unrealistic. Be ready to monitor references constantly.
我下载了3dscanstore纹理,然后在Mari中添加了程序噪声,为颜色和粗糙度贴图添加了位移细节,添加了化妆图层,并做了很多测试。我总是使用XYZ设计的微置换图。去年,我积极使用了ACES工作流程,现在最新版本的Maya默认支持它,这真是太好了。
如何对资产进行建模非常重要:例如,如果耳朵厚度不正确,则皮肤着色器中的结果将不切实际。准备好不断监视引用。
The Eye
The eye consists of 2 parts: the iris and the sclera. It is pretty hard to get correct values of the SSS radius in such places as eyelids: they can be too thin and the light will give the wrong colors, the devil is in the details. But it is great that you can set up the asset once and use it many times later, sometimes you just need to adjust it. For example, I wrapped every eye from XYZ through a smart layer in Photoshop, and it helped to edit all the layers at the same time.
眼睛
眼睛由2部分组成:虹膜和巩膜。在眼睑等地方很难获得SSS半径的正确值:它们可能太薄,光线会给出错误的颜色,魔鬼在细节中。但是,您可以设置一次资产,然后再多次使用它,这真是太好了,有时您只需要调整它。例如,我在Photoshop中通过智能图层包装了XYZ的每只眼睛,它有助于同时编辑所有图层。
The Hair
I do hair in XGen and try to make it less artificial and more lifelike: different thickness, different width, applying noise to roughness and color channels, a gradient to transparency channel to simulate hair sticking to the skin, adding slight AO imitation to skin color texture. I recommend searching some big resolution references on Freepik or Flickr and using PureRef.
头发
我在XGen中做头发,并试图让它不那么人造,更逼真:不同的厚度,不同的宽度,将噪音应用于粗糙度和颜色通道,渐变到透明通道以模拟头发粘附在皮肤上,在肤色纹理上添加轻微的AO模仿。我建议在Freepik或Flickr上搜索一些大分辨率的参考,并使用PureRef。
Here are some tips on how to work with hair:
When lookdev is done, I convert eyebrows and eyelashes into geometry. It helps a lot at the rigging stage because when you do blendshapes in XGen, there can be a problem.
If you use Arnold, I recommend using standins (procedural), especially when you work with XGen. For example, you can have two scenes: the first one with skin shaders and such, the second one – with hair only (XGen). Use blendshapes to get XGen scalps animated, use nHair to get XGen simulated, and export results as cache to the first scene, it will render without problems on your local machine or on a render farm using standins.
以下是一些有关如何处理头发的提示:
当 lookdev 完成后,我将眉毛和睫毛转换为几何图形。它在索具阶段有很大帮助,因为当你在XGen中做混合形状时,可能会有问题。
如果您使用 Arnold,我建议您使用 standins(程序式),尤其是在使用 XGen 时。例如,您可以有两个场景:第一个场景带有皮肤着色器等,第二个场景 - 仅带有头发(XGen)。使用混合形状使 XGen 头皮动画化,使用 nHair 模拟 XGen,并将结果作为缓存导出到第一个场景,它将在本地计算机或使用替身渲染场上毫无问题地进行渲染。
The Final Render
One of the main challenges for an artist who tries to get ultra-realistic models is working with lighting. You must use all available HDRI/Area lights you can. The point is not to render in exactly one environment but to understand how your shaders should work in reality. For example, how should skin react to one Key Light? Should gloss be stronger or less? And that is a quest: without direct reference, all you have are your hypotheses, which hide fundamental intricacy.
I do a lot of tests and corrections on shading/texturing to find the references I don't have. This balance is the secret to success. I advise you to try 3D scanning with HDRI capturing, to take photo references and reproduce them, or at least to buy lighting references on ArtStation.
最终渲染
对于试图获得超现实模型的艺术家来说,主要挑战之一是使用光照。您必须尽可能使用所有可用的 HDRI/区域光源。关键不是要在一个环境中进行渲染,而是要了解着色器在现实中应如何工作。例如,皮肤应该如何对一盏钥匙灯做出反应?光泽应该更强还是更低?这是一个追求:没有直接的参考,你所拥有的只是你的假设,这些假设隐藏着根本的复杂性。
我对着色/纹理做了很多测试和更正,以找到我没有的参考资料。这种平衡是成功的秘诀。我建议您尝试使用HDRI捕获进行3D扫描,拍摄照片参考并重现它们,或者至少在ArtStation上购买照明参考。
As I use ACES and Arnold's Light Mixer, I do not spend much time on post-production, just a bit of chromatic aberration and atmosphere with blend modes.
I would like to emphasize that Light Mixer is very helpful. First, you can create about 5-10 lights, then rotate them around assets, and finally, start rendering. After that, you can change the colors of the lights and the intensity in real-time. But I have to warn you: when lookdev is done, always disable unnecessary lights because a lot of them mean longer render time.
Good luck!
当我使用ACES和Arnold的光混合器时,我不会花太多时间进行后期制作,只是用混合模式进行一点色差和氛围。
我想强调的是,Light Mixer非常有帮助。首先,您可以创建大约 5-10 个光源,然后围绕资源旋转它们,最后开始渲染。之后,您可以实时更改灯光的颜色和强度。但我必须警告你:当lookdev完成后,总是禁用不必要的灯光,因为很多灯光意味着更长的渲染时间。
祝你好运!
|


 评分
评分