您需要 登录 才可以下载或查看,没有账号?注册

x
在本教程中,向您展示如何快速轻松地将 3D Scanstore 实时头发模型传输到3D Scanstore任何高清或标清头部扫描。此处提供头发模型 : https://www.3dscanstore.com/hair
Introduction
In this tutorial, I will demonstrate the procedure for transferring our real-time hair models onto any of our high-definition (HD) or standard-definition (SD) head scans. This method necessitates the use of Wrap 3. The technique outlined here is applicable to any head model generated using either our head base mesh or one of our scans.
在本教程中,我将演示将实时头发模型转移到任何高清(HD)或标准清晰度(SD)头部扫描上的过程。这种方法需要使用Wrap 3。这里概述的技术适用于使用我们的头基网格或扫描生成的任何头部模型。
Step 1
Okay, let's dive in! Load up the base mesh and the hair models from any of the scan store's real-time hair products into Wrap 3 using the geometry nodes. For this example, I've picked the trendy Man bun hairstyle that even comes with its own beard mesh. I'll guide you through the process of transferring both effortlessly. Let's get cracking!
好的,让我们投入进去!使用几何体节点将基础网格和头发模型从扫描存储的任何实时头发产品加载到“包裹3”中。在这个例子中,我选择了时尚的男士发髻发型,它甚至自带胡须网布。我将引导您轻松完成两者的转换过程。让我们开始狂欢吧!
Step 2
To begin, load the subdivision level 1 model from any of the available HD or SD head scans. For the purpose of this example, we will be using the HD Male 34 scan.
首先,从任何可用的HD或SD头部扫描加载细分级别1模型。为了这个例子的目的,我们将使用HD男性34扫描。
Step 3
Now, let's set up the "Lattice" node in Wrap 3 and connect the mesh nodes as depicted in the image below. Make sure to adjust the number of neighbours to 100. We'll start by transferring the hair mesh and then repeat the same steps for the beard.
现在,让我们在Wrap 3中设置“Lattice”节点,并连接网格节点,如下图所示。确保将邻居的数量调整为100。我们将从转移头发网格开始,然后对胡须重复相同的步骤。
Step 4
Voila! You will now observe the flawless alignment of the hair mesh onto the HD head scan. Simply right-click on the lattice node and proceed to save the hair as an .OBJ file.
瞧!现在,您将观察头发网格在HD头部扫描上的完美对齐。只需右键单击晶格节点,然后继续将头发另存为。OBJ文件。
Step 4a
Now, let's repeat the exact same process with the beard mesh. Just swap the "Hair" node with the "Beard" node, as demonstrated below. Once done, simply right-click and export the beard model as a .obj file, following the same procedure we used for the hair.obj file.
现在,让我们对胡须网格重复完全相同的过程。只需将“头发”节点与“胡子”节点交换即可,如下所示。完成后,只需右键单击并将胡须模型导出为.obj文件,遵循与hair.obj文件相同的过程。
Step 5
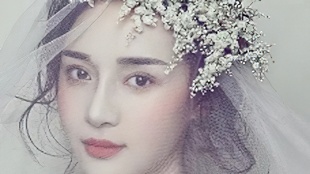
Now, let's take a moment to appreciate the HD head scan with its fresh new hair and beard! For this step, we will utilize the provided Marmoset Toolbag render scene, which comes bundled with all the HD head scans. Simply load the scene and import the recently acquired hair and beard models. Sit back and enjoy the stunning render!
现在,让我们花点时间欣赏一下高清头部扫描及其新鲜的新头发和胡子!在这一步中,我们将使用提供的Marmoset Toolbag渲染场景,该场景与所有HD头部扫描捆绑在一起。只需加载场景并导入最近获取的头发和胡须模型。坐下来欣赏令人惊叹的渲染!
You will have something that looks like the image below.
你会得到一些看起来像下图的东西。
Step 6
To complete the process, let's apply the appropriate shaders to both the hair and beard. Simply navigate to the Marmoset folder and load the shaders designed specifically for these elements
Step 7
Drag the shader from the material window onto the mesh.
Congratulations! You've successfully textured and fitted the hair onto your HD head scan. This technique can be applied to any HD or SD head scan or any model derived from them, utilizing our retopologised head meshes. The versatility of this approach allows for seamless integration of hair onto any of our scans as shown in the gif below.
|