您需要 登录 才可以下载或查看,没有账号?注册

x
本帖最后由 执此一念 于 2021-11-15 16:36 编辑
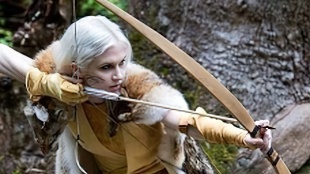
使用 Blender、ZBrush 和 Marvelous Designer 从 Valorant 创建 Sova
Caterina Sumalla 讲述了《Valorant》中 Sova 的 3D 重建,讨论了将 Blender 新角色艺术工作流程,并告诉我们如何使用 FlowMap 添加思想绘画。
介绍
我的名字是 Caterina Sumalla,我目前在 SocialPoint (TakeTwo) 担任 3D 角色艺术家。我在视频游戏行业工作了大约 6 年,我曾在 A Crowd of Monsters、Digital Legends、8Bit Studio 或 Radical Graphics 等公司工作过。
介绍
我的名字是 Caterina Sumalla,我现在在 SocialPoint (TakeTwo) 曾担任 3D 角色艺术家。我在视频游戏行业工作了大约 6 年,我在 A Crowd of Monsters、Digital Legends、8Bit Studio 或 Radical Graphics 等公司工作过。
这个细分将集中在我的角色创建工作流程上。
这个将集中在我的角色创建工作流程上。
收集参考
Why Sova? I think he’s a great character. He has a fascinating design to me, a new challenge with which to try new techniques and continue to improve my skills:
收集参考
为什么是索瓦?我认为他是一个很棒的角色。他对我来说有一个迷人的设计,一个新的挑战,可以尝试新技术并继续提高我的技能:
Explore stylized hair.
探索风格化的头发。
Learn to use Marvelous Designer.
学习使用 Marvelous Designer。
Work with hard-surface techniques on weapons.
在武器上使用硬表面技术。
I wanted to do something different, so I decided on a character halfway between the stylized cartoon style and the hyper-realistic style, trying to get the best of both worlds.
我想做一些不同的事情,所以我决定选择一个介于程式化卡通风格和超现实主义风格之间的角色,试图做到两全其美。
So, first, before starting to work, I spent a few hours looking for references, perhaps the most essential part.
所以,首先,在开始工作之前,我花了几个小时寻找参考资料,这可能是最重要的部分。
BaseMesh in ZBrush
I started the model with a BaseMesh made from spheres, making it easier to modify proportions, muscles, etc. This way, the character obtains a defined musculature, and I don't have to sculpt everything from “slab”. This part is crucial because if it’s not done correctly from the beginning at the level of proportions we can find problems in the future.
ZBrush 中的 BaseMesh
我用由球体制成的 BaseMesh 开始模型,这样可以更容易地修改比例、肌肉等。这样,角色获得了明确的肌肉组织,我不必从“平板”雕刻所有东西。这部分至关重要,因为如果从一开始就在比例级别上没有正确完成,我们将来可能会发现问题。
Once I have obtained the shape that interests me, I use the DynaMesh function in ZBrush, thus converting all the spheres into a single piece, perfectly welded. From this point on, I am qualifying and sculpting the final muscles that my character will have.
一旦我获得了我感兴趣的形状,我就会使用 ZBrush 中的 DynaMesh 功能,从而将所有球体转换为一个整体,完美焊接。从现在开始,我正在排位和雕刻我的角色将拥有的最终肌肉。
As the character of the concept art is a strong man, I wanted to emphasize the lines of the musculature to leave it well marked, looking for an intermediate point between the stylized cartoonish and the realism.
由于概念艺术的角色是一个强壮的人,我想强调肌肉组织的线条以使其清晰可见,寻找风格化卡通和现实主义之间的中间点。
One of the parts that I spend the most time on is the character's face since it’s the most characteristic and will make us identify him better. In Sova's case, he has a muscular body, and his face is very masculine: he has a prominent nose and a square jaw. I had to spend a long time detailing all those features without reaching a point where anyone could perceive the face as strange or exaggerated. I also did a hair blocking to make it look more like the final character.
我花费最多时间的部分之一是角色的脸,因为它是最具特征的,可以让我们更好地识别他。在 Sova 的例子中,他有一个肌肉发达的身体,他的脸非常男性化:他有一个突出的鼻子和一个方形的下巴。我不得不花很长时间详细描述所有这些特征,但没有达到任何人都可以认为这张脸很奇怪或夸张的程度。我还做了一个头发块,让它看起来更像最终的角色。
In this sculpting phase, I always start to work on the features from the lowest SubDivision level to start pulling out the volumes, always trying to keep volumes smooth.
在这个雕刻阶段,我总是从最低的细分级别开始处理特征以开始拉出体积,总是试图保持体积平滑。
To get the bigger volumes, I use the Standard and Move brushes with low intensity. Depending on the occasion, I use either hPolish or TrimDynamic to leave the areas more polished.
为了获得更大的体积,我使用低强度的标准和移动画笔。视情况而定,我使用 hPolish 或 TrimDynamic 使这些区域更加抛光。
I always try to have most of my sculpting work done in the lower subdivisions. When I see that I can not do anything else, I level up, preventing the "wobbly" clumps so troublesome from ZBrush.
我总是尽量让我的大部分雕刻工作在较低的细分中完成。当我看到我不能做任何其他事情时,我会升级,以防止 ZBrush 出现如此麻烦的“摇晃”团块。
Clothing
Once I was finished with body proportions and the levels of detail of the face, I began to create the blocking of the clothes. This stage is where I decide the volumes that each piece will have.
衣服
一旦我完成了身体比例和面部的细节层次,我就开始创造衣服的块。这个阶段是我决定每件作品的数量的地方。
I think carefully about all the elements that the character has (knife, pockets, etc.). I like to do this part in Blender since it allows me to model each asset very quickly.
我仔细考虑了角色拥有的所有元素(刀、口袋等)。我喜欢在 Blender 中做这部分,因为它允许我非常快速地为每个资产建模。
In Blender, I made some armor pieces almost in their final form, such as the boots or the armband. It’s much more comfortable for me to make them in low poly in Blender and then take them to ZBrush to give them details, avoiding once again the "wobbly" part mentioned above.
在 Blender 中,我制作了一些几乎处于最终形式的盔甲,例如靴子或臂章。在 Blender 中将它们制作成低多边形,然后将它们带到 ZBrush 为它们提供详细信息,这对我来说要舒服得多,再次避免了上面提到的“摇摆不定”的部分。
Other pieces, like the gloves or the forearm sleeves, were created thanks to the Extrude function. I made a correct final topology for them and then sent them to ZBrush to give them the final details.
其他部分,如手套或前臂袖子,是通过挤出功能创建的。我为它们制作了正确的最终拓扑,然后将它们发送到 ZBrush 以提供最终细节。
Refining Clothes
At this point, some pieces were not the optimal result: the shirt, the pants, and the cape. That is why I decided to make these garments in Marvelous and then give them some details in Zbrush.
炼衣
在这一点上,有些单品不是最佳结果:衬衫、裤子和斗篷。这就是为什么我决定在 Marvelous 中制作这些服装,然后在 Zbrush 中提供一些细节。
With the shirt, I picked up a pattern from the internet. Some parts of the shirt were unnecessary, like the collar, because the cape would cover it. I didn't make the cuffs rolled up with Marvelous, as it would be too realistic, so I decided to make them later in Blender.
有了这件衬衫,我从网上找到了一个图案。衬衫的某些部分是不必要的,比如衣领,因为斗篷会盖住它。我没有用 Marvelous 卷起袖口,因为它太逼真了,所以我决定稍后在 Blender 中制作它们。
I got the basic shapes that interested me and then polished them in ZBrush.
我得到了我感兴趣的基本形状,然后在 ZBrush 中打磨它们。
The pants are a similar case to the shirt; I looked for a pattern online that more or less adjusted to what I needed, and I started creating it in Marvelous. Since there were no bloomer pants patterns, I added a seam to the above-knee section, getting the puff shape I needed and removing the tighter bottom.
裤子与衬衫类似;我在网上寻找一种或多或少适合我需要的模式,然后我开始在 Marvelous 中创建它。由于没有灯笼裤图案,我在膝盖以上部分添加了一个接缝,得到我需要的粉扑形状并去除较紧的底部。
The cape was a bit more complicated, as it’s a unique pattern made especially for the character, so I looked for references of capes and stoles and tried to mix the patterns to get the shapes that I liked.
斗篷有点复杂,因为它是专门为角色制作的独特图案,所以我寻找斗篷和披肩的参考,并尝试混合图案以获得我喜欢的形状。
One thing to keep in mind when we use Marvelous, it’s essential that we respect the volume of all the props that our character carries and that they are included in the model that we import into the program. In this case, I imported the character with the bow, so that the cloth simulation of the cape took into account the volume of the bow.
当我们使用 Marvelous 时要记住的一件事是,我们必须尊重我们角色携带的所有道具的体积,并且它们包含在我们导入到程序中的模型中。在这种情况下,我导入了带有弓的角色,以便斗篷的布料模拟考虑了弓的体积。
With these three garments made in Marvelous, the character has changed significantly, giving a much higher quality look and achieving that style between realism and stylized.
这三件由 Marvelous 制作的服装,角色发生了显着变化,赋予了更高品质的外观,并实现了介于现实主义和程式化之间的风格。
Another detail I did before working in ZBrush was touching up the pants to make them look like they are inside the boots, as it gives it a more refined finish and shows attention to detail.
我在 ZBrush 工作之前做的另一个细节是修饰裤子,让它们看起来像是在靴子里,因为它使它更精致,并显示出对细节的关注。
Sculpting in ZBrush
We return to ZBrush, this time to give details to the clothes and polish other aspects.
在 ZBrush 中雕刻
我们回到ZBrush,这次给衣服做细节,擦亮其他方面。
The most extensive work I had to do at this point in the workflow was giving the final details of the clothes, such as the seams of the pants, the shirt, polishing the wrinkles that I brought from Marvelous Designer, and adding details to pockets, gloves, and other assets.
在工作流程的这一点上,我必须做的最广泛的工作是给出衣服的最终细节,例如裤子的接缝、衬衫、打磨我从 Marvelous Designer 带来的皱纹,以及在口袋上添加细节,手套和其他资产。
For scratches or to define more finely, I used the DamStandard, such as the details of the bib or the pockets, while for the seams of the trousers and the shirt I used the OrbCracks brush.
对于划痕或更精细的定义,我使用了 DamStandard,例如围兜或口袋的细节,而对于裤子和衬衫的接缝,我使用了 OrbCracks 笔刷。
Then I made a second inspection of the character's face to give it a slightly more stylized touch, making the cheekbone, nose, lips, more hard edge. I also broke the symmetry of the eye, marking the scar and cutting off the eyebrow.
然后我对角色的脸部进行了第二次检查,使其具有稍微风格化的触感,使颧骨、鼻子、嘴唇的边缘更加坚硬。我还打破了眼睛的对称性,标记了疤痕并剪掉了眉毛。
I also used the DE_HairRubes brush to define and polish the hair. I usually do the hair in Blender, but I was curious about this brush and felt like using it.
我还使用了DE_HairRubes 刷子来定义和抛光头发。我通常在 Blender 中做头发,但我对这个刷子很好奇并想使用它。
I also gave the fur more detail, using some alphas and sculpting by hand, giving it a more fluffy and worked look than before.
我还为毛皮提供了更多细节,使用了一些 alpha 和手工雕刻,使其看起来比以前更加蓬松和工作。
In short, these would be the brushes that I have used the most to give the details in ZBrush of my model.
简而言之,这些将是我使用最多的笔刷,用于在我的模型的 ZBrush 中提供细节。
Some close-ups from ZBrush:
ZBrush 的一些特写:
Retopology and UVs
Retopology is one of the most important parts of the video game pipeline. If we have a correct topology, we will facilitate the work of the rigger and the animator. The most basic rules for a good retopology are putting more loops in the bending areas, such as shoulders, elbows, knees, hips, etc. There isn’t only one correct way to do it, so my recommendation is to look in ArtStation for different wireframe examples to see which one best suits your needs according to the polygonal load that the model requires.
重新拓扑和 UV
重新拓扑是视频游戏管道中最重要的部分之一。如果我们有正确的拓扑结构,我们将促进装配工和动画师的工作。良好重新拓扑的最基本规则是在弯曲区域放置更多循环,例如肩部、肘部、膝盖、臀部等。 正确的方法不止一种,所以我的建议是在 ArtStation 中寻找不同的线框示例,根据模型所需的多边形负载来查看哪一个最适合您的需求。
As I had already made some pieces before, such as the boots or the gauntlet, this time, I was able to take advantage of them and save myself the retopology.
由于我之前已经制作了一些作品,例如靴子或手套,这一次,我能够利用它们并节省自己的重新拓扑。
In my case, this character has 57,336 triangles, counting all the props, hair, etc., except the bow and the rifle. That polycount situates the character as a mid poly character, fully compatible with most games.
就我而言,这个角色有 57,336 个三角形,算上所有的道具、头发等,除了弓和步枪。该 polycount 将角色定位为中多边形,与大多数游戏完全兼容。
I used four packs for the character's UV at 2K because I wanted a good resolution but not a new generation character. So I divided the UVs into Hair and Fur, Rifle and Bow, and the other two packs on the body and clothing.
我在 2K 下为角色的 UV 使用了四包,因为我想要一个好的分辨率而不是新一代的角色。所以我将 UV 分为 Hair 和 Fur、Rifle 和 Bow,以及其他两个包在身体和衣服上。
I always try to use the symmetry of the assets as much as possible, but in this particular model, I could only do it with the boots. I also try to place the pieces as much as I can, either horizontally or vertically, to avoid problems with patterns that may not match when texturing.
我总是尽量使用资产的对称性,但在这个特殊的模型中,我只能用靴子来做。我还尝试尽可能多地放置碎片,无论是水平还是垂直,以避免出现纹理时可能不匹配的图案问题。
Another detail that I always do is to increase the space occupied by the face and eyes to give it more resolution than other pieces.
我经常做的另一个细节是增加面部和眼睛所占的空间,使其比其他部分具有更高的分辨率。
In the hair UV pack, the placement of the UVs will be crucial since it will help us for the future creation of the FlowMap, so all the strands have to be placed in the same direction, from roots to ends, in my case, vertical.
在头发 UV 包中,UV 的放置将至关重要,因为它将帮助我们将来创建 FlowMap,因此所有股线必须放置在同一方向,从根部到末端,在我的情况下,是垂直的.
Texturing
With the UVs mapped, I exported the low poly model and the high poly model to Marmoset Toolbag, where I did the texture baking.
纹理
映射 UV 后,我将低多边形模型和高多边形模型导出到 Marmoset Toolbag,在那里我进行了纹理烘焙。
The next step is to start texturing, in my case in Substance Painter. From Marmoset, I brought the texture packs of Normal Map, Ambient Occlusion, Curvature, Position, and Thickness.
下一步是开始贴图,就我而言是在 Substance Painter 中。我从 Marmoset 中带来了法线贴图、环境光遮蔽、曲率、位置和厚度的纹理包。
At this point, I wanted a PBR texture that, even with detail, would be a bit stylized, so with this in mind, I began to texturize the skin, emphasizing the redder areas, such as cheekbones, chin, and nose, to give it a “lively appearance”, but without appearing to be wearing makeup.
在这一点上,我想要一个 PBR 纹理,即使有细节,也会有点风格化,所以考虑到这一点,我开始对皮肤进行纹理化,强调较红的区域,如颧骨、下巴和鼻子,以提供它是一个“活泼的外观”,但没有化妆。
As the character is blonde, I used tones that go from almost white to light brown, giving different shades since the hair is never one color. Soon I will explain how I solved the challenge of hair's brightness with the FlowMap technique.
由于角色是金发女郎,我使用了从近乎白色到浅棕色的色调,因为头发从来不是一种颜色,所以呈现出不同的色调。很快我将解释我如何使用 FlowMap 技术解决头发亮度的挑战。
I always avoid pure black and white in my texturing, and fur is a good example, where the light tones are a light yellowish gray, and the dark areas are a dark gray to brown.
我总是在纹理中避免纯黑色和白色,毛皮就是一个很好的例子,其中浅色调是浅黄灰色,深色区域是深灰色到棕色。
I try to stay in the same color gamut, but at extremes like in the cape, I go from a more greenish and saturated blue to a more purple and darker blue. This way, I give the richness of color, and I can distort the lighting a bit (without exaggerating) and the ambient occlusions.
我试图保持相同的色域,但在像斗篷这样的极端情况下,我会从更偏绿和饱和的蓝色变为更紫色和更深的蓝色。通过这种方式,我提供了丰富的色彩,并且可以稍微扭曲照明(不夸张)和环境遮挡。
When I start texturing, I always put a basic color layer with a certain Roughness. Then I add another layer with very subtle color variations (using procedurals) and roughness as well. Afterward, I will clarify each piece's darker and lighter areas, but always within the same color range, as I have said before.
当我开始纹理时,我总是放置一个具有一定粗糙度的基本颜色层。然后我添加另一个具有非常微妙的颜色变化(使用程序)和粗糙度的图层。之后,我会澄清每件作品的较暗和较亮的区域,但始终在相同的颜色范围内,正如我之前所说的。
Once with this as a base, you can now vary between adding a fabric pattern (very subtle to avoid distortions and not going towards the realistic style), adding nuances to the AOs, and other details.
一旦以此为基础,您现在可以在添加织物图案(非常微妙以避免扭曲且不趋向于现实风格)、向 AO 添加细微差别和其他细节之间进行变化。
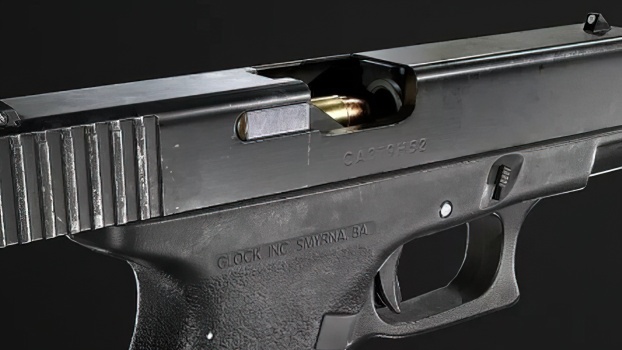
I wanted to make the weapons in style very similar to the Valorant and Overwatch textures, having a gray Roughness, without glare, and with subtle chromatic variations, with slightly blurred spots.
我想让武器的风格与 Valorant 和 Overwatch 的纹理非常相似,具有灰色的粗糙度,没有眩光,有微妙的色彩变化,有轻微模糊的斑点。
Clothes and props have a certain worn-out since I wanted to give it an effect of age-worn, but not of mistreated.
衣服和道具有一定的破旧,因为我想给它一个陈旧的效果,而不是虐待。
FlowMap
I wanted to get a special hair shine using the FlowMap for the first time for this character, so I got down to business.
流程图
我想第一次使用 FlowMap 为这个角色获得特殊的头发光泽,所以我开始做正事。
We need to create a texture with this particular color (it doesn't have to be large, it can be 16x16 pixels). Then I drag the texture, drop it onto the Shelf in the program, and set up a brush.
我们需要创建一个具有这种特殊颜色的纹理(它不必很大,可以是 16x16 像素)。然后我拖动纹理,将其放到程序中的 Shelf 上,并设置一个画笔。
Once I have the brush configured, I create a Layer, put it in Normal mode, and start painting in the UVs, always in the same direction (that's why the placement of the UVs was so important previously). In my case, the result is this.
配置笔刷后,我创建一个图层,将其置于正常模式,然后开始在 UV 中绘制,始终在同一方向上(这就是之前 UV 的放置如此重要的原因)。就我而言,结果是这样的。
I export the FlowMap to Photoshop and place it under the Multiply masks and with the Blue channel.
我将 FlowMap 导出到 Photoshop,并将其放置在 Multiply 蒙版和蓝色通道下。
Then I took the model and the FlowMap to Marmoset and put this configuration on it.
然后我把模型和 FlowMap 带到 Marmoset 并把这个配置放在上面。
And the results I think are very satisfactory (in this case, it’s a bit exaggerated to see that everything worked correctly).
并且我认为结果非常令人满意(在这种情况下,看到一切正常工作有点夸张)。
Rendering
Once I have the character ready, it’s time to pose it and prepare it for a good presentation, since this way, the work will look much more, and everything will be more spectacular. In my case, I decided to make a pose very similar to the concept and a simple base, but within the character's mood.
渲染
一旦我准备好角色,就该为它摆姿势并准备好展示了,因为这样,作品会看起来更漂亮,一切都会更壮观。就我而言,我决定制作一个与概念非常相似的姿势和一个简单的基础,但要符合角色的情绪。
I did the pose with a simple rig in Blender and the lighting and rendering in Marmoset. The lighting is quite classic, with two leading lights, one warm and one cold, and then several support lights, to show the different volumes of the character.
我用 Blender 中的一个简单装备和 Marmoset 中的照明和渲染做了这个姿势。灯光相当经典,两盏主灯,一暖一冷,再配上几盏辅助灯,将人物的不同体量表现得淋漓尽致。
最后是布局和演示。在这种情况下,我受到了几本《Valorant》原创出版物的启发,赋予它一种更贴近和更酷的风格。
在这种情况下,我受到了几本《Valorant》原创贴花的伤害,它会变成一种近乎和更酷的风格。
结论
非常感谢 80 Level 邀请我。描述整个工作流程很有趣,看看你可以改进你的做事方式,因为有时,在制作过程的中间,你没有时间反思它。这很有趣,我希望它提供了有用的信息并可以帮助他人!
结论
非常感谢 80 级邀请我。描述整个工作流程很简单,看看你改进你的做事方式,因为有时,在制作的中间,你没有时间可以回顾它。这一次,希望它提供很多有用的信息并可以帮助生命!
结尾
|


 画板
画板 显示全部 7